Charcoal Acorn Hanging Bauble Free Crochet Pattern
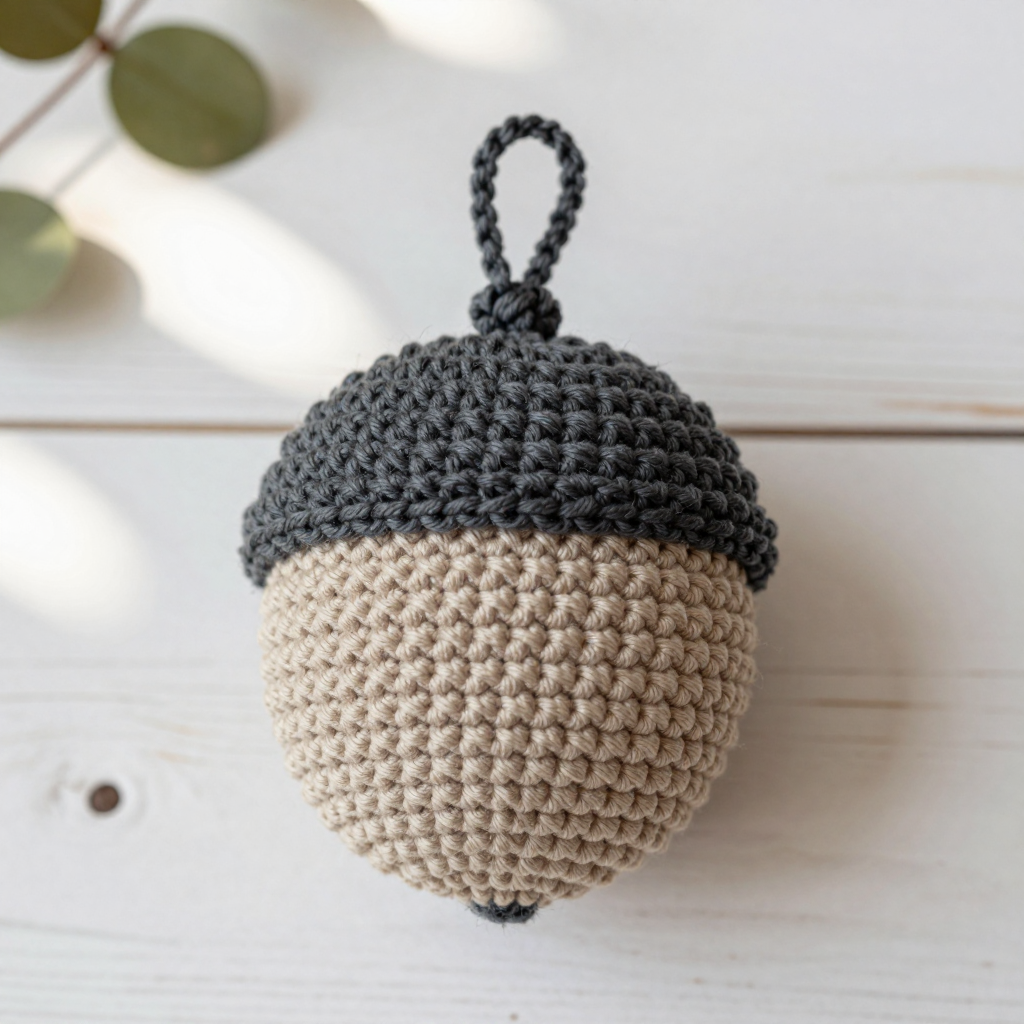
Charcoal Acorn Hanging Bauble: A Free Beginner Crochet Pattern
Introduction
This little charcoal acorn bauble is the perfect first amigurumi project for anyone who has just learned to hold a hook. It is small enough to finish in one cozy evening, and it uses only the most basic crochet stitches: chain, single crochet, slip stitch, and one simple decrease. The finished ornament has a soft oatmeal sphere body, a textured charcoal cap that sits over the top third like a little hat, and a simple yarn loop so it can hang from a tree, a hook, or a gift bag. It feels light and matte in your hand, with a fine, even stitch texture and a subtle ridged band on the cap. Best of all, it is the kind of project that teaches you shaping, stuffing, and seaming without ever feeling overwhelming.
Materials Needed
- Yarn: DK weight (weight 3 / light worsted) yarn, approximately 15–20 m total. You need about 10–12 m of oatmeal (MC) and about 5–8 m of charcoal (CC). A smooth wool or wool-blend DK works best.
- Crochet hook: 2.75 mm (US C/2) for the body and cap. A 2.25 mm (US B/1) hook is optional if you want a tighter, firmer cap.
- Stitch marker: 1, to track the start of each spiral round on the body.
- Tapestry needle: a blunt-tipped needle with a large eye, for sewing the cap and loop and for weaving in ends.
- Scissors: any small sharp pair.
- Stuffing: a small amount of polyester toy stuffing.
Finished size: Body approx 4 cm (1.5 in) tall and 3.5 cm (1.4 in) wide. Cap approx 3.5 cm (1.4 in) wide and 1.5 cm (0.6 in) tall. Hanging loop approx 5 cm (2 in) long. Total ornament height including the loop is approx 9–10 cm (3.5–4 in).
Abbreviations and Beginner Glossary
- ch – chain. Make a loop of yarn on your hook, wrap yarn over the hook, and pull it through the loop. That is one chain.
- sc – single crochet. Insert your hook into the stitch, wrap yarn over the hook, pull up a loop (2 loops on hook), wrap yarn over again, and pull through both loops. One loop remains.
- sl st – slip stitch. Insert your hook into the stitch, wrap yarn over, and pull that loop straight through the loop already on your hook. It joins without adding height.
- sc2tog – single crochet 2 stitches together (a decrease). Insert hook into the first stitch, pull up a loop, insert hook into the next stitch, pull up a loop (3 loops on hook), wrap yarn over, pull through all 3 loops. Two stitches become one.
- st(s) – stitch or stitches.
- MR – magic ring. A loop of yarn you crochet into and then pull closed, so there is no hole in the center.
- BLO – back loop only. Every stitch has two top loops (a front one and a back one). Working in BLO means you insert your hook only under the loop farthest from you.
- FLO – front loop only. The same idea, but you work only under the loop closest to you.
- 2 sc in next st – an increase. Work two single crochets into the same stitch to add one stitch.
- [ ] – brackets. Repeat everything inside the brackets the number of times stated after them.
- US terms – all stitches here use US names.
Gauge
Gauge: 24 sc x 26 rounds = 10 x 10 cm (4 x 4 in) in single crochet.
Gauge matters because it controls the finished size. If your stitches are looser than the gauge, your acorn will be bigger and the stuffing may peek through; if they are tighter, the cap may not fit over the body. To check, crochet a small flat swatch of single crochet about 6 cm (2.5 in) square, then lay a ruler across the middle and count how many stitches fit in 4 inches. If you have more stitches than 24, try a larger hook; if you have fewer, try a smaller hook. Because this ornament is tiny, a close match is plenty.
Beginner Tips Before You Start
- Use a stitch marker. The body is worked in a spiral, so there is no seam to tell you where a round begins. Place the marker in the first stitch of each round and move it up as you go.
- Do not pull the yarn too tight. Firm, even tension is what you want. If your stitches squeak or your hook fights you, relax your grip.
- Count every round. The stitch counts in parentheses are your safety net. If a round ends with the wrong number, undo it before moving on.
- Stuff before the hole gets tiny. The pattern tells you exactly when to stuff. Add small pinches at a time and shape as you go.
- Keep your magic ring tail handy. Give it a gentle tug after Round 2 to close any center gap, then weave it in later.
- Work the cap a little tighter. The cap should sit snugly on the body, so it is fine to use the smaller 2.25 mm hook for it.
Step-by-Step Instructions
Body (oatmeal / MC)
Work in continuous spiral rounds. Do not join rounds; move your stitch marker up each round.
Round 1: Make a magic ring, work 6 sc into the ring, and pull the ring closed. (6 sc)
Round 2: 2 sc in each st around. (12 sc)
Round 3: [Sc in next st, 2 sc in next st] around. (18 sc)
Round 4: [Sc in next 2 sts, 2 sc in next st] around. (24 sc)
Rounds 5–10: Sc in each st around. (24 sc for 6 rounds)
Round 11: [Sc in next 2 sts, sc2tog] around. (18 sc)
Round 12: [Sc in next st, sc2tog] around. (12 sc)
Stuff the body now firmly but not overfull, shaping it into a rounded acorn body with your fingers.
Round 13: [Sc2tog] around. (6 sc)
Fasten off, leaving a 15 cm (6 in) tail. Thread the tail onto your tapestry needle, pass it through the remaining 6 stitches, and pull closed. Weave in the end.
Cap (charcoal / CC)
The cap is a shallow textured dome worked in joined rounds. Each round ends with a slip stitch into the first stitch of that round.
Round 1: With CC, ch 2, work 6 sc into the first ch (or use a magic ring). Join with sl st to first sc. (6 sc)
Round 2: Ch 1, 2 sc in each st around. Join with sl st to first sc. (12 sc)
Round 3: Ch 1, [Sc in next st, 2 sc in next st] around. Join with sl st to first sc. (18 sc)
Round 4: Ch 1, [Sc in next 2 sts, 2 sc in next st] around. Join with sl st to first sc. (24 sc)
Round 5 (texture round): Ch 1, working in BLO, sc in each st around. Join with sl st to first sc. (24 sc)
Round 6: Ch 1, sc in each st around. Join with sl st to first sc. (24 sc)
Round 7 (edging): Ch 1, sc in each st around, then sl st in next st. Fasten off, leaving a 20 cm (8 in) tail for sewing. (24 sc)
Hanging Loop
Loop: With CC, ch 12. Sl st in the second ch from the hook and in each ch across to form a cord. Fasten off, leaving short tails. (Alternatively, make a 5 cm / 2 in chain and knot the ends.)
Assembly and Finishing
1. Position the cap. Place the charcoal cap over the top of the oatmeal body, centering it so the cap covers the upper third of the body. Pin it in place if that helps you keep it steady.
2. Sew the cap on. Thread the long CC tail onto your tapestry needle. Sew the cap to the body around the lower edge of the cap, catching only the surface of the body so the stitches do not show through. Work all the way around and sew securely.
3. Attach the loop. Fold the hanging loop cord in half. Sew both ends firmly to the center top of the cap with several stitches, then weave in the ends.
4. Weave in all ends. Pass each tail through a few stitches on the wrong side, then trim close to the work.
5. Shape and block. Shape the acorn gently with your fingers. If you like, lightly steam the cap only to settle the texture; do not flatten the body. Let it dry fully before hanging.
Pro Tips and Variations
- Change the colors. Try a cream body with a deep brown cap, or a soft grey body with a mustard cap. Any two DK colors that contrast will read clearly as an acorn.
- Adjust the size. For a larger bauble, use worsted weight yarn with a 3.5 mm (E/4) hook and add one more increase round to the body and the cap. For a tiny one, use a 2.25 mm (B/1) hook and sport weight yarn.
- Add texture to the cap. Work Round 6 in BLO as well, or add a round of slip stitches around the cap edge for a crisper, more scalloped finish.
- Substitute yarn. Cotton DK gives a crisper, more matte look, while a wool blend gives a softer, fuzzier finish. Just check your gauge again, since fibers behave differently.


