Whispering Willow Wreath Free Knitting Pattern – Textured Leaf & Berry Door Decor
Whispering Willow Wreath Free Knitting Pattern – Textured Leaf & Berry Door Decor
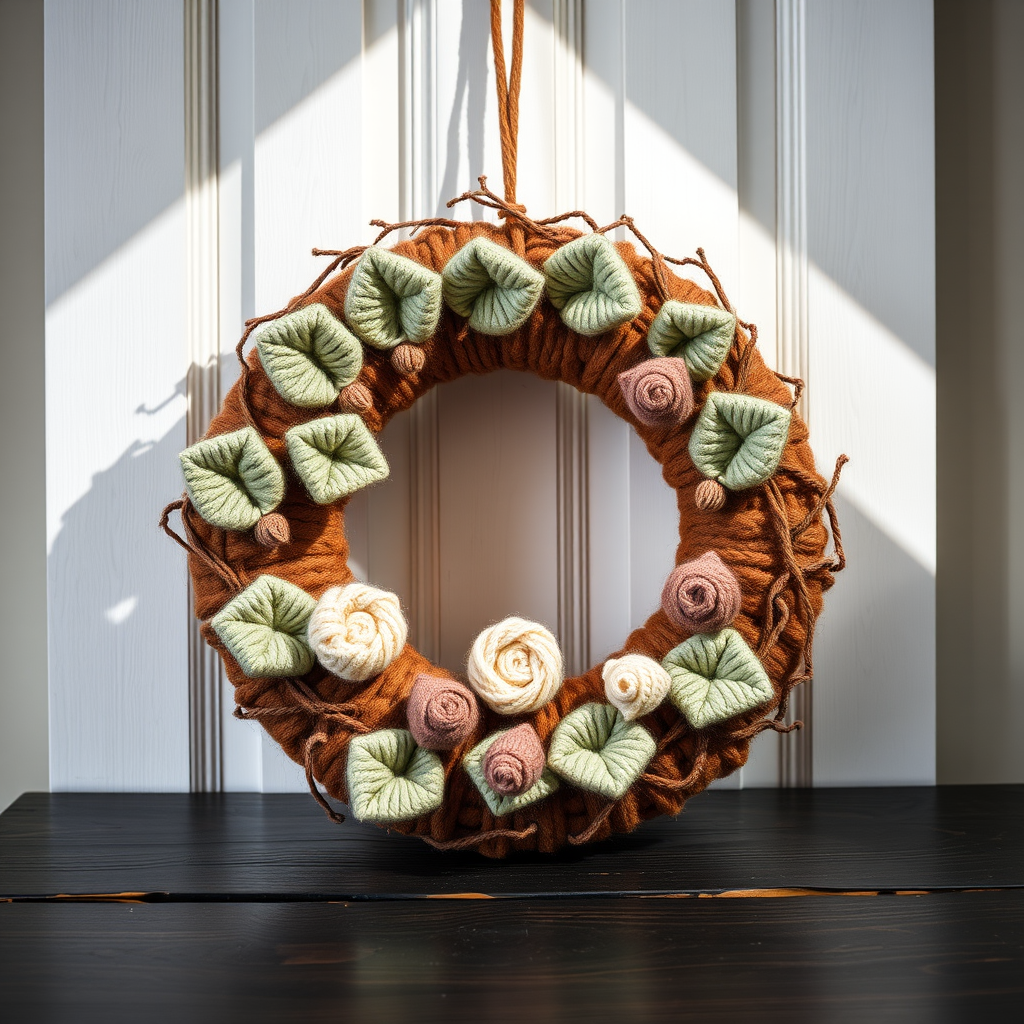
Bring the serene beauty of a spring willow into your home with this charming knitted wreath, adorned with delicate leaves and plump berries. A perfect weekend project to welcome the season with handmade warmth. This pattern is designed with beginners in mind, using simple knit and purl stitches, yarn overs, and decreases to create a stunning textured piece that will impress every guest. Whether you're an experienced knitter looking for a quick decorative project or a newcomer eager to try something beyond scarves, this wreath offers a delightful journey into textured knitting.
The Whispering Willow Wreath combines three distinct elements—a twisted brown base, pointed sage green leaves, and soft dusty rose berries with cream flowers—to create a cohesive, garden-inspired decoration. The finished piece measures approximately 12 inches in diameter, making it perfect for doors, walls, or even as a centerpiece base. The natural color palette ensures it complements any home décor style, from farmhouse to modern minimalist.
Materials Needed
Before you begin, gather the following materials. All yarn amounts are generous estimates, so you'll have plenty to work with even if you need to adjust your tension.
Yarn Requirements
- Worsted weight cotton yarn: 100g sage green (for leaves)
- Worsted weight cotton yarn: 50g dusty rose (for berries)
- Worsted weight cotton yarn: 50g cream (for flowers)
- Worsted weight cotton yarn: 20g brown (for the base)
Tip: Choose a cotton or cotton-blend yarn for durability and stitch definition. The natural fiber will hold its shape beautifully and withstand the wear of being displayed year-round.
Tools and Notions
- US 7 (4.5 mm) knitting needles – straight or circular, whichever you prefer
- Tapestry needle – for sewing pieces together and weaving in ends
- 12-inch foam wreath form or wire wreath frame
- Scissors
- Stitch markers (optional, but helpful for counting rows)
Gauge Information
20 stitches and 28 rows = 4 inches in stockinette stitch
While gauge isn't critical for this project (since you're covering a wreath form), maintaining consistent tension will ensure your leaves and berries are uniform in size. If your leaves come out slightly larger or smaller, simply adjust the number of leaves you make to cover your wreath form evenly.
Abbreviations Used in This Pattern
- CO: cast on
- K: knit
- P: purl
- K2tog: knit two together (decrease)
- Yo: yarn over (increase)
- St(s): stitch(es)
- Rep: repeat
- RS: right side
- WS: wrong side
Step-by-Step Instructions
Part 1: Knit the Wreath Base
The base of your wreath mimics twisted willow branches, creating a sturdy foundation for your decorations. This is worked as a long strip that wraps around your wreath form.
- Cast on: With brown yarn, CO 30 stitches.
- Work in stockinette stitch: Knit on the right side (RS) and purl on the wrong side (WS) for 60 inches, or until the strip wraps around your wreath form with a slight overlap. This will take some time—about 420 rows—but the repetitive rhythm is meditative and perfect for relaxing.
- Bind off: Bind off all stitches loosely so the edge doesn't pucker.
- Form the loop: Sew the short ends together to create a continuous loop. Use a mattress stitch or whip stitch for a seamless join.
- Cover the wreath form: Place the knitted loop over your wreath form, adjusting it so the fabric covers the form evenly. If you're using a foam form, you may need to stretch the fabric slightly. For a wire frame, the fabric will drape naturally.
- Secure the base: Sew the long edges together on the back of the wreath to keep the fabric in place. Use small, discreet stitches that won't show from the front.
Pro tip: If your strip is slightly too short, you can block it gently by wetting it and stretching it to fit. If it's too long, simply overlap the edges more when sewing.
Part 2: Knit the Leaves (Make 12)
Each leaf is worked flat, starting from the stem and increasing outward to create a pointed oval shape. The central "vein" is formed naturally by the increases and decreases.
- Cast on: With sage green yarn, CO 3 stitches.
- Row 1 (RS): K1, yo, K1, yo, K1 (5 sts). You've just created two new stitches with yarn overs.
- Row 2 and all WS rows: Purl all stitches. This creates the stockinette texture on the right side.
- Row 3: K2, yo, K1, yo, K2 (7 sts).
- Row 5: K3, yo, K1, yo, K3 (9 sts).
- Row 7: K4, yo, K1, yo, K4 (11 sts).
- Row 9: K5, yo, K1, yo, K5 (13 sts).
- Row 11: K6, yo, K1, yo, K6 (15 sts). This is the widest point of your leaf.
- Row 13: K1, K2tog, K9, K2tog, K1 (13 sts). You're now decreasing to shape the leaf tip.
- Row 15: K1, K2tog, K7, K2tog, K1 (11 sts).
- Row 17: K1, K2tog, K5, K2tog, K1 (9 sts).
- Row 19: K1, K2tog, K3, K2tog, K1 (7 sts).
- Row 21: K1, K2tog, K1, K2tog, K1 (5 sts).
- Row 23: K1, K2tog, K2tog (3 sts). Note: K2tog twice in a row is fine here.
- Row 25: K1, K2tog (2 sts).
- Row 27: K2tog (1 st).
- Finish: Fasten off, leaving a long tail (at least 12 inches) for sewing the leaf onto the wreath base.
Repeat this process 12 times total. As you become comfortable with the pattern, you'll notice the rhythm of increases and decreases creating a beautiful, natural leaf shape.
Part 3: Knit the Berries (Make 8)
These plump little spheres add a pop of color and dimension to your wreath. They're quick to knit and satisfying to assemble.
- Cast on: With dusty rose yarn, CO 1 stitch.
- Row 1: K1, then knit into the front and back of the same stitch twice (3 sts). To do this: knit into the front of the stitch, don't slip it off, knit into the back, then slip off. Repeat once more for a total of 3 stitches.
- Row 2: Purl all stitches.
- Row 3: K1, K2tog (2 sts).
- Row 4: Purl all stitches.
- Row 5: K2tog (1 st).
- Finish: Fasten off, leaving a long tail (at least 10 inches).
- Shape the berry: Thread the tail onto your tapestry needle. Weave the needle through the edge stitches of the knitted piece, then pull tight to gather the fabric into a small ball.
- Stuff and secure: Insert a tiny bit of yarn scraps into the center of the ball to give it plumpness. Pull the gathering thread tight, then secure with a few small stitches. Weave in the end.
Repeat to make 8 berries total. For variety, you could make a few in a slightly darker or lighter shade of rose.
Part 4: Knit the Small Flowers (Make 5)
These delicate spiral flowers add an elegant touch. They're created by knitting a small strip and then rolling it into a rose-like shape.
- Cast on: With cream yarn, CO 5 stitches.
- Row 1: K1, yo, K1, yo, K1, yo, K1, yo, K1 (9 sts). Four yarn overs create four new stitches.
- Row 2: Purl all stitches.
- Row 3: K2tog, K2tog, K1, K2tog, K2tog (5 sts). This decreases back to your original count.
- Row 4: Purl all stitches.
- Row 5: K2tog, K1, K2tog (3 sts).
- Row 6: Purl all stitches.
- Row 7: K2tog, K1 (2 sts).
- Row 8: Purl all stitches.
- Row 9: K2tog (1 st).
- Finish: Fasten off, leaving a long tail (at least 12 inches).
- Shape the flower: Starting from the cast-on edge, roll the knitted strip into a tight spiral, with the right side facing outward. The increases and decreases will naturally create a ruffled, rose-like effect.
- Secure: Use the tail to sew through the base of the rolled flower, catching all layers to hold the spiral in place. Make several passes to ensure it's secure.
Repeat to make 5 flowers total. These cream blossoms will beautifully contrast with the sage leaves and rose berries.
Part 5: Assemble the Wreath
Now comes the fun part—bringing all your pieces together to create a stunning, balanced composition.
- Lay out your pieces: Before sewing anything, arrange all 12 leaves, 8 berries, and 5 flowers around the wreath base. Step back and adjust until you're happy with the placement. Consider the visual weight—you want an even distribution of colors and shapes.
- Cluster the leaves: For a natural look, group leaves in clusters of three, with the points facing outward from the wreath center. Position them at slight angles to mimic how leaves grow on a branch.
- Place the berries: Scatter the berries between the leaf clusters. They should look like they're nestled among the foliage, not sitting on top of it.
- Add the flowers: Tuck the cream flowers into the spaces between leaves and berries. They should peek out delicately, adding visual interest without overwhelming the design.
- Sew each piece: Using the long tails you left on each piece, sew them securely onto the wreath base. Use small, invisible stitches that catch both the decoration and the base fabric. For leaves, sew along the center vein. For berries and flowers, sew around the base.
- Tuck in ends: After each piece is secured, weave the remaining tail into the back of the wreath and trim.
- Add a hanging loop: Cut a 6-inch piece of brown yarn. Fold it in half and sew the ends to the back of the wreath at the top, creating a loop for hanging.
Finishing Touches
- Weave in all loose ends: Use your tapestry needle to hide any remaining yarn tails on the back of the wreath. This ensures a clean, professional finish.
- Block the leaves and flowers (optional): If you want your leaves to lie perfectly flat and your flowers to hold their shape, gently steam block them. Hold a steam iron about 2 inches above the pieces and steam until they're slightly damp, then shape them with your fingers and let them dry completely.
- Final inspection: Check that all pieces are securely attached and that no yarn ends are visible from the front.
- Hang and enjoy: Place your wreath on your door or wall and admire your handiwork. The soft, natural palette will bring a touch of spring to any space, all year round.
Tips for Success
- Count your rows: Especially when making multiple leaves, it's easy to lose track. Use a row counter or make a tally mark on paper after each leaf.
- Keep tension consistent: Try to knit with the same tension throughout. If you notice your leaves are different sizes, it's likely due to tension variations.
- Customize your palette: While the sage, rose, and cream combination is lovely, don't be afraid to experiment. Deep burgundy berries, ivory leaves, or even a dusty blue could create a completely different mood.
- Make it your own: Add extra leaves or berries if you prefer a fuller look. The pattern is forgiving—you can always add more decorations.
This Whispering Willow Wreath is more than just a decoration—it's a labor of love that brings warmth and handmade charm to your home. The combination of textured stitches, natural colors, and organic shapes creates a piece that looks like it was plucked straight from a spring garden. Whether you hang it on your front door to welcome guests or display it on an interior wall, this wreath is sure to become a cherished part of your seasonal décor.
Happy knitting, and may your home be filled with the serene beauty of the whispering willow!


