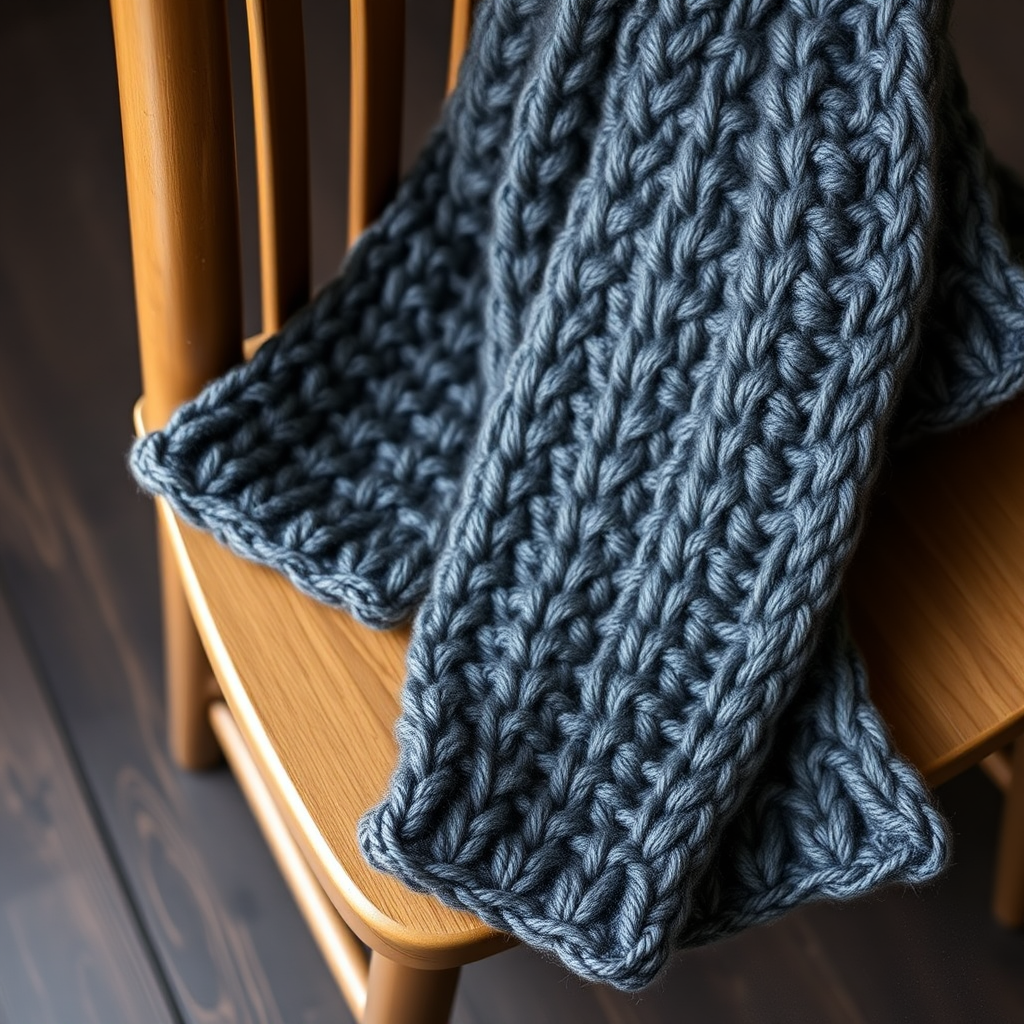
Whispering Pines Skinny Scarf Free Pattern

Introducing the Whispering Pines Skinny Scarf
There are some crochet projects that feel less like crafting and more like a quiet walk through the woods. The Whispering Pines Skinny Scarf is exactly that—a delicate, textured accessory that captures the serene beauty of a pine forest in every stitch. This modern twist on a classic scarf features a gorgeous ribbed texture created by alternating front post and back post double crochet stitches, mimicking the look of knitted brioche with a crochet hook.
What makes this pattern truly special is its versatility. It's the perfect lightweight layer for transitional weather—those crisp autumn mornings or cool spring evenings when you need just a hint of warmth without the bulk. And because it works up with just one skein of fingering weight yarn, it's an incredibly satisfying project that you can complete in a weekend.
Despite its sophisticated appearance, this pattern is surprisingly beginner-friendly. If you know how to chain, work half double crochets, and are ready to learn two simple post stitches, you're fully equipped to create this stunning scarf. The repetitive nature of the pattern makes it almost meditative—perfect for relaxing evenings with your favorite show playing in the background.
Let's dive into everything you need to create your own Whispering Pines Skinny Scarf.
Materials Needed
Before you begin, gather these supplies. The beauty of this pattern is that it requires minimal materials, making it an affordable and portable project.
Yarn
- 1 skein (approximately 400 yards) of fingering weight yarn (Category 1 Super Fine)
- The sample shown uses a soft sage green, but this pattern shines in any color. Consider these options:
- Malabrigo Sock in 'Piedras' for a heathered, organic look
- Knit Picks Stroll in 'Forest' for a rich, deep green
- Any fingering weight yarn you love—solid colors highlight the texture beautifully, while variegated yarns create a more playful effect
Hook
- US E/4 (3.5 mm) crochet hook—this smaller hook creates the dense, defined stitches that make the texture pop
Additional Supplies
- Tapestry needle for weaving in ends
- Scissors
- Measuring tape (optional, for checking your length)
- Blocking mats and pins (optional, for finishing)
Gauge Information
- 11 half double crochets (hdc) x 6 rows = 2 inches (5 cm) in pattern stitch
- Exact gauge is not critical for this project, but consistency is important. If your stitches are looser or tighter than the gauge, your scarf will still work—it will just be slightly wider or narrower. What matters most is maintaining an even tension throughout so the ribbing looks uniform.
Step-by-Step Instructions
This pattern is worked in rows lengthwise, creating a long, narrow scarf. The stitch pattern is a simple repeat of front post and back post half double crochets, which creates a lovely ribbed texture that mimics the look of knitted brioche. Let's break it down step by step.
Special Stitches You'll Need
Before we begin, let's master the two special stitches that create the magic of this pattern. Don't worry—they're easier than they look!
FPdc (Front Post Double Crochet):
- Yarn over your hook
- Insert your hook from front to back to front around the post of the next stitch (you're essentially hooking around the vertical bar of the stitch below, not through the top loops)
- Yarn over and pull up a loop (you should now have 3 loops on your hook)
- Yarn over and pull through two loops
- Yarn over and pull through the remaining two loops
BPdc (Back Post Double Crochet):
- Yarn over your hook
- Insert your hook from back to front to back around the post of the next stitch (working from the opposite side compared to the front post stitch)
- Yarn over and pull up a loop (3 loops on hook)
- Yarn over and pull through two loops
- Yarn over and pull through the remaining two loops
Pro tip: The key difference between these two stitches is simply which direction you insert your hook around the post. Front post stitches create a raised ridge on the front of your work, while back post stitches create a recessed valley. Alternating them creates that beautiful ribbed texture.
Getting Started: The Foundation Row
Row 1: Chain 8. Work 1 half double crochet (hdc) in the 3rd chain from your hook and in each chain across. You should now have 6 hdc stitches. Turn your work.
Note: The chain 2 at the beginning of each row counts as your first half double crochet throughout the entire pattern. This keeps your edges neat and consistent.
Establishing the Pattern
Row 2: Chain 2 (this counts as your first hdc). Skip the first hdc (the one at the base of your chain). Now we'll begin the post stitch pattern:
- FPdc around the next hdc—insert your hook from front to back to front around the post of that stitch
- BPdc around the next hdc—insert your hook from back to front to back around the post of that stitch
- Repeat steps 1 and 2 across until only 1 hdc remains
- Work 1 hdc in the top of the turning chain from the previous row
Turn your work.
Row 3: Chain 2. Skip the first hdc. Now here's where the magic happens—you'll be working the opposite post stitch around each stitch from the previous row:
- BPdc around the next stitch (which was a FPdc in the previous row)
- FPdc around the next stitch (which was a BPdc in the previous row)
- Repeat steps 1 and 2 across until 1 hdc remains
- Work 1 hdc in the top of the turning chain
Turn your work.
Why this matters: By working the opposite post stitch around each stitch, you're creating a reversible ribbed texture. The stitches from the previous row get "locked" into place, creating that dense, woven appearance that makes this scarf so special.
The Main Body: Rows 4 Through 214
Rows 4 – 214: Repeat Row 3 continuously. The scarf will grow in length with each row. Continue this pattern until:
- The scarf measures approximately 71.5 inches (181.5 cm) from the beginning, OR
- You have used almost all of your yarn, leaving about 12 inches for weaving in ends
Helpful tips for this section:
- Count your stitches occasionally to ensure you haven't accidentally added or dropped any. You should always have 6 stitches total (including your chain 2 at the beginning of each row).
- Keep your tension consistent. This pattern looks best when stitches are worked evenly—not too tight, not too loose.
- If you need to stop mid-project, simply place a stitch marker in your working loop so it doesn't unravel.
- The scarf will naturally curl slightly at the edges due to the post stitches. This is normal and will relax with blocking.
Finishing the Scarf
Final Row: When you've reached your desired length, it's time to finish off with a clean edge.
- Chain 1 and turn your work
- Work 1 single crochet (sc) in each stitch across
- Fasten off, leaving a 6-inch tail for weaving
Why the single crochet border? This final row helps stabilize the edge and prevents the post stitches from pulling or distorting. It creates a neat, polished finish that complements the textured body of the scarf.
Weaving in Ends
Thread your tapestry needle with the yarn tail. Weave the tail through the back of several stitches in a zigzag pattern, being careful not to pull too tightly. Trim any excess yarn close to the work.
Blocking (Optional but Recommended)
Blocking will help even out your stitches and relax the fabric, making the ribbing look more defined and professional.
- Soak your scarf in lukewarm water with a drop of gentle wool wash for 10-15 minutes
- Gently squeeze out excess water (never wring or twist!)
- Lay the scarf flat on a blocking mat or clean towel
- Gently stretch it to the desired dimensions—about 71.5 inches long and 2.75 inches wide
- Pin in place if needed and allow to dry completely
Your Finished Scarf
Once your scarf is dry and all ends are woven in, you're ready to enjoy your handiwork! The Whispering Pines Skinny Scarf is incredibly versatile—wear it wrapped once around your neck for a casual look, or double it up for extra warmth. The ribbed texture adds visual interest to any outfit, and the lightweight fingering weight yarn makes it perfect for layering.
This pattern is also wonderfully customizable. Want a longer scarf? Simply continue repeating Row 3 until you reach your desired length. Prefer a wider scarf? Start with more chains in Row 1 (just make sure you have an even number of stitches for the pattern repeat to work).
We'd love to see your finished Whispering Pines Skinny Scarf! Share your creation on social media with the hashtag #WhisperingPinesScarf and tag us so we can admire your beautiful work. Happy crocheting!