Whispering Pines Broomstick Lace Scarf Free Pattern
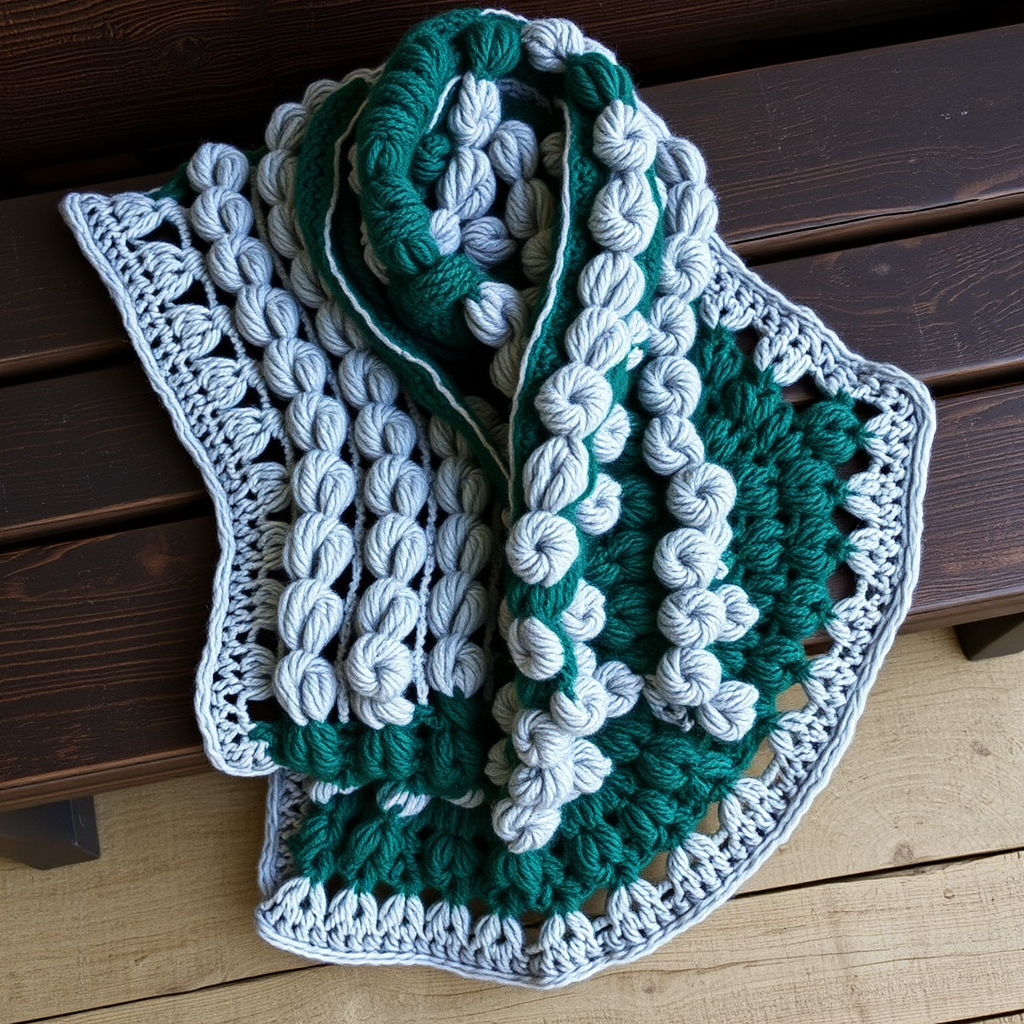
Wrap Yourself in Forest Elegance: The Whispering Pines Broomstick Lace Scarf
Imagine wrapping yourself in a cloud of delicate, handcrafted lace that whispers of pine forests and gentle breezes. That's the magic of the Whispering Pines Broomstick Lace Scarf. This free crochet pattern combines the classic, vintage technique of broomstick lace with a modern, earthy color palette, resulting in a stunningly textured accessory that's as light as air and undeniably elegant. Whether you're a seasoned crocheter looking for a new challenge or a confident beginner ready to expand your skills, this pattern offers a rewarding and beautiful project. The mesmerizing vertical loops and fan-like clusters create a fabric with incredible drape and movement, making this scarf a true statement piece for any season.
This pattern is worked in vertical strips, a clever construction that enhances the scarf's beautiful drape and makes the broomstick lace technique incredibly manageable. We'll guide you through every step, from the foundation chain to the delicate edging, ensuring you can recreate this ethereal accessory with confidence. Let's gather our materials and begin this journey into textured, forest-inspired crochet.
Materials Needed: Your Whispering Pines Toolkit
Before we dive into the stitches, let's ensure you have everything you need. The beauty of this pattern lies in its simplicity – the materials are few, but each plays a crucial role in achieving that perfect, airy texture.
Yarn
- Color A (Main) - "Mist": 220 yards of worsted weight (4) yarn in a soft heather gray. This forms the base and edging of your scarf, providing a neutral, calming backdrop.
- Color B (Accent) - "Pine": 180 yards of worsted weight (4) yarn in a deep forest green. This creates the striking, contrasting bands of loops that give the scarf its name and visual depth.
Pro Tip: Choose a yarn with good stitch definition, such as a soft acrylic, cotton blend, or merino wool. This will make the broomstick lace loops pop and ensure your hard work is beautifully visible.
Hooks and Tools
- Crochet Hook: Size G/6 (4.0 mm) hook. This is used for the foundation chain, the single crochet rows, and the final edging.
- Broomstick Lace Tool: A Size 10 (6.0 mm) knitting needle or a dedicated broomstick lace dowel (approximately 1 inch in diameter). This is the essential tool for creating those large, signature loops. A smooth, cylindrical object is key.
Other Essentials
- Yarn Needle: For weaving in those pesky ends and finishing your masterpiece.
- Scissors: To snip your yarn.
- Stitch Markers (Optional): Helpful for keeping track of your rows, especially when you're working on a long project.
Gauge
For the best results, aim for a gauge of 4 broomstick lace repeats (each repeat = 5 loops) and 6 rows = 4 inches in pattern. While gauge isn't critical for a scarf, matching it will ensure your finished piece has the intended dimensions and drape.
Step-by-Step Instructions: Crafting Your Broomstick Lace Masterpiece
Now, let's get to the fun part! This pattern is worked in vertical strips, creating a beautiful drape. The scarf is constructed by crocheting a foundation chain, then working broomstick lace rows, and finally adding a delicate edging. Follow along carefully, and you'll be amazed at what you create.
Part 1: The Foundation
This is the base upon which all your beautiful loops will be built. It's a simple row of single crochet, but it's crucial for a neat start.
Foundation Row:
With Color A (Mist), chain 30.
Row 1 (Right Side): Single crochet (sc) in the 2nd chain from the hook and in each chain across. Turn. (You will have 29 sc).
Part 2: The Broomstick Lace Technique
This is where the magic happens. We'll work in two-row repeats: a "Loop Row" where we pull up loops onto our knitting needle, and a "Group Row" where we cluster those loops together with single crochet.
Row 2 (Loop Row - Color A):
With Color A, *insert your hook into the next sc, yarn over and pull up a loop. Carefully place this loop onto your knitting needle/dowel. Repeat from * across all 29 stitches. Do not turn. You will now have 29 loops on your needle. This is a critical step – ensure the loops are not twisted and are sitting loosely on the needle.
Row 3 (Group Row - Color A):
This is where we gather the loops into their signature fans. Carefully slide the loops off the needle, keeping them all on your crochet hook.
*Insert your hook through the first 5 loops (as a single group), yarn over and pull through all 5 loops on the hook. Chain 1 to secure the group. Now, work 5 single crochet (sc) into the center of this group of 5 loops.
Repeat from * across, working groups of 5 loops. At the end, you will have 5 groups of 5 loops (using 25 loops) and 4 remaining loops. For the last group, insert your hook through the remaining 4 loops, yarn over and pull through, chain 1, and work 4 sc into the center of this group. Turn.
Checkpoint: You should now have 5 groups of 5 and 1 group of 4, totaling 29 sc across your row.
Row 4 (Loop Row - Color B):
Now we introduce our accent color. With Color B (Pine), *insert your hook into the next sc, yarn over and pull up a loop, and place this loop onto the needle. Repeat from * across all 29 sc. Do not turn.
Row 5 (Group Row - Color B):
Slide the loops off the needle. *Insert your hook through the first 5 loops, yarn over and pull through, chain 1, and work 5 sc into the center. Repeat from * across, ending with a group of 4 loops as you did in Row 3. Turn.
Part 3: Building the Scarf's Length
Now you'll simply repeat Rows 4 and 5, alternating your colors to create the beautiful striped effect. The pattern is intuitive and rhythmic once you get going.
Repeat Rows 4 and 5, alternating colors in this order:
- Row 4 with Color A, Row 5 with Color A.
- Row 4 with Color B, Row 5 with Color B.
Continue this sequence until the scarf measures approximately 60 inches from the foundation, always ending with a Group Row. Fasten off Color B, leaving a tail for weaving in.
Part 4: The Finishing Touches – Edging and Blocking
Your scarf is almost complete! The edging gives it a polished, professional look, and blocking will open up the lace to its full potential.
Edging:
With Color A, single crochet (sc) evenly around the entire perimeter of the scarf. When you reach a corner, work 2 sc in the corner stitch to ensure the corner lies flat and turns nicely. Join with a slip stitch to the first sc. Fasten off and weave in all ends with your yarn needle.
Finishing:
This final step is essential for transforming your work into a piece of art. Lightly block the scarf to open up the lace and even out the stitches. To do this, you can pin the scarf to a blocking mat or towel in the desired shape, mist it with water, and let it dry completely. This will relax the yarn and showcase the beautiful, intricate stitch definition. Lay flat to dry.
And there you have it – your very own Whispering Pines Broomstick Lace Scarf! A stunning, handcrafted accessory that perfectly blends classic technique with modern style. We hope you enjoyed this pattern and are proud of the beautiful piece you've created. Happy crocheting!


