Whispering Pines Basket Weave Throw Free Pattern
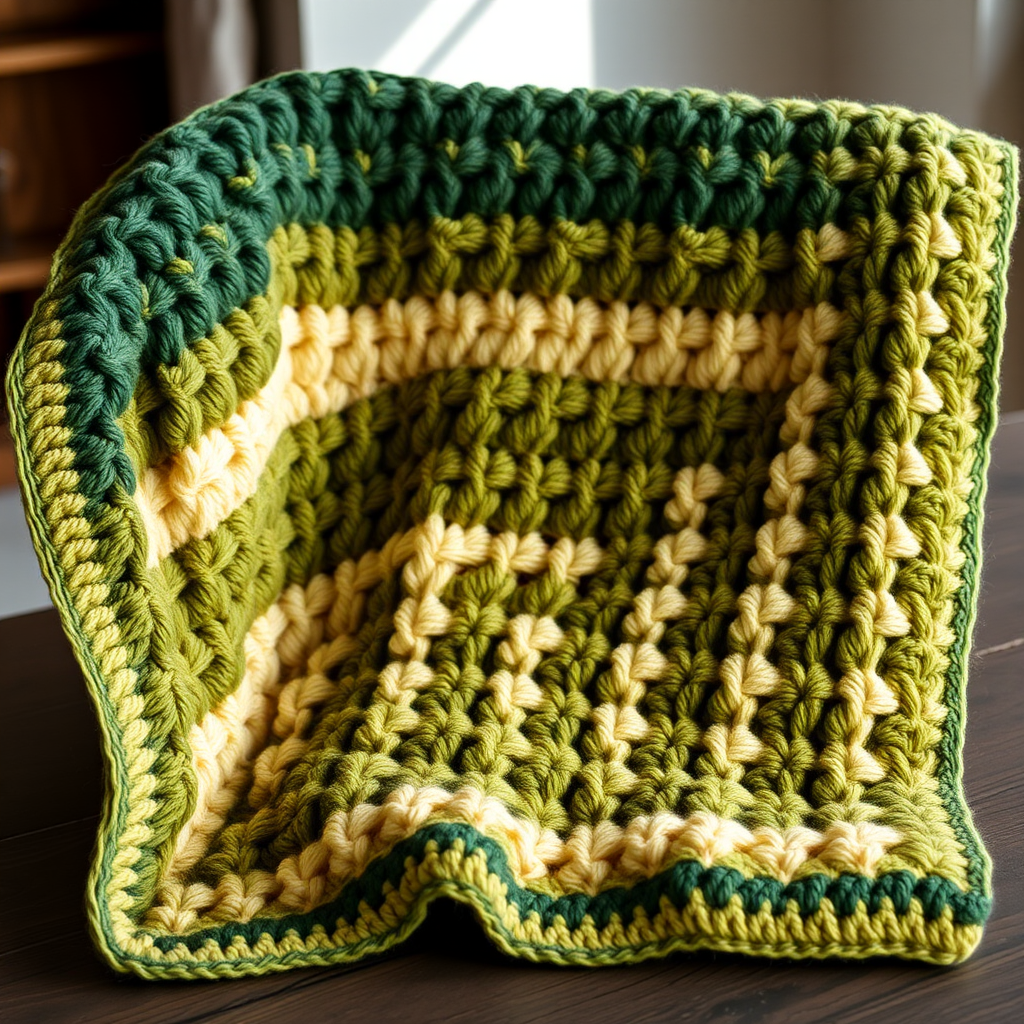
Whispering Pines Basket Weave Throw: A Free Crochet Pattern for Cozy, Textured Warmth
Wrap yourself in the cozy, textured embrace of the Whispering Pines Basket Weave Throw—a modern take on a classic stitch that mimics the serene beauty of a forest floor. This free crochet pattern is perfect for adding warmth and rustic charm to any living space. Whether you're an experienced crocheter looking for a relaxing project or a confident beginner ready to tackle a new technique, this throw delivers stunning, dimensional results that will become a family heirloom.
The basket weave stitch creates a rich, woven fabric that's not only beautiful but also incredibly warm and substantial. With its woodland-inspired palette of deep forest green, soft moss, and warm cream, this throw brings a touch of nature indoors. Let's dive into this rewarding project!
Materials Needed
Before you begin, gather the following supplies. Having everything ready will make your crochet session smooth and enjoyable.
Yarn
- Worsted weight yarn in 3 colors:
- Color A (Forest Green): Approximately 1200 yards
- Color B (Moss): Approximately 800 yards
- Color C (Cream): Approximately 600 yards
Pro tip: Choose a soft, durable acrylic or wool blend for easy care and long-lasting wear. The gauge is based on standard worsted weight, so any reputable brand will work beautifully.
Hook & Notions
- US Size J/10 (6.0 mm) crochet hook
- Yarn needle for weaving in ends
- Scissors
- Stitch markers (optional, but helpful for counting)
Gauge
4 basket weave pattern repeats (12 sts) x 8 rows = 4 inches in pattern. Always check your gauge before starting to ensure your finished throw matches the intended dimensions. If your gauge is off, adjust your hook size accordingly.
Step-by-Step Instructions
This pattern is worked in multiples of 6 + 3 for the foundation chain. Each basket weave block is 6 stitches wide and 6 rows tall. Follow these detailed instructions carefully, and you'll create a stunning textured throw.
Finished Size
Approximately 50 inches wide x 60 inches long (before blocking).
Special Stitches
Master these two stitches, and you'll have the entire pattern down:
- Front Post Double Crochet (fpdc): Yarn over, insert hook from front to back around the post of the next stitch, yarn over, pull up a loop, yarn over, pull through two loops, yarn over, pull through two loops.
- Back Post Double Crochet (bpdc): Yarn over, insert hook from back to front around the post of the next stitch, yarn over, pull up a loop, yarn over, pull through two loops, yarn over, pull through two loops.
Pattern Notes
- The pattern is worked in multiples of 6 + 3 for the foundation chain.
- Each basket weave block is 6 stitches wide and 6 rows tall.
- Color changes are made at the end of each row; do not cut yarn until instructed, carry it up the side.
- The ch 3 at the beginning of each row counts as the first double crochet.
Foundation & First Color Block (Color A)
Foundation: With Color A, chain 153 (or any multiple of 6 + 3 to reach desired width).
Row 1: Dc in 4th ch from hook and in each ch across. Turn. (150 dc)
Row 2: Ch 3 (counts as first dc here and throughout), *fpdc on next 3 sts, bpdc on next 3 sts; repeat from * across to last st, dc in top of turning ch. Turn.
Row 3: Ch 3, *fpdc on next 3 sts, bpdc on next 3 sts; repeat from * across, dc in top of turning ch. Turn.
Row 4: Ch 3, *bpdc on next 3 sts, fpdc on next 3 sts; repeat from * across, dc in top of turning ch. Turn.
Row 5: Repeat Row 4.
Row 6: Repeat Row 4.
Row 7: Repeat Row 2.
Row 8: Repeat Row 2.
You've just completed your first 6-row basket weave block in Forest Green. Notice how the fpdc and bpdc create the raised and recessed squares that form the weave pattern.
Second Color Block (Color B - Moss)
Row 9: Change to Color B. Ch 3, *bpdc on next 3 sts, fpdc on next 3 sts; repeat from * across, dc in top of turning ch. Turn.
Row 10: Repeat Row 9.
Row 11: Ch 3, *fpdc on next 3 sts, bpdc on next 3 sts; repeat from * across, dc in top of turning ch. Turn.
Row 12: Repeat Row 11.
Row 13: Repeat Row 11.
Row 14: Repeat Row 9.
Row 15: Repeat Row 9.
Notice how the pattern reverses direction with each new color block. This is what creates the beautiful woven basket effect.
Third Color Block (Color C - Cream)
Row 16: Change to Color C. Ch 3, *fpdc on next 3 sts, bpdc on next 3 sts; repeat from * across, dc in top of turning ch. Turn.
Row 17: Repeat Row 16.
Row 18: Ch 3, *bpdc on next 3 sts, fpdc on next 3 sts; repeat from * across, dc in top of turning ch. Turn.
Row 19: Repeat Row 18.
Row 20: Repeat Row 18.
Row 21: Repeat Row 16.
Row 22: Repeat Row 16.
Fourth Color Block (Color B - Moss)
Row 23: Change to Color B. Ch 3, *bpdc on next 3 sts, fpdc on next 3 sts; repeat from * across, dc in top of turning ch. Turn.
Row 24: Repeat Row 23.
Row 25: Ch 3, *fpdc on next 3 sts, bpdc on next 3 sts; repeat from * across, dc in top of turning ch. Turn.
Row 26: Repeat Row 25.
Row 27: Repeat Row 25.
Row 28: Repeat Row 23.
Row 29: Repeat Row 23.
Fifth Color Block (Color A - Forest Green)
Row 30: Change to Color A. Ch 3, *fpdc on next 3 sts, bpdc on next 3 sts; repeat from * across, dc in top of turning ch. Turn.
Rows 31-36: Repeat Rows 2-7 (alternating the pattern blocks as established).
Continuing the Pattern
Row 37: Change to Color B. Ch 3, *bpdc on next 3 sts, fpdc on next 3 sts; repeat from * across, dc in top of turning ch. Turn.
Rows 38-43: Continue in pattern, alternating the block direction every 6 rows, and changing colors in the sequence: A, B, C, B, A, B, C, B, A (or as desired).
Continue repeating the 6-row pattern blocks, changing colors in your desired sequence, until the throw measures approximately 58 inches from the foundation edge, ending after a complete 6-row block.
Final Border
With Color A, work 1 round of single crochet around the entire edge, working 3 sc in each corner. Join with slip stitch to first sc. Fasten off and weave in all ends.
Border tip: Work the single crochet border evenly around the edges, placing 3 sc in each corner to keep the corners flat and neat. This simple border frames the textured pattern beautifully.
Finishing
Block the throw gently to even out the stitches and enhance the basket weave texture. Lay it flat on a blocking mat, pin it to the desired dimensions, and mist with water. Allow it to dry completely before removing pins. This step is crucial for achieving that crisp, professional look.
Tips for Success
- Count your stitches regularly. The basket weave pattern is easy to lose track of, so count every few rows to ensure you haven't accidentally added or dropped a stitch.
- Carry your yarn up the side. When changing colors, don't cut the yarn unless instructed. Simply carry it up the side of your work—this will save you time weaving in ends later.
- Keep your tension consistent. The beauty of the basket weave stitch comes from even tension. Try to keep your post stitches uniform in height.
- Use stitch markers. Place a marker every 6 stitches in the foundation row to help you keep track of your pattern repeats.
Customization Ideas
While the Whispering Pines color palette is gorgeous, don't be afraid to make this pattern your own! Here are a few ideas:
- Monochrome magic: Use a single color for a subtle, elegant texture that speaks for itself.
- Seasonal swap: Try warm autumn tones like rust, mustard, and cream for a fall-inspired version.
- Baby blanket size: Adjust the foundation chain to a multiple of 6 + 3 for a smaller baby blanket—just remember to adjust your yarn amounts accordingly.
This Whispering Pines Basket Weave Throw is more than just a blanket—it's a labor of love that will keep you cozy for years to come. The rhythmic repetition of post stitches is meditative, and watching the weave pattern emerge is deeply satisfying. Happy crocheting!



