Whispering Petal Meadow Blanket Free Pattern
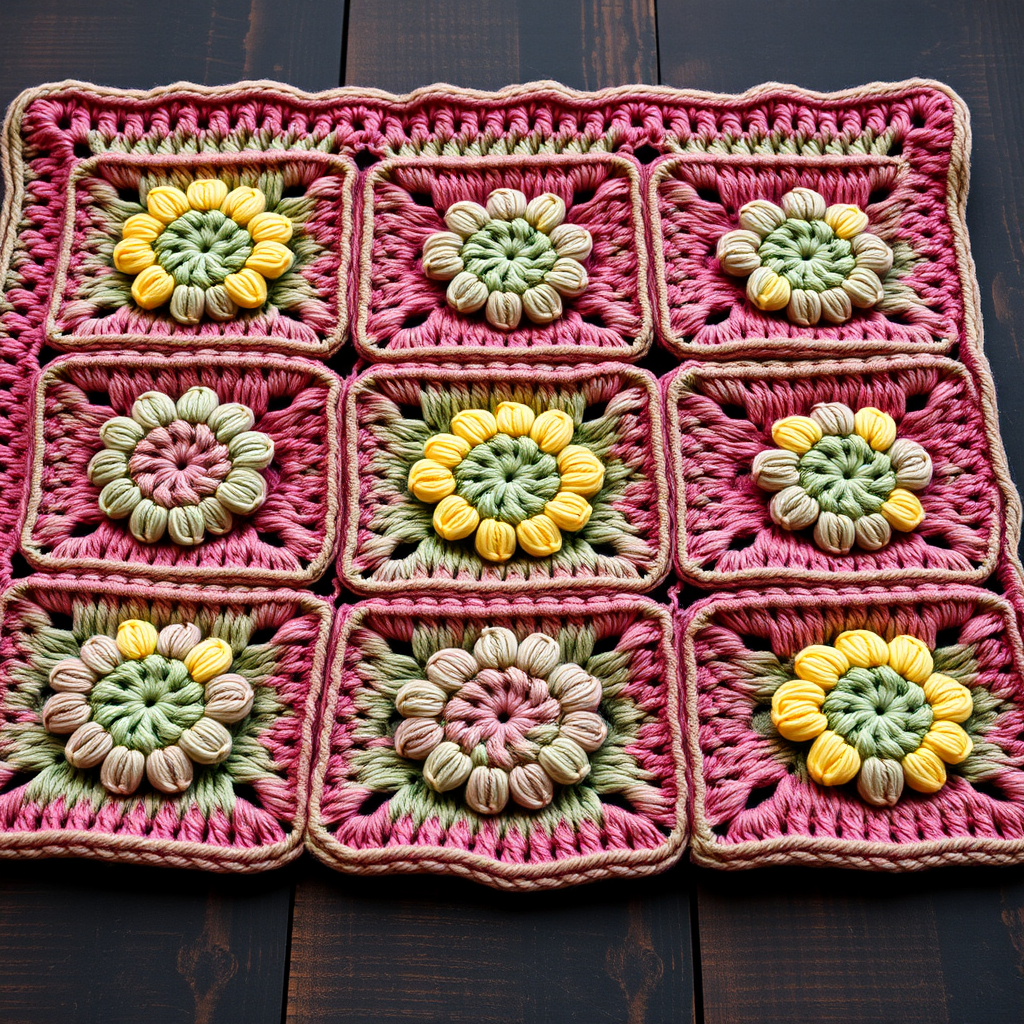
Whispering Petal Meadow Blanket: A Free Crochet Pattern for a Flower-Filled Heirloom
Imagine wrapping yourself in a cozy, handmade meadow where every stitch blooms with delicate petals. The Whispering Petal Meadow Blanket is a stunning crochet project that combines the timeless charm of granny squares with the rich, textured beauty of a flower garden. Each of the 12 squares features a soft cream center, a ring of sunny yellow petals, and concentric rounds of earthy sage green and dusty rose, creating a dimensional, floral feel that evokes a peaceful garden at dusk.
This pattern is perfect for intermediate crocheters looking for a rewarding project, but with clear, detailed instructions, even confident beginners can create this heirloom-quality afghan. The result is a soft, cozy throw that lies flat and drapes beautifully—a true testament to the art of handmade craftsmanship. Let's gather our materials and start crocheting this meadow of petals!
Materials Needed
Before we dive into the stitches, let's ensure you have everything you need for this project. The beauty of this blanket lies in its simple, worsted-weight yarn and a single hook size, making it an accessible and portable project.
Yarn & Colors
You will need worsted weight yarn in four harmonious colors. The total yardage is approximately 1800 yards, but this will vary slightly based on your tension. Here is the color breakdown:
- Color A (Cream): For the flower centers and final border. (Approx. 400 yards)
- Color B (Sunny Yellow): For the delicate daisy petals. (Approx. 300 yards)
- Color C (Sage Green): For the earthy rounds, joining seams, and first border round. (Approx. 550 yards)
- Color D (Dusty Rose): For the outer rounds of the squares and the second border round. (Approx. 550 yards)
Hook & Notions
- Crochet Hook: 5.5 mm (I-9) hook. This size is essential for achieving the correct gauge and drape.
- Yarn Needle: For weaving in ends and whip-stitching squares together.
- Scissors: A sharp pair for cutting yarn.
- Stitch Markers (optional): Helpful for keeping track of rounds, especially when working on the border.
Gauge & Finished Size
To ensure your blanket comes together perfectly, it's crucial to check your gauge. The pattern specifies that each square measures 6 inches x 6 inches, and the stitch pattern should achieve 4 rounds = 4 inches. If your squares are smaller, try a larger hook; if they are larger, switch to a smaller hook to match this specification. The final blanket, with a 3x4 grid of squares and border, will measure approximately 36 inches by 48 inches, perfect for a cozy lap blanket or a baby stroller throw.
Step-by-Step Instructions: The Flower Squares
This blanket is constructed by crocheting 12 individual flower squares. Each square is worked in the round, starting from a magic ring and building outward with clusters of double crochet. Take your time with the first square to get the rhythm, and the rest will fly by!
Round 1: The Cream Center
With Color A (cream), make a magic ring. Chain 3 (this counts as your first double crochet). Now, work 11 double crochet (dc) into the ring. Pull the tail to close the ring tightly. Join with a slip stitch to the top of the beginning chain 3. You should now have 12 dc stitches in total. This forms the solid, creamy heart of your flower.
Round 2: The Yellow Petals Foundation
Switch to Color B (sunny yellow). Join the new yarn in any of the double crochet stitches from Round 1. Chain 1 (this counts as a single crochet), and single crochet (sc) in the same stitch. *Chain 3, skip the next dc, and single crochet in the following dc.* Repeat from * around the circle. You will end with a chain 3, and then slip stitch to the first single crochet to close the round. You should now have 6 chain spaces that will form the basis of your petals.
Round 3: Forming the Petals
Slip stitch into the first chain-3 space. Chain 3 (counts as a dc), and work 2 double crochet (dc) in the same space. *Chain 1, then work 3 dc in the next chain space.* Repeat from * around the circle, ending with a chain 1. Slip stitch to the top of the beginning chain 3 to join. You will now have 6 groups of 3 dc, separated by chain-1 spaces. The yellow petals are starting to take shape!
Round 4: Adding Sage Green
Now, introduce Color C (sage green). Join the yarn in any of the chain-1 spaces from Round 3. Chain 3 (counts as dc), and work 2 dc in the same space. *Chain 1, then work 3 dc in the next chain-1 space.* Repeat from * around, ending with a chain 1. Slip stitch to the top of the beginning chain 3. This round simply repeats the previous one, adding a fresh green ring around the yellow petals.
Round 5: Introducing Dusty Rose
Switch to Color D (dusty rose). Join in any chain-1 space. Chain 3 (counts as dc), and work 2 dc in the same space. *Chain 2, then work 3 dc in the next chain-1 space.* Repeat from * around, ending with a chain 2. Slip stitch to the top of the beginning chain 3. Notice the change: we are now using chain-2 spaces instead of chain-1, which begins to open up the square and prepare it for corner formation.
Round 6: Continuing the Rose Ring
Slip stitch into the next chain-2 space. Chain 3 (counts as dc), and work 2 dc in the same space. *Chain 2, then work 3 dc in the next chain-2 space.* Repeat from * around, ending with a chain 2. Slip stitch to the top of the beginning chain 3. This round repeats Round 5, solidifying the dusty rose ring and maintaining the chain-2 spaces.
Round 7: Creating the Corners
This is a crucial shaping round. Slip stitch into the next chain-2 space. Chain 3 (counts as dc), and work 2 dc in the same space. *Chain 2, then work 3 dc in the same space (this creates your first corner). Chain 1, then work 3 dc in the next chain-2 space, chain 1, and work 3 dc in the following chain-2 space.* Repeat from * around the square. You will end with a chain 1, and slip stitch to the top of the beginning chain 3. You should now have 4 distinct corners with 2 side groups of 3 dc between each corner.
Round 8: Squaring Off
Slip stitch into the corner chain-2 space. Chain 3 (counts as dc), and work 2 dc in the same space. *Chain 2, then work 3 dc in the same space (corner complete). Chain 1, work 3 dc in the next chain-1 space, chain 1, work 3 dc in the next chain-2 space, chain 1, and work 3 dc in the next chain-1 space.* Repeat from * around the square, ending with a chain 1. Slip stitch to the top of the beginning chain 3. Fasten off and weave in all ends securely. Your first flower square is complete! Repeat this entire process to create 12 squares total.
Joining the Squares
Once all 12 squares are complete, it's time to assemble them into the blanket. Lay them out in a 3x4 grid (3 squares across, 4 squares down). Arrange them so the colors and patterns flow nicely. With Color C (sage green) and a yarn needle, we will use a simple whip stitch to join them.
Place two squares with their right sides together. Thread your yarn needle with a length of sage green yarn. Insert the needle through the back loops only of the corresponding stitches on both squares, working from one corner to the next. This creates a nearly invisible, flat seam on the front and a decorative, visible seam on the back. Match the corners and the chain spaces carefully to ensure your grid lines up perfectly. Continue joining all squares in rows, then join the rows together in the same manner.
Adding the Finishing Border
The border frames your beautiful meadow and gives the blanket a polished, professional look. We will work three rounds of border, adding texture and color.
Border Round 1: Sage Green Foundation
With Color C (sage green), join the yarn in any corner space of the assembled blanket. Chain 3 (counts as dc), and work 2 dc in the same corner space. *Chain 2, then work 3 dc in the same corner space (corner made). Now, work 1 dc in each stitch and 1 dc in each chain space across the side of the blanket.* When you reach the next corner, repeat from *. Continue around the entire blanket, working 3 dc in each corner space. Slip stitch to the top of the beginning chain 3 to join.
Border Round 2: Dusty Rose Accent
Switch to Color D (dusty rose). Join in any corner space. Chain 3 (counts as dc), and work 2 dc in the same space. *Chain 2, then work 3 dc in the same corner space. Work 1 dc in each stitch across the side of the blanket.* Repeat from * around, working 3 dc in each corner space. Slip stitch to the top of the beginning chain 3. This round adds a lovely dusty rose frame to your blanket.
Border Round 3: Cream Finish
Finally, switch to Color A (cream). Join with a slip stitch in any corner space. Chain 1 (counts as a single crochet), and work a single crochet in each stitch around the entire blanket. When you reach a corner chain-2 space, work 3 single crochet (sc) in that space to keep the corner flat and sharp. Slip stitch to the first single crochet to join. Fasten off and weave in all remaining ends with your yarn needle.
Your Whispering Petal Meadow Blanket is now complete! Lay it flat to admire the textured, floral grid and the rich, earthy color palette. This blanket is more than just a craft project; it's a cozy piece of art that brings the serenity of a blooming meadow into your home. Whether you keep it for yourself or gift it to a loved one, the love and care stitched into every petal will be felt for years to come. Happy crocheting!



