Whimsical Woolen Berry Basket Free Pattern
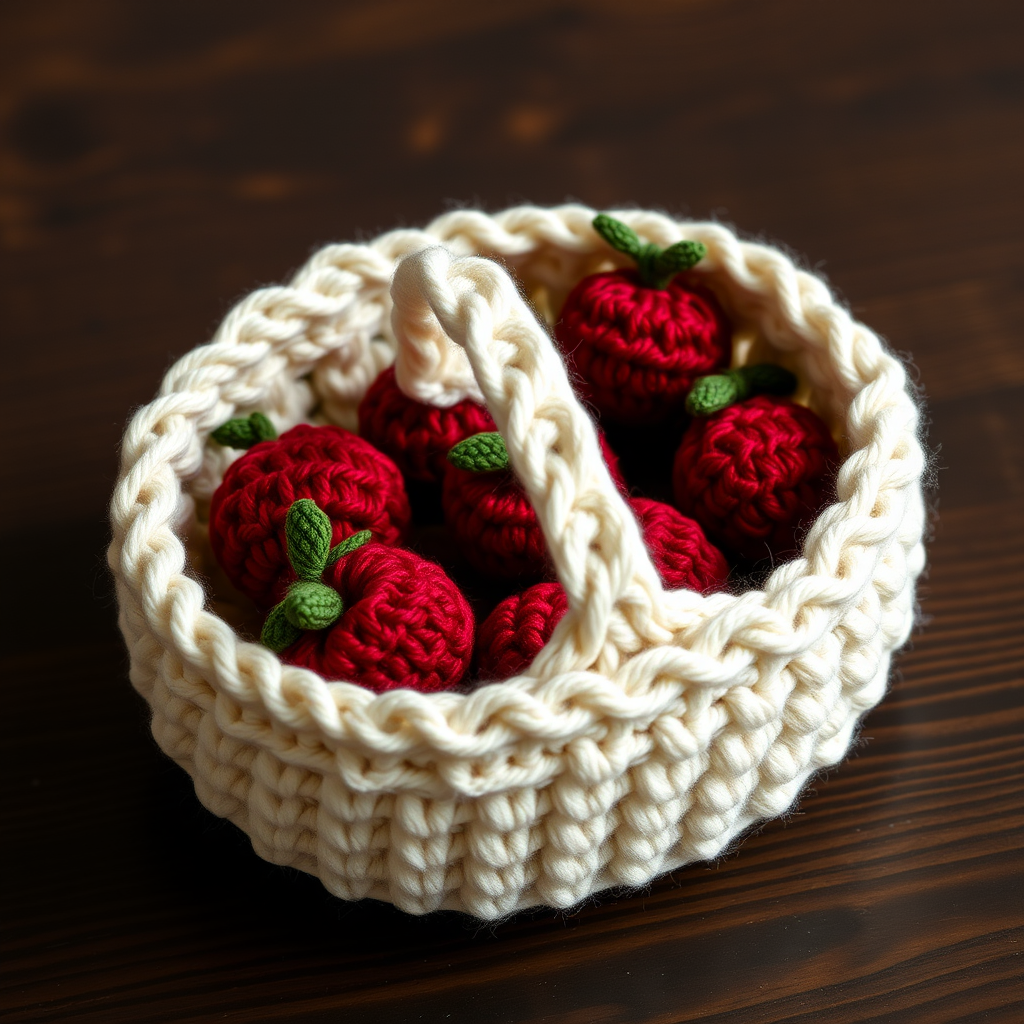
Whimsical Woolen Berry Basket: A Free Crochet Pattern for Rustic Kitchen Charm
Welcome to a delightful crochet journey that will transform simple yarn into a charming, textured berry basket! This whimsical woolen berry basket is the perfect project for crafters of all skill levels, combining functional design with cozy farmhouse aesthetics. Whether you're looking to add rustic charm to your kitchen table or searching for a thoughtful handmade gift, this pattern delivers both beauty and utility.
Using basic single crochet stitches and simple shaping techniques, you'll create a sturdy basket complete with plump, squishy berries and delicate leaves. The natural cream base paired with deep red berries and forest green accents creates a warm, earthy palette that complements any home decor style. Best of all, this project works up quickly and requires minimal materials, making it an ideal weekend crafting session.
Materials Needed
Before diving into this delightful project, gather the following materials to ensure a smooth crafting experience:
- Yarn: Worsted weight cotton yarn in three colors:
- Natural cream (for basket body and handle) – approximately 150 yards
- Deep red (for berries) – approximately 50 yards
- Forest green (for leaves) – approximately 10 yards
- Crochet Hook: 5.0 mm (H-8) crochet hook
- Stitch markers (at least 2, for tracking rounds)
- Yarn needle for weaving in ends and assembly
- Fiberfill stuffing for the berries
- Scissors
Gauge: 16 single crochet stitches x 18 rows = 4 inches (10 cm) in single crochet. While gauge isn't critical for this project, maintaining consistent tension will ensure your basket has the proper shape and sturdiness.
Step-by-Step Instructions
Part 1: Crocheting the Basket Base
The basket begins with a flat, circular base worked in continuous rounds. This foundation creates the sturdy bottom that will support your berries beautifully.
Round 1: With natural cream yarn, create a magic ring. Work 6 single crochet (sc) stitches into the ring. Pull the tail to close the ring tightly. (6 stitches)
Round 2: Work 2 single crochet stitches (an increase, abbreviated as "inc") into each stitch around. (12 stitches)
Round 3: *Single crochet in the next stitch, increase in the next stitch* – repeat from * to * around. (18 stitches)
Round 4: *Single crochet in the next 2 stitches, increase in the next stitch* – repeat from * to * around. (24 stitches)
Round 5: *Single crochet in the next 3 stitches, increase in the next stitch* – repeat from * to * around. (30 stitches)
Round 6: *Single crochet in the next 4 stitches, increase in the next stitch* – repeat from * to * around. (36 stitches)
Round 7: *Single crochet in the next 5 stitches, increase in the next stitch* – repeat from * to * around. (42 stitches)
Round 8: *Single crochet in the next 6 stitches, increase in the next stitch* – repeat from * to * around. (48 stitches)
Your basket base should now measure approximately 4 inches in diameter, creating a flat, even circle. If your circle appears wavy or ruffled, your tension may be too loose; if it curls upward, your tension may be too tight. Adjust accordingly for the next section.
Part 2: Creating the Basket Sides
Now we'll build upward to create the basket walls. This section uses continuous spiral crochet, meaning you won't join rounds with slip stitches. Instead, you'll work in a spiral, using a stitch marker to track your progress.
Rounds 9-18: Single crochet in each stitch around (48 stitches each round). Do not join – work in a continuous spiral. Place a stitch marker at the beginning of each round to keep track of your place. Continue for 10 rounds total.
Pro Tip: As you work these rounds, you'll notice the basket sides naturally begin to angle upward. This is exactly what we want! The single crochet fabric will create a sturdy, textured wall that holds its shape beautifully.
Round 19: *Single crochet in the next 6 stitches, decrease (dec) in the next stitch* – repeat from * to * around. (42 stitches)
Round 20: Single crochet in each stitch around. (42 stitches)
Fasten off, leaving a tail of approximately 6 inches. Weave in the end securely using your yarn needle, being careful to hide the tail within the fabric of the basket.
Part 3: Crafting the Handle
The handle adds both functionality and charm to your basket. This simple chain-based handle is sturdy enough to carry your berries while maintaining the rustic aesthetic.
With natural cream yarn, create a foundation chain of 30 stitches. Work 1 slip stitch into the second chain from your hook, then continue slip stitching into each chain across. This creates a sturdy, slightly textured cord.
Fasten off, leaving a long tail (approximately 12 inches) for sewing. Using your yarn needle, sew the handle securely to the inside of the basket on opposite sides. Position the handle so it arches naturally over the basket opening. Weave in all ends.
Part 4: Making the Plump Berries (Make 6)
Now for the fun part – creating those adorable, squishy berries! Each berry is worked in the round, then lightly stuffed to achieve that perfect plump appearance.
Round 1: With deep red yarn, create a magic ring. Work 6 single crochet stitches into the ring. Pull tight to close. (6 stitches)
Round 2: Increase in each stitch around. (12 stitches)
Round 3: *Single crochet in the next stitch, increase in the next stitch* – repeat from * to * around. (18 stitches)
Rounds 4-5: Single crochet in each stitch around. (18 stitches each round)
Round 6: *Single crochet in the next stitch, decrease in the next stitch* – repeat from * to * around. (12 stitches)
Round 7: Decrease in each stitch around. (6 stitches)
Fasten off, leaving a tail of approximately 8 inches. Lightly stuff the berry with fiberfill – you want it squishy but not overly firm. Using your yarn needle, thread the tail through the remaining 6 stitches and pull tight to close the opening. Secure with a knot and weave in the end.
Repeat this process to create all 6 berries. For variety, you can stuff some berries slightly more than others to create natural-looking variation in size and shape.
Part 5: Creating the Leaves (Make 3)
Each berry gets a cute little leaf on top, adding that perfect finishing touch. These simple leaves are quick to make and add wonderful dimension to your berries.
With forest green yarn, create a foundation chain of 6 stitches. Work 1 single crochet in the second chain from your hook, 1 half double crochet (hdc) in the next chain, 1 double crochet (dc) in the next chain, 1 half double crochet in the next chain, and 1 single crochet in the last chain.
Fasten off, leaving a tail of approximately 6 inches. Using your yarn needle, sew the leaf to the top center of each berry. Position the leaf so it lies flat against the berry's surface, creating a natural, organic look. Weave in all ends.
Part 6: Final Assembly and Styling
Your basket and berries are now complete! Here's how to bring everything together:
Place the berries inside the basket, arranging them attractively. You can cluster them in the center or spread them out for a more casual look. For an extra decorative touch, consider sewing one or two berries to the basket rim – this creates a charming, cohesive display that looks intentional and polished.
Styling Suggestions:
- Display on a kitchen counter or farmhouse-style dining table
- Pair with fresh flowers or dried botanicals for a seasonal centerpiece
- Use as a catch-all for keys, jewelry, or small trinkets
- Fill with wrapped candies or small gifts for a handmade present
Tips for Success
To ensure your whimsical woolen berry basket turns out perfectly, keep these helpful tips in mind:
- Maintain consistent tension: This is especially important for the basket sides to ensure they stand up straight rather than flaring outward.
- Use stitch markers diligently: The continuous spiral can be tricky to track, so markers are essential for keeping your place.
- Choose quality cotton yarn: Cotton holds its shape better than acrylic and gives that beautiful, rustic texture.
- Block your basket: If your basket seems misshapen, gently wet it and reshape while drying to achieve the perfect form.
- Customize freely: Feel free to experiment with different color combinations or add extra berries for a fuller look.
This whimsical woolen berry basket is more than just a crochet project – it's a piece of functional art that brings warmth and charm to any space. The combination of simple stitches, thoughtful construction, and delightful details makes this pattern accessible to beginners while still offering satisfaction to experienced crafters.
We'd love to see your finished creations! Share your berry basket photos on social media using the hashtag #WhimsicalBerryBasket and tag us in your posts. Happy crocheting!


