Whimsical Woodland Gnome Keychain Free Pattern – Knitted Garden Charm
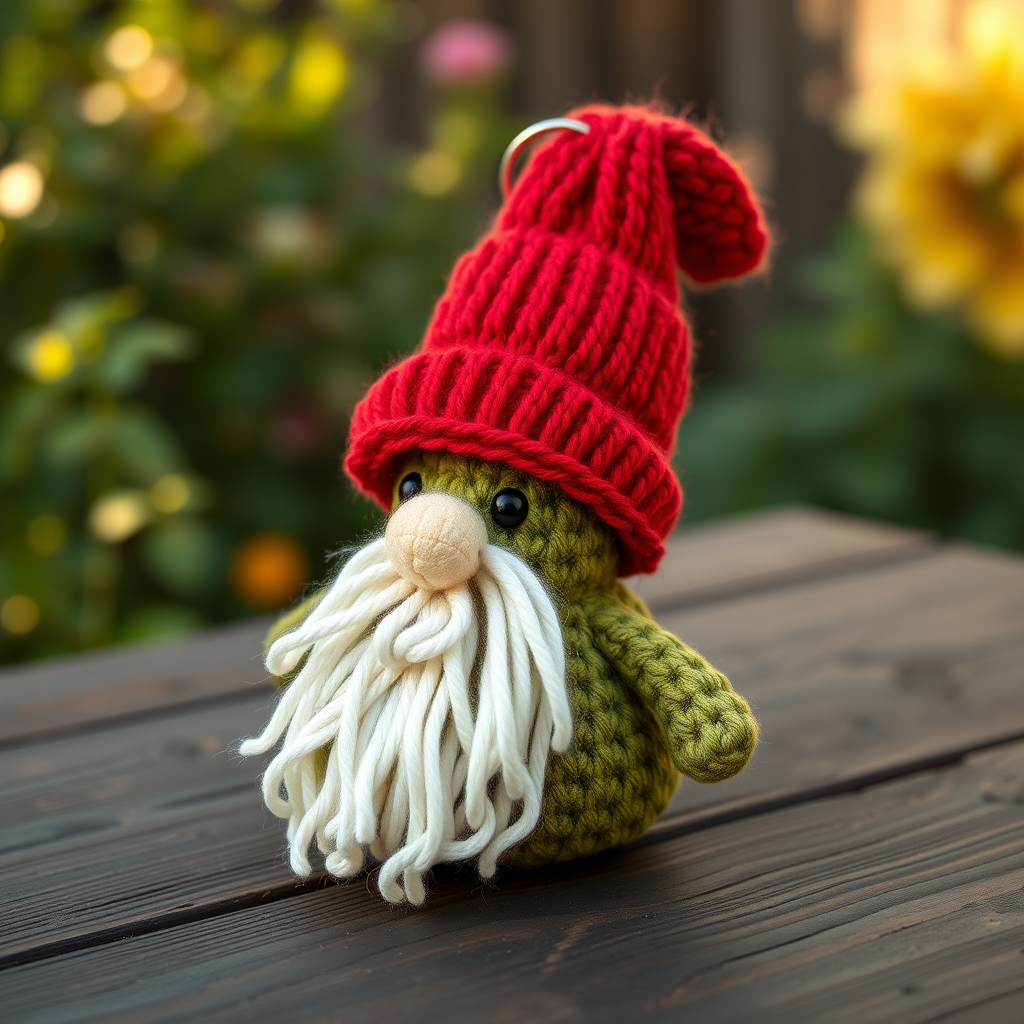
Bring a Little Magic to Your Keys: The Whimsical Woodland Gnome Keychain
There's something undeniably charming about a tiny, handcrafted gnome. He’s a little guardian of the garden, a keeper of secrets, and now, he can be the perfect companion for your keys, bag, or zipper pull. This Whimsical Woodland Gnome Keychain pattern is a delightful, quick project that’s ideal for beginners looking to try their hand at knitting in the round, or for seasoned crafters who need a satisfying, stash-busting fix. Using just a few scraps of worsted weight yarn, you can create a cozy, rustic charm that makes a wonderful handmade gift for a friend, a teacher, or a little bit of magic for yourself.
This pattern is worked from the bottom up, all in one piece, using simple increases and decreases. The result is a slightly pear-shaped, firmly stuffed gnome with a fluffy, cloud-like beard and a jaunty, pointed hat. Let’s gather our supplies and get started on bringing this little fellow to life!
Materials Needed: Your Gnome-Making Kit
Before we begin, let's make sure you have everything you need. This project is wonderfully portable and requires very little material.
- Yarn: Worsted weight yarn in the following colors:
- Moss Green: For the body (a small amount, roughly 20-30 yards).
- Cream: For the face and nose (a small amount, roughly 10-15 yards).
- Warm Red: For the hat (a small amount, roughly 15-20 yards).
- White or Light Gray: For the beard (a small amount, roughly 5-10 yards).
- Knitting Needles: US Size 4 (3.5 mm) double-pointed needles (DPNs) or a long circular needle if you prefer the magic loop method. A set of 4 or 5 DPNs is standard.
- Fiberfill: For stuffing the gnome firmly.
- Yarn Needle: For weaving in ends, sewing parts together, and attaching the keychain.
- Crochet Hook: A small hook (any size, like 3.5mm or 4mm) to help pull yarn loops for the beard. This is optional but makes the process much easier.
- Keychain Ring or Lobster Clasp: For the final attachment.
- Scissors: For cutting yarn.
- Stitch Marker (optional): To help you keep track of your rounds.
Note on Gauge: Gauge is not critical for this project, but you do want to aim for a tight gauge. This means your stitches should be snug on the needles. This is important to prevent the white fiberfill stuffing from peeking through your knitting. If your knitting is loose, consider using a smaller needle size.
Step-by-Step Instructions: Knitting Your Gnome
This pattern is worked in a continuous spiral in the round. We'll start with the head and body, which are knitted as one piece from the bottom up. Let's get started!
Part 1: Head & Body (Knitted in One Piece)
Getting Started:
Using your moss green yarn, cast on 6 stitches. Distribute these stitches evenly onto 3 of your double-pointed needles (2 stitches on each needle). Join in the round, being very careful not to twist your stitches. Place a stitch marker to mark the beginning of the round if you like.
Round 1: Knit front and back (kfb) into each stitch around. (12 stitches)
Tip: To kfb, knit into the front of the stitch as normal, but before slipping it off the left needle, knit into the back of the same stitch. This creates two stitches from one.
Round 2: *Kfb, k1* around. (18 stitches)
This means: (kfb into the next stitch, then knit 1 stitch) and repeat this sequence all the way around.
Round 3: *Kfb, k2* around. (24 stitches)
Now you have a nice, flat circle that will form the base of your gnome.
Rounds 4-8: Knit all stitches. (24 stitches)
This section forms the lower part of the body. Just knit every stitch in these rounds, no increases.
Switching to the Face:
Cut the moss green yarn, leaving a small tail. Join the cream yarn by simply starting to knit with it.
Rounds 9-12: Knit all stitches. (24 stitches)
These four rounds of cream will be the gnome's face.
Switching to the Body:
Cut the cream yarn, leaving a small tail. Join the moss green yarn again.
Rounds 13-16: Knit all stitches. (24 stitches)
This is the upper part of the body, just below the head.
Shaping the Top:
Now we will begin to decrease to close the top of the head.
Round 17: *K2tog, k2* around. (18 stitches)
K2tog means "knit two together." Insert your right needle into the next two stitches on the left needle as if to knit, and knit them together as one. This decreases your stitch count by one.
Round 18: *K2tog, k1* around. (12 stitches)
Stuffing Time!
This is the perfect moment to stuff your gnome's head and body firmly with fiberfill. Use your finger or the blunt end of a pencil to push the stuffing all the way down into the body and up into the head. Make sure it's nice and plump, but not so tight that the stitches are stretching.
Round 19: K2tog around. (6 stitches)
You will now have 6 stitches left on your needles.
Finishing the Body:
Cut the yarn, leaving a long tail (about 8 inches). Thread this tail onto your yarn needle. Slide the needle through the remaining 6 stitches on your knitting needles, one by one, and slip them off the knitting needles. Pull the yarn tail tight to cinch the hole closed. Weave in the end securely inside the body.
Part 2: The Jaunty Red Hat
Getting Started:
Using your warm red yarn, cast on 6 stitches. Distribute onto 3 DPNs and join in the round, being careful not to twist.
Round 1: Kfb into each stitch around. (12 stitches)
Round 2: Knit all stitches. (12 stitches)
Round 3: *Kfb, k1* around. (18 stitches)
Rounds 4-5: Knit all stitches. (18 stitches)
Round 6: *Kfb, k2* around. (24 stitches)
Rounds 7-9: Knit all stitches. (24 stitches)
This wider section will be the brim of the hat that folds over.
Shaping the Point:
Now we'll decrease to form the pointy top of the hat.
Round 10: *K2tog, k2* around. (18 stitches)
Round 11: *K2tog, k1* around. (12 stitches)
Rounds 12-14: Knit all stitches. (12 stitches)
These plain rounds give the hat a bit of length before the final point.
Round 15: K2tog around. (6 stitches)
Finishing the Hat:
Cut the yarn, leaving a long tail (about 10 inches). Thread it onto your yarn needle, slide it through the remaining 6 stitches, and pull tight to close the point. Do not weave in this end yet! We will use it to sew the hat onto the head.
Attaching the Hat:
Fold the bottom brim of the hat up slightly. Position the hat on top of the gnome's head, angling it slightly to one side for a whimsical look. Using the long yarn tail, sew the hat securely to the head, stitching around the brim. Weave in the end.
Part 3: The Fluffy Beard & Nose
Creating the Beard:
Cut 8-10 strands of your white or light gray yarn, each about 4 inches long. Fold one strand in half. Insert your crochet hook (or yarn needle) into a stitch in the cream-colored face area, right below where the hat sits. Hook the folded loop of the yarn strand and pull it through the stitch, creating a loop on the outside. Then, take the two loose ends of the strand and pull them through the loop. Pull tight to secure the loop. Repeat this process, filling in the face area to create a full, fluffy beard. Once all strands are attached, use your scissors to trim the beard into a neat, rounded shape.
Knitting the Nose:
With your cream yarn, cast on 3 stitches onto a single needle (you can work this flat, back and forth).
Row 1: Knit all stitches. (3 stitches)
Row 2: Kfb, k1, kfb. (5 stitches)
Row 3: Knit all stitches. (5 stitches)
Row 4: K2tog, k1, k2tog. (3 stitches)
Row 5: Bind off all stitches.
Attaching the Nose:
Cut the yarn, leaving a long tail. Use this tail to sew the nose onto the center of the face, just above the beard. Sew around the edges of the nose piece to secure it firmly, then weave in the end.
Part 4: Final Assembly & Keychain Attachment
Adding the Keychain:
Using your yarn needle and a piece of moss green yarn, create a sturdy loop at the very top of the hat's point. Insert your needle through the tip of the hat and create a loop of yarn, securing it with several firm stitches. Make sure the loop is big enough to fit your keychain ring. Once secure, weave in the end. Attach your keychain ring or lobster clasp to this loop.
Finishing Touches:
Weave in any remaining loose ends throughout the gnome. For an extra touch of charm, you can use a small piece of pink or dark yarn to embroider a tiny smile or add a couple of rosy cheeks to the face. Use a simple backstitch for a smile or a few small straight stitches for the cheeks.
And there you have it! Your very own Whimsical Woodland Gnome Keychain. He's ready to guard your keys, zip up your bag, or bring a smile to someone's face. This project is so quick and fun, you might find yourself making a whole family of gnomes. Happy knitting!


