Whimsical Woodland Fox Lovey Free Pattern
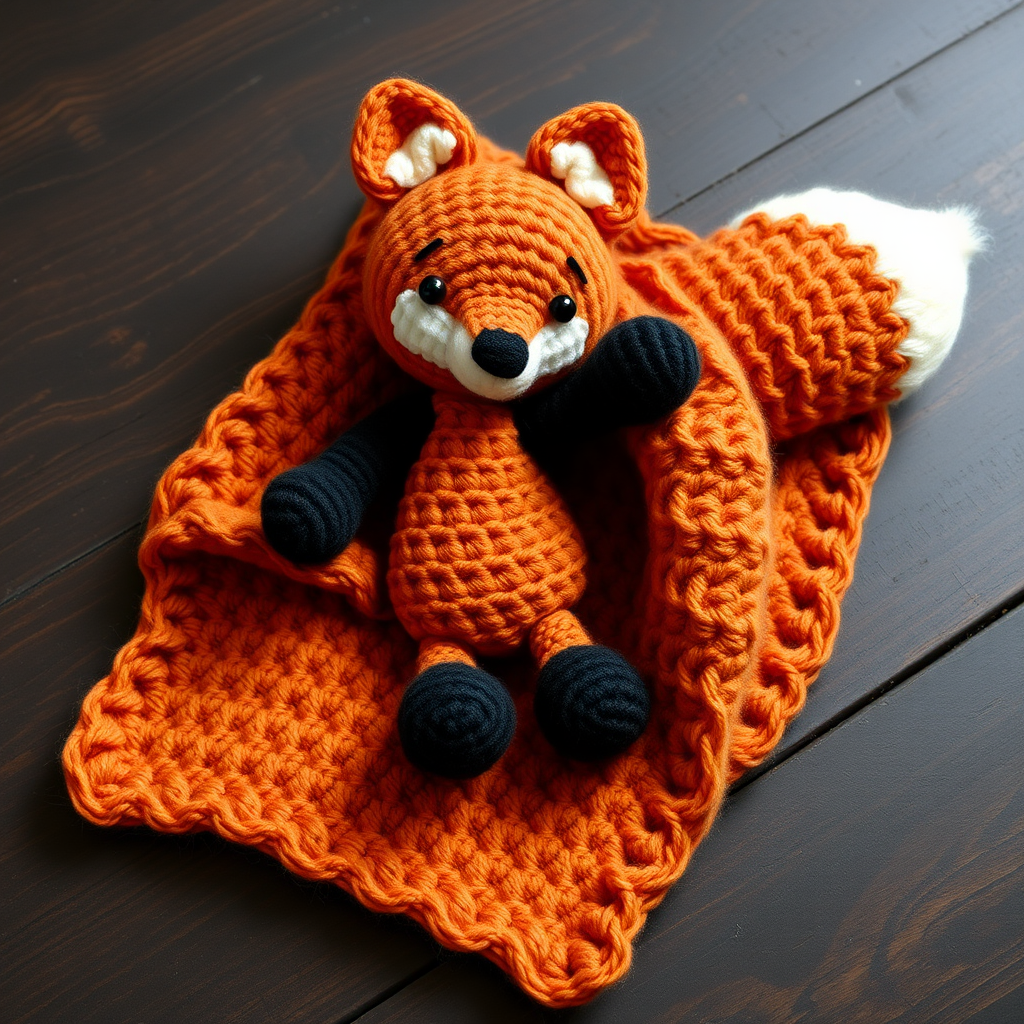
Whimsical Woodland Fox Lovey Free Pattern: A Cozy Crochet Companion
There's something truly magical about creating a handmade gift for a little one. This Whimsical Woodland Fox Lovey is the perfect blend of cuddly comfort and charming design—a soft, textured body paired with a cozy blanket tail that little hands will love to grasp. Whether you're a seasoned crocheter or just starting your amigurumi journey, this free pattern will guide you through every step to create a delightful woodland friend that's sure to become a cherished keepsake.
With its warm burnt orange, cream white, and deep black color palette, this fox lovey brings a touch of nature's beauty indoors. The visible single crochet stitches give it that cozy, handmade aesthetic that makes handmade gifts so special. Let's dive into this enchanting project!
Materials Needed
Before we begin, gather these essential supplies to ensure a smooth crocheting experience:
- Yarn: Worsted weight yarn in three colors:
- Orange (main color) – approximately 200 yards
- White (muzzle, tail tip) – approximately 50 yards
- Black (nose, eyes) – small amount
- Crochet Hook: G/6 (4.0 mm) hook
- Yarn needle: For sewing pieces together and weaving in ends
- Polyester fiberfill stuffing: For the head, body, and tail
- Stitch marker: To keep track of your rounds
- Scissors: For cutting yarn
- Optional: Safety eyes (8mm) if you prefer not to embroider
Gauge: 4 inches = 16 single crochet stitches and 18 rows in single crochet. While gauge isn't critical for amigurumi, maintaining consistent tension will ensure your pieces fit together properly.
Abbreviations
Familiarize yourself with these standard crochet abbreviations before starting:
- ch = chain
- sc = single crochet
- inc = increase (2 sc in same stitch)
- dec = decrease (sc 2 together)
- sl st = slip stitch
- st(s) = stitch(es)
- Rnd = round
Step-by-Step Instructions
Head (Make 1, in Orange)
The head is worked in continuous rounds, so no need to join at the end of each round—just keep going and use your stitch marker to track the beginning of each round.
- Rnd 1: Create a magic ring, work 6 sc into the ring. (6 sts)
- Rnd 2: Work 2 sc in each stitch around. (12 sts)
- Rnd 3: *Sc in next st, inc* repeat around. (18 sts)
- Rnd 4: *Sc in next 2 sts, inc* repeat around. (24 sts)
- Rnd 5: *Sc in next 3 sts, inc* repeat around. (30 sts)
- Rnd 6-10: Sc in each stitch around. (30 sts) – This creates the height of the head.
- Rnd 11: *Sc in next 3 sts, dec* repeat around. (24 sts)
- Rnd 12: *Sc in next 2 sts, dec* repeat around. (18 sts)
- Stuff the head firmly with polyester fiberfill. Make sure to fill the top of the head well to maintain its shape.
- Rnd 13: *Sc in next st, dec* repeat around. (12 sts)
- Rnd 14: Dec around. (6 sts)
- Fasten off, leaving a long tail for sewing. Weave the end through the remaining stitches and pull tight to close the hole.
Muzzle (Make 1, in White)
This small piece adds the adorable fox face detail. It's worked flat and then sewn onto the head.
- Rnd 1: Magic ring, 6 sc in ring. (6 sts)
- Rnd 2: Inc in each stitch around. (12 sts)
- Rnd 3: *Sc in next st, inc* repeat around. (18 sts)
- Rnd 4-5: Sc in each stitch around. (18 sts)
- Fasten off, leaving a long tail for sewing. Stuff lightly with fiberfill—you want it to be soft and slightly puffy, not firm.
Ears (Make 2, in Orange)
These cute triangular ears are left unstuffed to maintain their shape and sit nicely on the head.
- Rnd 1: Magic ring, 6 sc in ring. (6 sts)
- Rnd 2: *Sc in next st, inc* repeat around. (9 sts)
- Rnd 3: *Sc in next 2 sts, inc* repeat around. (12 sts)
- Rnd 4-5: Sc in each stitch around. (12 sts)
- Fasten off, leaving a long tail for sewing. Do not stuff.
Body (Make 1, in Orange)
The body is slightly wider than the head to create a cute, chubby fox shape.
- Rnd 1: Magic ring, 6 sc in ring. (6 sts)
- Rnd 2: Inc in each stitch around. (12 sts)
- Rnd 3: *Sc in next st, inc* repeat around. (18 sts)
- Rnd 4: *Sc in next 2 sts, inc* repeat around. (24 sts)
- Rnd 5-8: Sc in each stitch around. (24 sts) – This creates the body height.
- Rnd 9: *Sc in next 2 sts, dec* repeat around. (18 sts)
- Rnd 10: *Sc in next st, dec* repeat around. (12 sts)
- Stuff the body firmly with fiberfill.
- Rnd 11: Dec around. (6 sts)
- Fasten off, leaving a long tail for sewing. Close the opening as you did for the head.
Tail (Make 1, in Orange)
The tail is long and slightly tapered, perfect for little hands to hold.
- Rnd 1: Magic ring, 6 sc in ring. (6 sts)
- Rnd 2: Inc in each stitch around. (12 sts)
- Rnd 3-10: Sc in each stitch around. (12 sts) – Maintain this width for the main part of the tail.
- Rnd 11: *Sc in next st, dec* repeat around. (8 sts)
- Rnd 12-15: Sc in each stitch around. (8 sts) – This creates the tapered end.
- Fasten off, leaving a long tail for sewing. Stuff lightly—you want the tail to be soft and flexible, not stiff.
Tail Tip (Make 1, in White)
This small white piece gives the fox its characteristic white-tipped tail.
- Rnd 1: Magic ring, 6 sc in ring. (6 sts)
- Rnd 2: Inc in each stitch around. (12 sts)
- Rnd 3-4: Sc in each stitch around. (12 sts)
- Fasten off, leaving a long tail for sewing. Do not stuff.
Blanket (Make 1, in Orange)
The blanket is worked in rows, creating a soft, square surface for the lovey.
- Foundation: Chain 41.
- Row 1: Sc in 2nd ch from hook and in each ch across. (40 sts)
- Row 2-40: Ch 1, turn, sc in each stitch across. (40 sts) – Repeat this row until you have 40 rows total.
- Fasten off and weave in ends.
Assembly Instructions
Now comes the fun part—bringing all your pieces together to create your adorable fox lovey!
Step 1: Attach the Muzzle
Position the muzzle on the front of the head, centered between where the eyes will be. Using the long tail from the muzzle, sew it securely to the head using a whip stitch or invisible seam. Make sure it's centered and sits about halfway down the face.
Step 2: Add the Face Details
Using black yarn, embroider a small triangle nose at the top of the muzzle. For the eyes, you have two options:
- Option 1: Embroider small black circles or X's above the muzzle on either side.
- Option 2: Attach 8mm safety eyes before sewing the muzzle on, positioning them between Rounds 6-7 of the head, about 6 stitches apart.
Step 3: Attach the Ears
Position the ears on top of the head, slightly to the sides. They should sit about 3-4 stitches apart at the center. Using the long tails, sew each ear securely to the head. Make sure they're angled slightly outward for that cute fox look.
Step 4: Attach the Head to the Body
Using the long tail from the body, sew the head to the top of the body. Make sure the head is centered and sits securely. Use a whip stitch around the seam, going through both pieces to create a strong attachment.
Step 5: Attach the Tail Tip and Tail
First, sew the white tail tip to the end of the orange tail (the tapered end). Use the long tail from the tail tip to sew it securely. Then, using the long tail from the tail, attach the tail to the back of the body. Position it so it curves naturally and sits at a comfortable angle.
Step 6: Attach the Blanket
Place the blanket flat on your work surface. Position the body in the center of the blanket, with the head and tail extending beyond the edges. Using the long tail from the body (or additional orange yarn), sew the bottom of the body to the center of the blanket. For extra security, you can also sew the edges of the blanket to the sides of the body, creating a more integrated look.
Step 7: Final Touches
Weave in all remaining ends using your yarn needle. Give your fox lovey a gentle squeeze to ensure all pieces are securely attached and the stuffing is evenly distributed.
Your Whimsical Woodland Fox Lovey Is Complete!
Congratulations! You've just created a beautiful, handmade fox lovey that's perfect for snuggling, gifting, or decorating a nursery. The combination of the soft blanket and the adorable fox head makes this a truly special piece that will be treasured for years to come.
This pattern is perfect for beginners and experienced crocheters alike. The repetitive single crochet stitches make it meditative and relaxing, while the assembly process allows you to see your creation come to life. Feel free to experiment with different color combinations—a gray fox, a red fox, or even a pastel version would be adorable!
Don't forget to share your finished creation with the crochet community. Tag your photos with #WoodlandFoxLovey and inspire others to try this delightful pattern. Happy crocheting!


