Whimsical Woodland Fox Dog Snood Free Pattern
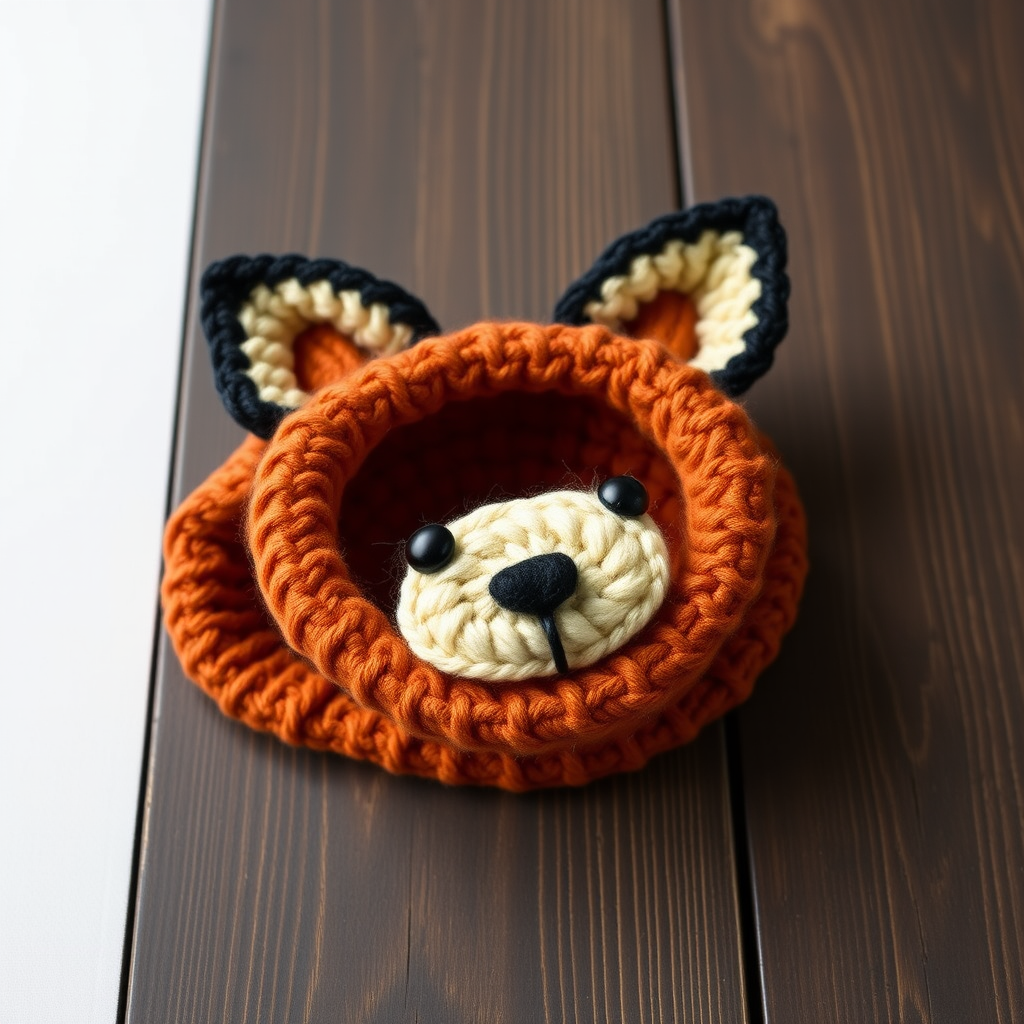
Whimsical Woodland Fox Dog Snood: A Free Crochet Pattern for Cozy Autumn Walks
Turn your beloved pup into a charming woodland fox with this utterly adorable, ear-flap snood! Perfect for crisp autumn strolls or simply keeping your furry friend extra cozy, this free crochet pattern combines warmth with undeniable cuteness. The textured ribbed band and playful pointed ears are worked in warm, earthy tones, creating a handmade accessory that is both functional and full of personality. Even if you're a beginner, this project is wonderfully approachable and will yield a professional-looking result that you'll be proud to show off.
Materials Needed
Before you begin, gather your supplies. This project is portable and quick to work up, making it a fantastic weekend craft.
- Yarn: Worsted weight yarn in three colors: Burnt Orange (main color), Cream (for the muzzle and optional trim), and Black (for the nose, eyes, and ear tips). Small amounts of cream and black are all that's needed.
- Crochet Hook: 5.5 mm hook (US Size I/9).
- Other: Yarn needle for weaving in ends and sewing pieces, stitch markers, and scissors.
Gauge: 16 sts x 8 rows = 4 inches in double crochet. Getting the right gauge ensures a proper fit, but for a snood, a slightly loose gauge is fine.
Step-by-Step Instructions
Follow this pattern carefully, and you'll have a gorgeous fox snood in no time. The pattern is written for sizes XS (S, M, L), fitting neck circumferences of 10 (12, 14, 16) inches.
Abbreviations (US Terms)
- ch: chain
- sc: single crochet
- dc: double crochet
- sl st: slip stitch
- st(s): stitch(es)
- rnd: round
- inc: increase (2 dc in same st)
- dec: decrease (dc2tog - double crochet 2 stitches together)
Notes for Success
The main snood tube is worked in continuous rounds to create a seamless, stretchy band. The ear flaps are then worked flat back and forth on top of the tube. Use a stitch marker to keep track of your rounds, as you will not be joining at the end of each round for the main tube.
Part 1: The Main Snood Tube (Worked in Burnt Orange)
- Foundation: Chain 36 (42, 48, 54). Join with a slip stitch to the first chain to form a ring, being very careful not to twist your chain.
- Rnd 1: Chain 2 (this counts as your first double crochet). Work 1 double crochet in each chain around. Join with a slip stitch to the top of the beginning chain-2. You should have 36 (42, 48, 54) stitches.
- Rnd 2: Chain 2 (counts as dc). Work 1 double crochet in each stitch around. Join with a slip stitch to the top of the chain-2.
- Repeat Rnd 2 until the tube measures 3 (3.5, 4, 4.5) inches from the starting edge. This forms the cozy, ribbed neck band.
- Finish: Fasten off and weave in the yarn end securely.
Part 2: The Pointed Ear Flaps (Worked Flat in Burnt Orange)
This section creates the signature fox ears that stand up on top of your dog's head.
- Positioning: Lay the tube flat so the seam is at the bottom. Place a stitch marker at the center of the top edge.
- Starting Point: Count 6 (7, 8, 9) stitches to the right of your center marker. Attach your burnt orange yarn to this stitch with a slip stitch.
- Row 1: Chain 2 (counts as dc). Work 1 dc in the same stitch and in the next 11 (13, 15, 17) stitches, working across the center marker. Turn. You will have 12 (14, 16, 18) stitches.
- Row 2: Chain 2. Work a dc2tog decrease over the first two stitches. Work 1 dc in each stitch until you have 2 stitches left. Work a dc2tog decrease over the last two stitches. Turn. You will have 10 (12, 14, 16) stitches.
- Row 3: Repeat Row 2. You will have 8 (10, 12, 14) stitches.
- Row 4: Repeat Row 2. You will have 6 (8, 10, 12) stitches.
- Row 5: Repeat Row 2. You will have 4 (6, 8, 10) stitches.
- For sizes M and L only: Repeat Row 2 once more. You will have 4 (6, 6, 8) stitches.
- Shape the Ear: Fasten off, leaving a long tail (at least 12 inches) for sewing. Fold the flap in half lengthwise so the decrease edges meet. Sew the top edges together to create a pointed, triangular ear shape.
- Second Ear: Repeat the entire process on the other side of the center marker to create the second ear flap.
Part 3: Fox Face Appliqué (Worked Flat)
Now for the fun part—bringing the fox to life! These small pieces are sewn onto the front of the snood.
Fox Ears (Make 2, in Black)
- Chain 4.
- Work 1 sc in the 2nd chain from the hook, 1 sc in the next chain, and 3 sc in the last chain. Now working down the other side of the foundation chain, work 1 sc in the next chain and 1 sc in the last chain.
- Fasten off, leaving a long tail. Sew these small black ears to the top of the snood, nestled between the two large burnt orange ear flaps.
Cream Muzzle
- Rnd 1: Create a magic ring. Chain 1, then work 6 sc into the ring. Pull the ring tight. (6 sts)
- Rnd 2: Work 2 sc in each stitch around. (12 sts)
- Rnd 3: *Work 1 sc in the next stitch, then 2 sc in the next stitch (an increase)*. Repeat from * to * around. (18 sts)
- Fasten off, leaving a long tail. Sew this oval to the front center of the snood, just below the ear flaps.
Black Nose
- Create a magic ring. Chain 1, then work 6 sc into the ring. Pull tight.
- Slip stitch to the first sc to join.
- Fasten off, leaving a tail. Sew this small circle onto the center of the cream muzzle.
Eyes (Make 2, in Black)
- Create a magic ring. Chain 1, then work 6 sc into the ring. Pull tight.
- Slip stitch to the first sc to join.
- Fasten off, leaving a tail. Sew these onto the snood on either side of the muzzle, about 1 inch below the ear flaps for a cute, expressive face.
Finishing Touches
- Weave in all remaining yarn ends securely with your yarn needle.
- Optional Contrast Trim: For an extra cozy and polished look, attach your cream yarn to the bottom edge of the snood. Work a round of single crochet evenly around the entire bottom opening. Join with a slip stitch and fasten off.
Your Whimsical Woodland Fox Dog Snood is complete! Slip it over your pup's head, adjust the ear flaps, and get ready for the most adorable compliments on your next walk. This snood makes a wonderful handmade gift for the dog lovers in your life, too. Happy crocheting!


