Dusty Rose Gnome Hexi Pillow Free Pattern: Chunky Chenille Crochet
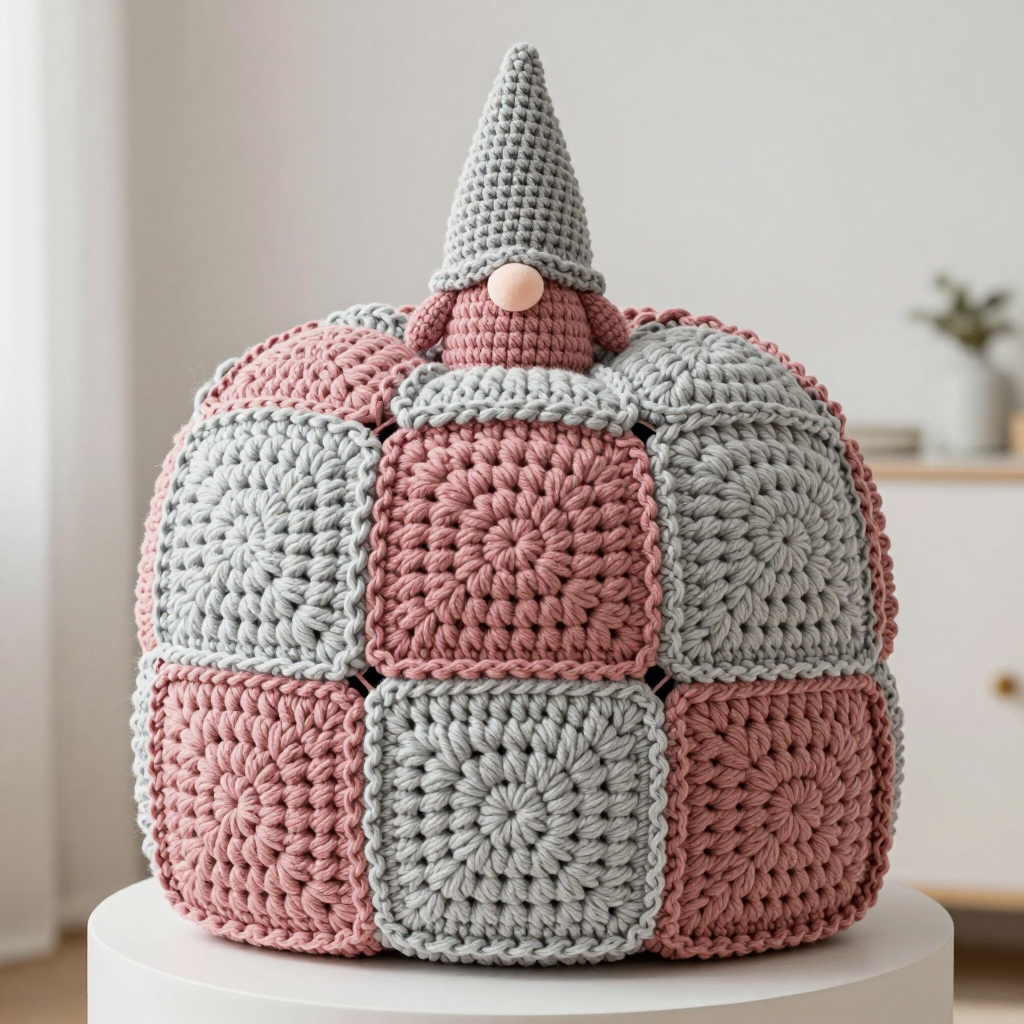
Dusty Rose Gnome Hexi Pillow: Free Chunky Chenille Crochet Pattern
Introduction
This Dusty Rose Gnome Hexi Pillow is the coziest little character you will ever make — a soft, round chenille pillow built from six chunky hexagon motifs in dusty rose and light grey, with a tiny stuffed gnome head peeking over the center seam. It is perfect for anyone who has mastered the very basics of crochet and wants a project that feels special but stays forgiving, because plush chenille hides small mistakes beautifully. The finished pillow is about 13 inches (33 cm) across, plump and squishy, with a fuzzy, velvety surface that begs to be squeezed. The alternating rose-and-grey hexagons create a soft checkerboard, and the little grey pointed hat and blush-pink nose give it that whimsical autumn-gnome charm. Whether you tuck it into a reading chair or gift it to a gnome lover, this is a project that looks far more complicated than it actually is.
Materials Needed
- Yarn (weight 5 / chunky): Plush polyester chenille yarn. Dusty rose (Color A): approx. 220 yd / 200 m total (about 2 skeins). Light grey (Color B): approx. 110 yd / 100 m (about 1 skein). Blush pink (Color C): a small amount for the nose.
- Main hook: 6.0 mm (US J-10) crochet hook — for the hexagons and pillow back.
- Small hook: 5.0 mm (US H-8) crochet hook — for the gnome head, nose, and hat.
- Stitch marker (or a scrap of contrasting yarn) — essential for the gnome pieces worked in a spiral.
- Tapestry needle (blunt-tipped, large eye) — for seaming and weaving in ends.
- Scissors
- Polyester fiberfill — for stuffing the pillow, head, and hat.
- Optional: a small handful of poly-pellets for a weighted pillow base.
Finished size: Pillow approx. 13 in (33 cm) across. Gnome head approx. 2.5 in (6 cm) tall. Hat approx. 4 in (10 cm) tall. Each hexagon measures approx. 4.75 in (12 cm) flat-to-flat.
Abbreviations and Beginner Glossary
- ch — chain: yarn over the hook, pull the loop through the loop on your hook. Creates a small loop.
- sc — single crochet: insert hook into stitch, yarn over, pull up a loop (2 loops on hook), yarn over, pull through both loops. One loop remains.
- sl st — slip stitch: insert hook into stitch, yarn over, pull the loop straight through both the stitch and the loop on your hook. Used to join rounds.
- 2 sc in next st — increase: work two single crochets into the same stitch. Adds one stitch.
- sc2tog — single crochet two together (decrease): insert hook into first stitch, pull up a loop; insert hook into next stitch, pull up a loop (3 loops on hook); yarn over, pull through all 3 loops. Turns two stitches into one.
- st / sts — stitch / stitches.
- rnd / rnds — round / rounds: one complete circle of stitches worked around.
- magic ring — an adjustable loop: wrap yarn around your fingers to form a loop, work your first stitches into it, then pull the tail tight to close the center hole.
- join — connect the last stitch of a round to the first with a slip stitch so the round closes into a circle.
- fasten off — cut the yarn a few inches from your work and pull the tail through the last loop to secure it.
- [ ] — brackets: repeat everything inside the brackets the number of times stated after them.
- ( ) — parentheses at the end of a line show the total stitch count for that round.
Gauge
Hexagon gauge (6.0 mm hook): 1 hexagon = 4.75 in (12 cm) across flat-to-flat.
Gnome gauge (5.0 mm hook): 4 sc x 4 rnds = 1 in (2.5 cm).
Why gauge matters: Gauge is how big your stitches turn out. If your stitches are looser or tighter than the pattern, your hexagons will be bigger or smaller, and six of them will no longer add up to a 13-inch pillow. How to check: Crochet one complete hexagon with your 6.0 mm hook and measure it flat-to-flat. If it is larger than 4.75 in, try a smaller hook; if smaller, try a larger hook. Because chenille is stretchy, measure gently without pulling.
Beginner Tips Before You Start
- Mark your first stitch. The gnome head and hat are worked in a continuous spiral with no joining, so place a stitch marker in the first stitch of each round and move it up as you go. This stops you from losing your place.
- Do not pull the yarn tight. Chenille yarn sheds and snaps if you yank it. Keep a relaxed, even tension — snug, not strangling.
- Count every round. The stitch counts in parentheses are your safety net. If a round does not match, fix it before moving on.
- Keep your magic ring tail long. A long tail lets you pull the center hole completely closed and gives you yarn for seaming later.
- Work the hexagons first. Lay all six out and check the color arrangement before you sew anything — it is much easier to rearrange loose hexagons than sewn ones.
- Stuff firmly but in small handfuls. Little bits at a time give a smooth, lump-free pillow.
Step-by-Step Instructions
Part 1: Hexagon Motif (make 6 — 3 in Color A, 3 in Color B)
Work with the 6.0 mm hook. Each round is joined with a slip stitch to the first stitch of the round.
Rnd 1: Make a magic ring. Ch 1, work 6 sc into the ring, join with sl st to first sc. (6 sc)
Rnd 2: Ch 1, 2 sc in each st around, join. (12 sc)
Rnd 3: Ch 1, [2 sc in next st, sc in next st] 6 times, join. (18 sc)
Rnd 4: Ch 1, [2 sc in next st, sc in next 2 sts] 6 times, join. (24 sc)
Rnd 5: Ch 1, [2 sc in next st, sc in next 3 sts] 6 times, join. (30 sc)
Rnd 6: Ch 1, [2 sc in next st, sc in next 4 sts] 6 times, join. (36 sc)
Rnd 7: Ch 1, [2 sc in next st, sc in next 5 sts] 6 times, join. (42 sc)
Rnd 8: Ch 1, [2 sc in next st, sc in next 6 sts] 6 times, join. (48 sc)
Rnd 9 (edging): Ch 1, sc in each st around, join with sl st. Fasten off, leaving a 12 in (30 cm) tail for joining. (48 sc)
Each hexagon should measure approx. 4.75 in (12 cm) flat-to-flat. Block lightly if needed.
Part 2: Joining the Hexagons
Arrange the 6 hexagons in a 2x3 grid, alternating colors so no two same-color hexagons touch edge-to-edge (A-B-A over B-A-B).
Join with a whipstitch or sc seam using the long tails: place two hexagons right sides together, matching stitch for stitch along one flat side (8 sts per side), and sew or sc through both layers. Join all internal seams to form a flat panel. Leave the outer edge open.
Part 3: Pillow Back
With the 6.0 mm hook and Color A, work a flat circle to match the joined hexagon panel. Join each round with a sl st.
Rnd 1: Magic ring, 6 sc, join. (6)
Rnd 2: 2 sc in each st, join. (12)
Rnd 3: [2 sc, sc] 6 times, join. (18)
Rnd 4: [2 sc, sc 2] 6 times, join. (24)
Rnd 5: [2 sc, sc 3] 6 times, join. (30)
Rnd 6: [2 sc, sc 4] 6 times, join. (36)
Rnd 7: [2 sc, sc 5] 6 times, join. (42)
Rnd 8: [2 sc, sc 6] 6 times, join. (48)
Rnd 9: [2 sc, sc 7] 6 times, join. (54)
Rnd 10: [2 sc, sc 8] 6 times, join. (60)
Rnd 11: [2 sc, sc 9] 6 times, join. (66)
Rnd 12: [2 sc, sc 10] 6 times, join. (72)
Rnd 13: sc in each st around, join. (72)
Fasten off, leaving a long tail.
Part 4: Assembling the Pillow
Place the hexagon panel and the back circle right sides together, matching outer edges. Join with sc or whipstitch around the perimeter, leaving a 5 in (13 cm) opening. Turn right side out. Stuff firmly with fiberfill (add a small handful of poly-pellets in the bottom if desired for weight). Sew the opening closed. The pillow should measure approx. 13 in (33 cm) across.
Part 5: Gnome Head (5.0 mm hook, Color A)
Worked in a continuous spiral — do not join rounds. Move your stitch marker up each round.
Rnd 1: With A, magic ring, 6 sc. (6)
Rnd 2: 2 sc in each st. (12)
Rnd 3: [2 sc, sc] 6 times. (18)
Rnd 4: [2 sc, sc 2] 6 times. (24)
Rnd 5: [2 sc, sc 3] 6 times. (30)
Rnds 6–10: Sc in each st around. (30)
Rnd 11: [sc2tog, sc 3] 6 times. (24)
Rnd 12: [sc2tog, sc 2] 6 times. (18)
Stuff head firmly with fiberfill.
Rnd 13: [sc2tog, sc] 6 times. (12)
Rnd 14: Sc2tog around. (6)
Fasten off, close remaining hole. Head measures approx. 2.5 in (6 cm) tall.
Part 6: Nose (5.0 mm hook, Color C)
Rnd 1: With C, magic ring, 4 sc. (4)
Rnd 2: 2 sc in each st. (8)
Rnd 3: Sc around. (8)
Stuff lightly, fasten off. Sew nose to the front of the head, centered, about 0.75 in (2 cm) below the top of the head.
Part 7: Gnome Hat (5.0 mm hook, Color B — worked top-down in a spiral)
Rnd 1: Magic ring, 4 sc. (4)
Rnd 2: [2 sc, sc] 2 times. (6)
Rnd 3: [2 sc, sc 2] 2 times. (8)
Rnd 4: [2 sc, sc 3] 2 times. (10)
Rnd 5: [2 sc, sc 4] 2 times. (12)
Rnd 6: [2 sc, sc 5] 2 times. (14)
Rnd 7: [2 sc, sc 6] 2 times. (16)
Rnd 8: [2 sc, sc 7] 2 times. (18)
Rnd 9: [2 sc, sc 8] 2 times. (20)
Rnd 10: [2 sc, sc 9] 2 times. (22)
Rnd 11: [2 sc, sc 10] 2 times. (24)
Rnd 12: [2 sc, sc 11] 2 times. (26)
Rnd 13: [2 sc, sc 12] 2 times. (28)
Rnd 14: [2 sc, sc 13] 2 times. (30)
Rnd 15: Sc in each st around. (30)
Rnd 16: [sc2tog, sc 3] 6 times. (24)
Rnd 17: Sc in each st around. (24)
Rnd 18: [sc2tog, sc 2] 6 times. (18)
Rnd 19: Sc in each st around. (18)
Rnd 20: [sc2tog, sc] 6 times. (12)
Rnd 21: Sc in each st around. (12)
Rnd 22: Sc2tog around. (6)
Fasten off, leaving a long tail. Hat measures approx. 4 in (10 cm) tall. Weave tail through remaining sts and pull closed.
Part 8: Finishing the Gnome
Stuff the hat lightly with a small amount of fiberfill to hold its shape. Place the hat over the top of the head, aligning the hat brim with the head's upper edge; sew in place with matching yarn. Sew the finished gnome head to the center-top point of the pillow, just above the central seam where the hexagons meet, so the gnome appears to peek over the edge. Use a few extra stitches to anchor securely.
Assembly and Finishing
Seaming: Use the long tails you left and a tapestry needle. For the hexagons, hold two pieces right sides together, line up the edge stitches one-for-one, and whipstitch through both layers, catching the top loops only so the seam stays flat. For the pillow, sew around the outer edge with a simple whipstitch, working small, even stitches so no stuffing peeks through.
Weaving in ends: Thread each tail onto the tapestry needle and run it through the back of several stitches (about 1 inch), then change direction and run it back through a few more stitches to lock it. Trim close to the work.
Blocking: Lightly steam the pillow seams to settle the chenille. Do not over-steam the plush yarn; a light hover with steam is enough — hold the iron an inch or two above the surface and never press it down. Let the pillow air-dry completely before using.
Pro Tips and Variations
- Change the palette: Swap dusty rose and grey for sage and cream, mustard and charcoal, or any two chunky chenille colors you love. Keep the alternating checkerboard so the hexagon pattern still reads clearly.
- Adjust the size: For a bigger pillow, add one more increase round to each hexagon (Rnd 10: [2 sc in next st, sc in next 7 sts] 6 times = 54 sc) and add matching rounds to the back circle. For a smaller pillow, stop one round earlier on both.
- Substitute yarn: Any weight-5 chunky yarn works, but plush chenille gives the signature velvety look. If you use a smoother yarn, check your hexagon gauge again, since smooth yarns behave differently.
- Make it a set: Work a second gnome head in a contrasting color and attach it to the opposite corner, or add a small crocheted pom-pom to the hat tip for extra charm.


