Whimsical Woodland Fox Dog Bandana Free Pattern
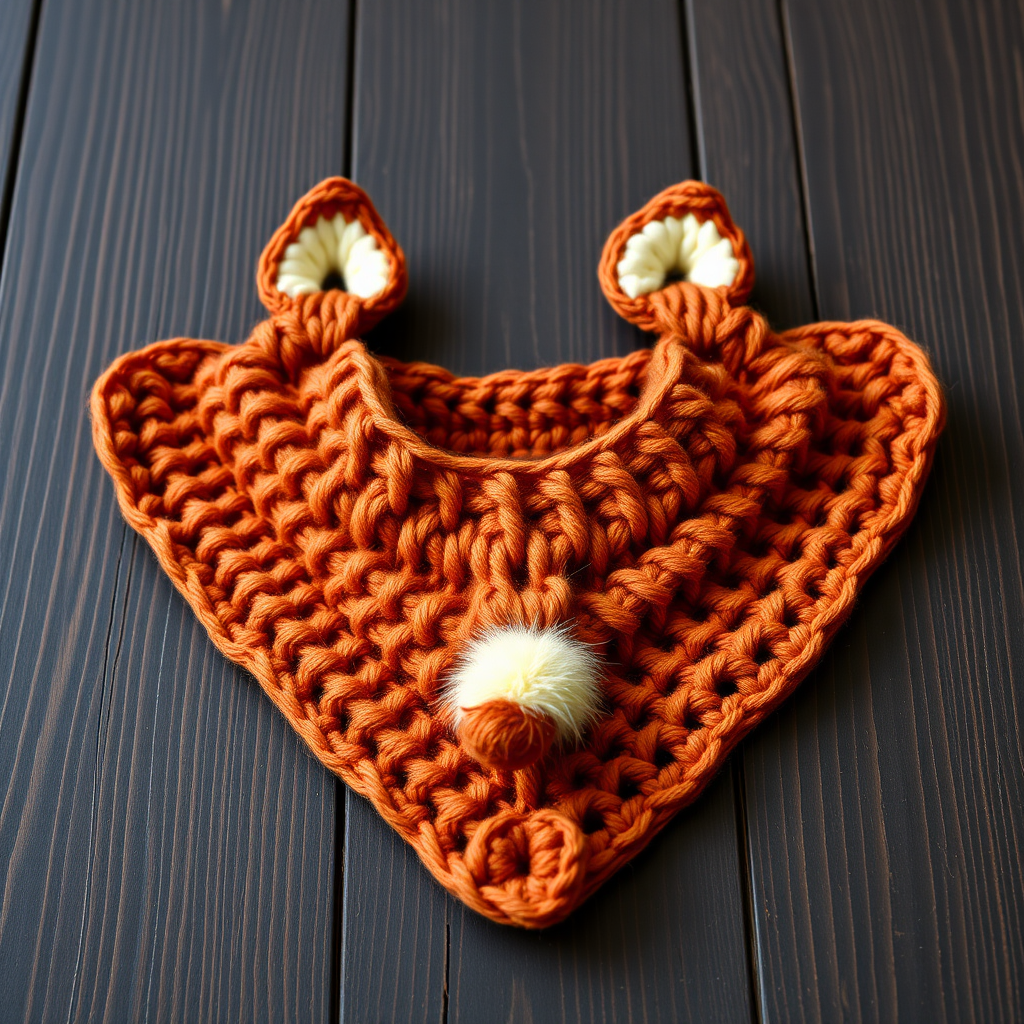
Whimsical Woodland Fox Dog Bandana: A Free Crochet Pattern
Turn your beloved pup into a charming forest creature with this cozy fox-inspired bandana! This unique crochet pattern features a textured ribbed edge, a playful faux fur tail accent, and adorable pointed ears that will make your furry friend the talk of the dog park. Perfect for pet owners who love handmade, nature-themed accessories, this bandana is both stylish and comfortable for your canine companion.
Whether you're a seasoned crocheter or just starting your yarn journey, this pattern is designed to be accessible and enjoyable. The repetitive single crochet stitches create a beautiful, dense fabric that drapes elegantly around your dog's neck, while the clever shaping gives it that classic bandana triangle silhouette. Let's dive into creating this woodland masterpiece!
Materials Needed
Before we begin, gather these supplies to ensure a smooth crocheting experience:
- Yarn: Worsted weight yarn in rust orange, cream, and black (approximately 100g total). Look for a soft, washable yarn that will be comfortable against your dog's fur.
- Crochet Hook: 5.0 mm crochet hook (H-8) – this size creates the perfect balance of drape and structure.
- Fiberfill: A small amount for stuffing the tail accent.
- Yarn Needle: For weaving in ends and sewing pieces together.
- Scissors: For cutting yarn.
- Optional: A small button or bell for extra charm at the center front.
Gauge: 18 single crochet stitches x 20 rows = 4 inches square. Note: Gauge is important for achieving the correct size, but this pattern is forgiving – slight variations will still result in a lovely bandana.
Step-by-Step Instructions
Bandana Body (Worked Flat)
The bandana body is worked in rows, starting from the wide top edge and decreasing toward the point. This creates the classic triangular shape that drapes beautifully around your dog's neck.
Row 1: With rust orange yarn, chain 45. Single crochet (sc) in the 2nd chain from the hook and in each chain across. You should have 44 single crochet stitches.
Row 2: Chain 1, turn. Single crochet in each stitch across. (44 stitches)
Row 3: Chain 1, turn. Single crochet in the first 10 stitches, then work a decrease (sc2tog) over the next 2 stitches, single crochet in the next 20 stitches, sc2tog over the next 2 stitches, single crochet in the last 10 stitches. (42 stitches)
Row 4: Chain 1, turn. Single crochet in each stitch across. (42 stitches)
Row 5: Chain 1, turn. Single crochet in the first 9 stitches, sc2tog, single crochet in the next 20 stitches, sc2tog, single crochet in the last 9 stitches. (40 stitches)
Row 6: Chain 1, turn. Single crochet in each stitch across. (40 stitches)
Row 7: Chain 1, turn. Single crochet in the first 8 stitches, sc2tog, single crochet in the next 20 stitches, sc2tog, single crochet in the last 8 stitches. (38 stitches)
Row 8: Chain 1, turn. Single crochet in each stitch across. (38 stitches)
Row 9: Chain 1, turn. Single crochet in the first 7 stitches, sc2tog, single crochet in the next 20 stitches, sc2tog, single crochet in the last 7 stitches. (36 stitches)
Row 10: Chain 1, turn. Single crochet in each stitch across. (36 stitches)
Row 11: Chain 1, turn. Single crochet in the first 6 stitches, sc2tog, single crochet in the next 20 stitches, sc2tog, single crochet in the last 6 stitches. (34 stitches)
Row 12: Chain 1, turn. Single crochet in each stitch across. (34 stitches)
Row 13: Chain 1, turn. Single crochet in the first 5 stitches, sc2tog, single crochet in the next 20 stitches, sc2tog, single crochet in the last 5 stitches. (32 stitches)
Row 14: Chain 1, turn. Single crochet in each stitch across. (32 stitches)
Row 15: Chain 1, turn. Single crochet in the first 4 stitches, sc2tog, single crochet in the next 20 stitches, sc2tog, single crochet in the last 4 stitches. (30 stitches)
Row 16: Chain 1, turn. Single crochet in each stitch across. (30 stitches)
Row 17: Chain 1, turn. Single crochet in the first 3 stitches, sc2tog, single crochet in the next 20 stitches, sc2tog, single crochet in the last 3 stitches. (28 stitches)
Row 18: Chain 1, turn. Single crochet in each stitch across. (28 stitches)
Row 19: Chain 1, turn. Single crochet in the first 2 stitches, sc2tog, single crochet in the next 20 stitches, sc2tog, single crochet in the last 2 stitches. (26 stitches)
Row 20: Chain 1, turn. Single crochet in each stitch across. (26 stitches)
Row 21: Chain 1, turn. Single crochet in the first 1 stitch, sc2tog, single crochet in the next 20 stitches, sc2tog, single crochet in the last 1 stitch. (24 stitches)
Row 22: Chain 1, turn. Single crochet in each stitch across. (24 stitches)
Row 23: Chain 1, turn. Sc2tog, single crochet in the next 20 stitches, sc2tog. (22 stitches)
Row 24: Chain 1, turn. Single crochet in each stitch across. (22 stitches)
Row 25: Chain 1, turn. Sc2tog, single crochet in the next 18 stitches, sc2tog. (20 stitches)
Row 26: Chain 1, turn. Single crochet in each stitch across. (20 stitches)
Row 27: Chain 1, turn. Sc2tog, single crochet in the next 16 stitches, sc2tog. (18 stitches)
Row 28: Chain 1, turn. Single crochet in each stitch across. (18 stitches)
Row 29: Chain 1, turn. Sc2tog, single crochet in the next 14 stitches, sc2tog. (16 stitches)
Row 30: Chain 1, turn. Single crochet in each stitch across. (16 stitches)
Row 31: Chain 1, turn. Sc2tog, single crochet in the next 12 stitches, sc2tog. (14 stitches)
Row 32: Chain 1, turn. Single crochet in each stitch across. (14 stitches)
Row 33: Chain 1, turn. Sc2tog, single crochet in the next 10 stitches, sc2tog. (12 stitches)
Row 34: Chain 1, turn. Single crochet in each stitch across. (12 stitches)
Row 35: Chain 1, turn. Sc2tog, single crochet in the next 8 stitches, sc2tog. (10 stitches)
Row 36: Chain 1, turn. Single crochet in each stitch across. (10 stitches)
Row 37: Chain 1, turn. Sc2tog, single crochet in the next 6 stitches, sc2tog. (8 stitches)
Row 38: Chain 1, turn. Single crochet in each stitch across. (8 stitches)
Row 39: Chain 1, turn. Sc2tog, single crochet in the next 4 stitches, sc2tog. (6 stitches)
Row 40: Chain 1, turn. Single crochet in each stitch across. (6 stitches)
Fasten off and weave in all loose ends with your yarn needle.
Fox Ears (Make 2)
These adorable pointed ears add the perfect fox-like touch to your bandana. Each ear is worked flat and then sewn onto the top corners.
Row 1: With rust orange yarn, chain 6. Single crochet in the 2nd chain from the hook and in each chain across. (5 single crochet stitches)
Row 2: Chain 1, turn. Single crochet in each stitch across. (5 stitches)
Row 3: Chain 1, turn. Sc2tog, single crochet in the next 1 stitch, sc2tog. (3 stitches)
Row 4: Chain 1, turn. Single crochet in each stitch across. (3 stitches)
Row 5: Chain 1, turn. Sc2tog, single crochet in the last stitch. (2 stitches)
Row 6: Chain 1, turn. Sc2tog. (1 stitch)
Fasten off, leaving a long tail (about 8-10 inches) for sewing the ear onto the bandana. Repeat these steps to create the second ear.
Fox Tail Accent
This playful tail accent adds a whimsical woodland touch to the bottom point of your bandana. Worked in the round, it creates a small, fluffy tail that your pup will love showing off.
Round 1: With cream yarn, make a magic ring. Work 6 single crochet stitches into the ring. (6 stitches)
Round 2: Work 2 single crochet in each stitch around. (12 stitches)
Round 3: (Single crochet in the next stitch, 2 single crochet in the next stitch) repeat around. (18 stitches)
Rounds 4-6: Single crochet in each stitch around. (18 stitches)
Switch to rust orange yarn.
Rounds 7-9: Single crochet in each stitch around. (18 stitches)
Round 10: (Sc2tog, single crochet in the next stitch) repeat around. (12 stitches)
Round 11: Sc2tog around. (6 stitches)
Fasten off, leaving a long tail for sewing. Stuff the tail lightly with fiberfill to give it a plump, fluffy appearance. Set aside.
Assembly
Now it's time to bring all your pieces together to create your woodland masterpiece!
- Attach the Ears: Position one ear on each top corner of the bandana (the wide end). The ears should point upward and slightly outward for that authentic fox look. Using the long tails you left, sew each ear securely to the bandana with your yarn needle. Make sure to stitch through both layers firmly so they stay in place during playtime.
- Attach the Tail: Sew the stuffed tail to the center bottom point of the bandana. Position it so it hangs down naturally from the point. Use the long tail from the tail piece to secure it firmly in place.
- Weave in All Ends: Use your yarn needle to weave in any remaining loose ends, making sure they're hidden within the stitches for a clean finish.
- Optional Embellishment: For extra charm, sew a small button or attach a tiny bell at the center front of the bandana, just above where the tail meets the body.
Tips for the Perfect Fit
This bandana is designed to fit small to medium-sized dogs. If you need to adjust the size, simply add or subtract stitches in multiples of 2 from your starting chain. For a larger bandana, start with more chains; for a smaller one, start with fewer. Remember to adjust the decrease rows accordingly to maintain the triangular shape.
When placing the bandana on your dog, it should drape comfortably around the neck without being too tight. The wide top edge sits at the back of the neck, while the point hangs down the chest. Always supervise your dog when wearing any accessory and remove it during meal times or unsupervised play.
Your Whimsical Woodland Fox Dog Bandana is now complete! This charming accessory is perfect for autumn walks, woodland adventures, or simply showing off your pup's personality at home. The combination of the rich rust orange, cream, and black creates a beautiful, nature-inspired palette that photographs beautifully. Your furry friend will be the most stylish pup in the forest!
Happy crocheting, and enjoy watching your dog strut their stuff in their new handmade woodland accessory!


