Whimsical Woodland Fox Applique Free Pattern
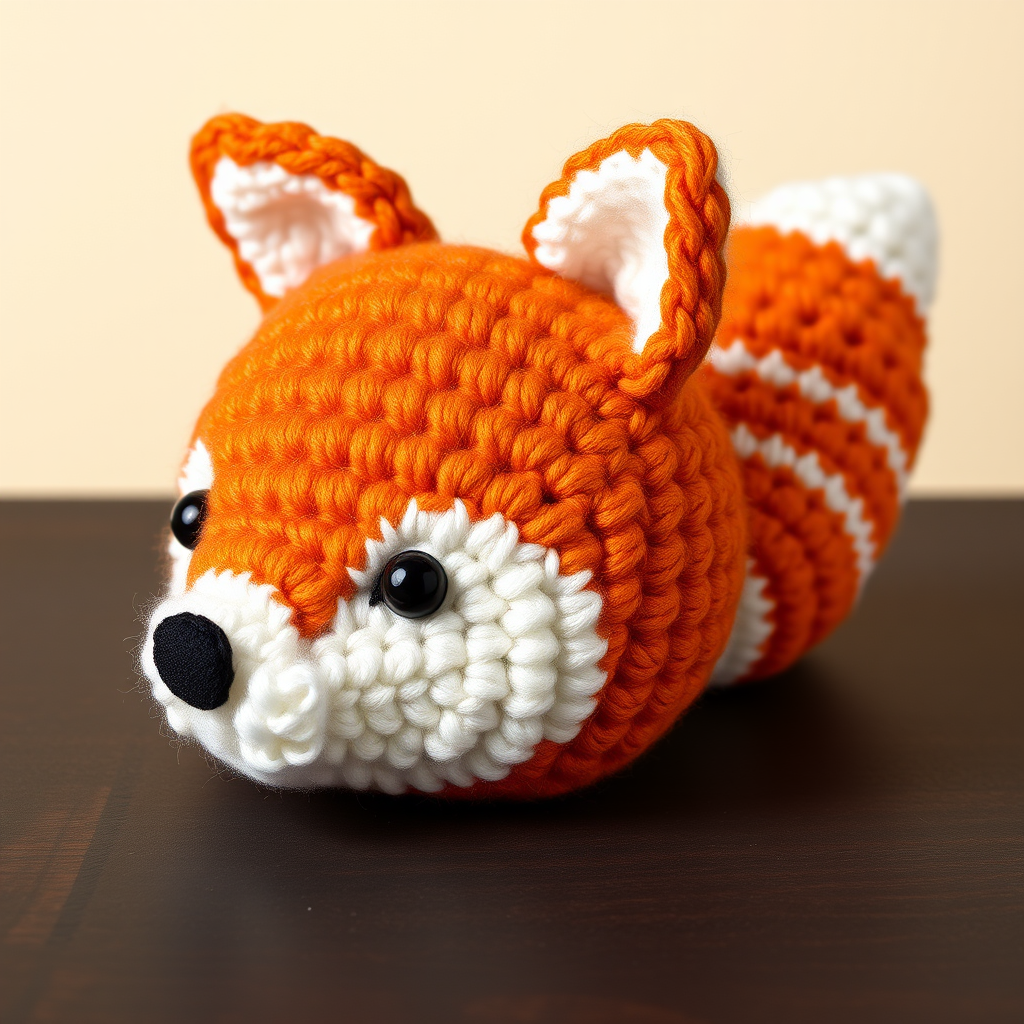
Whimsical Woodland Fox Applique Free Crochet Pattern
Bring a touch of the forest to your favorite handmade projects with this utterly charming crochet fox applique. Whether you're personalizing a child's backpack, adding woodland flair to a cozy blanket, or embellishing a simple tote bag, this sweet-faced fox with its bushy, striped tail is quick to stitch and endlessly adorable. Designed with beginners in mind, this pattern uses basic single crochet stitches and simple shaping to create a plush, dimensional applique that lies flat or can be stuffed lightly for extra puff. Let's gather your supplies and get hooking!
Materials Needed
Before you begin, collect the following supplies. This project is wonderfully portable and uses minimal yarn, making it perfect for using up scrap yarn from your stash.
- Yarn: Worsted weight yarn in three colors: Orange (main body and tail), White (muzzle and tail tip), and Black (for embroidered facial details). A small amount of black yarn or embroidery floss is all you need.
- Crochet Hook: 3.5 mm (E) crochet hook, or whatever size is needed to achieve a tight tension with your chosen yarn.
- Yarn Needle: A tapestry needle with a sharp point for sewing pieces together and weaving in ends.
- Stitch Marker: To keep track of your rounds, especially when working in continuous spirals.
- Stuffing (Optional): A small amount of polyester fiberfill if you wish to lightly stuff the head for a more dimensional look. The pattern works beautifully flat as well.
- Scissors: For cutting yarn.
Gauge: Gauge is not critical for this project. However, aim for a tight, firm tension to prevent the stuffing (if used) from showing through and to create a neat, professional finish.
Step-by-Step Instructions
This pattern is worked in continuous rounds unless otherwise stated. Use a stitch marker to keep track of your rounds. The entire applique is constructed from a few simple pieces: the head, muzzle, ears, and tail.
Head (Make 1)
The head is worked from the center outwards in a spiral, starting with a magic ring.
- Round 1: With orange yarn, make a magic ring, work 6 single crochet (sc) into the ring. Pull the tail to close the ring tightly. (6 stitches)
- Round 2: Work 2 sc in each stitch around. (12 stitches)
- Round 3: *Sc in the next stitch, 2 sc in the next stitch*; repeat from * to * around. (18 stitches)
- Round 4: *Sc in the next 2 stitches, 2 sc in the next stitch*; repeat from * to * around. (24 stitches)
- Round 5: *Sc in the next 3 stitches, 2 sc in the next stitch*; repeat from * to * around. (30 stitches)
- Rounds 6-8: Sc in each stitch around. (30 stitches) – This creates the height of the head.
- Round 9: *Sc in the next 3 stitches, single crochet 2 together (sc2tog)*; repeat from * to * around. (24 stitches)
- Round 10: *Sc in the next 2 stitches, sc2tog*; repeat from * to * around. (18 stitches)
Stuff the head firmly with fiberfill if you are using it. If you prefer a flat applique, skip the stuffing and proceed.
- Round 11: *Sc in the next stitch, sc2tog*; repeat from * to * around. (12 stitches)
- Round 12: Sc2tog around. (6 stitches)
Fasten off, leaving a long tail for sewing. Thread the tail onto a yarn needle, weave it through the front loops of the remaining 6 stitches, and pull tight to close the hole. Secure with a knot and set aside.
Muzzle (Make 1)
The white muzzle is a flat circle that will be sewn onto the front of the head.
- Round 1: With white yarn, make a magic ring, work 6 sc into the ring. (6 stitches)
- Round 2: 2 sc in each stitch around. (12 stitches)
- Round 3: *Sc in the next stitch, 2 sc in the next stitch*; repeat from * to * around. (18 stitches)
Fasten off, leaving a long tail for sewing. This creates a perfect oval base for the fox's face.
Ears (Make 2)
These small triangles are folded to give them a realistic, cupped shape.
- Round 1: With orange yarn, make a magic ring, work 4 sc into the ring. (4 stitches)
- Round 2: 2 sc in each stitch around. (8 stitches)
- Round 3: *Sc in the next stitch, 2 sc in the next stitch*; repeat from * to * around. (12 stitches)
Fasten off, leaving a long tail for sewing. Shaping: Fold each ear in half so the edges meet, and sew the bottom edge together with the tail yarn to create a slight curve. This gives the ear a 3D effect.
Tail (Make 1)
The tail is worked in rows, not rounds, and features a clever color change to create the striped effect.
- Foundation: With orange yarn, chain (ch) 11.
- Row 1: Sc in the 2nd ch from the hook and in each ch across. (10 sc)
- Row 2: Ch 1, turn. Sc in the next 5 stitches, switch to white yarn, sc in the remaining 5 stitches. (10 sc)
- Row 3: Ch 1, turn. With white yarn, sc in the next 5 stitches, switch to orange yarn, sc in the remaining 5 stitches. (10 sc)
Repeat Rows 2 and 3, alternating the colors every row, until the tail measures about 4 inches long. Tip: Carry the yarn you are not using loosely up the side of the tail to avoid cutting and re-joining constantly. Fasten off, leaving a long tail for sewing.
Assembly
Now for the fun part—bringing your fox to life!
- Attach the Muzzle: Position the white muzzle on the front of the head, centered and slightly below the top. Using the long tail from the muzzle, whip stitch it securely around its entire edge to the head.
- Embroider the Face: Using the black yarn or embroidery floss and a yarn needle, embroider a small, filled triangle nose at the top center of the muzzle. Then, embroider two small, curved or round eyes above the muzzle, spaced evenly apart. Tip: For a cuter look, place the eyes slightly lower and wider apart.
- Sew on the Ears: Position the ears on the top of the head, slightly to the sides and angled slightly outward. Using the long tails, sew them securely to the head.
- Attach the Tail: Sew the tail to the back of the head, positioning it so it curves upward naturally. Use the long tail to whip stitch the flat end of the tail to the back of the head, ensuring it is secure.
- Weave in Ends: Weave in all remaining yarn ends securely using your tapestry needle. Trim any excess yarn.
Your whimsical woodland fox applique is now complete! Sew it onto a blanket, a bag, a pillow, or even a simple headband to add a touch of handmade charm. This pattern is a fantastic way to practice color changes and simple amigurumi techniques. Happy crocheting!


