Whimsical Willow the Bunny Rattle Free Pattern
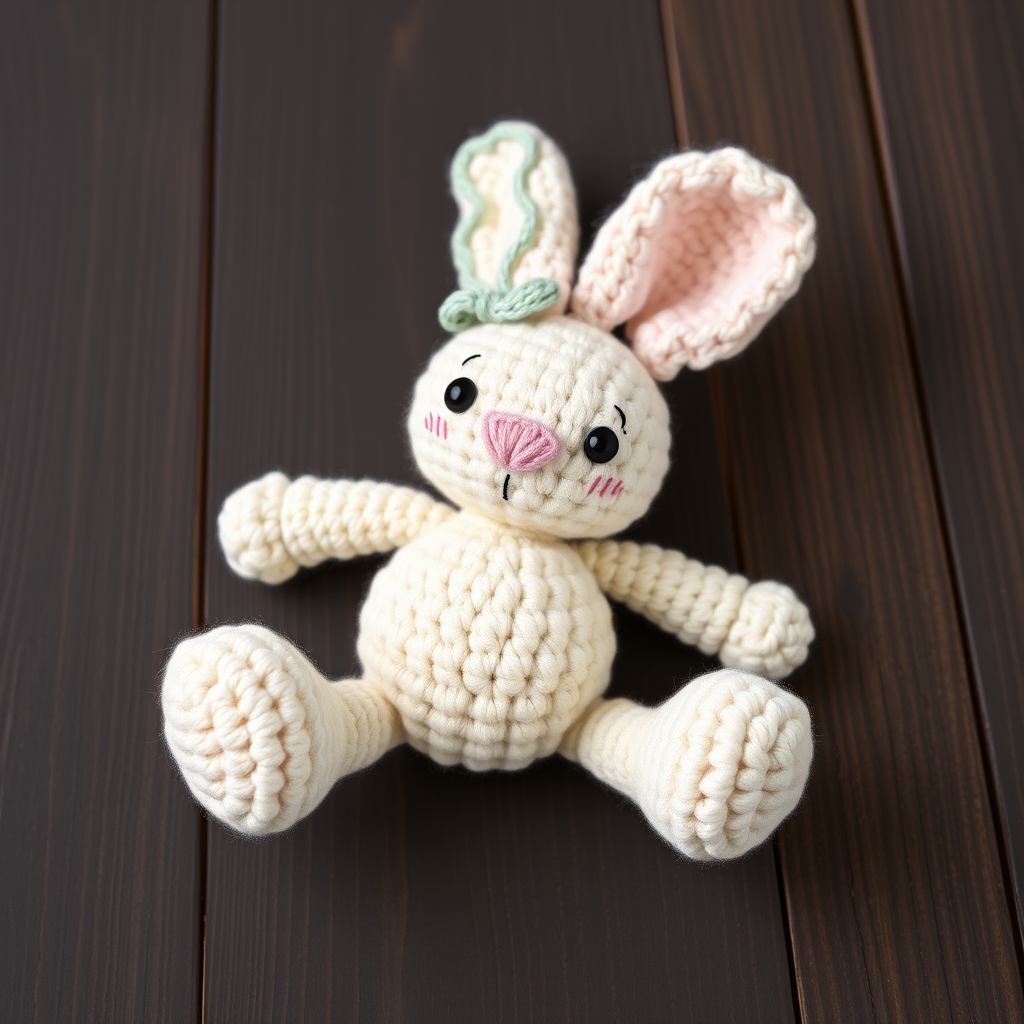
Whimsical Willow the Bunny Rattle: A Beginner-Friendly Heirloom Crochet Pattern
There's something truly magical about creating a handmade gift for a new little one. The Whimsical Willow the Bunny Rattle is more than just a toy—it's a keepsake that will be treasured for years to come. This charming amigurumi project combines the softness of a cuddly companion with the gentle delight of a rattle, making it the perfect sensory toy for babies and a heartfelt gift for baby showers or first birthdays.
Designed with beginners in mind, this pattern uses simple crochet stitches and straightforward shaping to create a bunny with floppy ears, rosy cheeks, and a sweet sage green leaf accent. The dense, tight stitches ensure your stuffing stays hidden, while the worsted weight yarn gives the bunny a plush, huggable texture. Whether you're new to amigurumi or a seasoned crocheter looking for a quick weekend project, Willow is sure to become a favorite in your pattern collection.
Materials Needed
Before you begin, gather the following supplies to ensure a smooth and enjoyable crochet experience:
Yarn
- Cream (worsted weight cotton or acrylic) – for the main body, arms, and legs
- Blush Pink (worsted weight) – for the ears and cheeks
- Sage Green (worsted weight) – for the leaf accent
Hooks & Notions
- G/6 (4.0 mm) crochet hook – for the main body pieces
- H/8 (5.0 mm) crochet hook – optional, for the ears to create a slightly looser fabric
- Yarn needle – for sewing pieces together and weaving in ends
- Scissors – for cutting yarn
- Stitch marker – to keep track of rounds
Additional Supplies
- Safety eyes (8 mm) – or embroidery thread for embroidered eyes
- Polyester fiberfill stuffing – for a firm, cuddly fill
- Plastic rattle insert – or a small bell inside a plastic egg (ensure it's securely sealed)
Gauge
Gauge is not critical for this project, but aim for a tight stitch to prevent stuffing from showing. Approximately 4 single crochet stitches = 1 inch.
Abbreviations
- MR: magic ring
- sc: single crochet
- inc: increase (2 sc in same stitch)
- dec: decrease (sc 2 together)
- sl st: slip stitch
- ch: chain
- FO: fasten off
Step-by-Step Instructions
Follow these detailed instructions carefully, and you'll have your very own Whimsical Willow in no time. Remember to work in continuous rounds unless otherwise noted, and use your stitch marker to keep track of your place.
Head (Cream Yarn)
Using 4.0 mm hook
- Round 1: Make a magic ring, work 6 sc into the ring. (6 stitches)
- Round 2: Increase in each stitch around. (12 stitches)
- Round 3: (sc in next stitch, inc) repeat around. (18 stitches)
- Round 4: (sc in next 2 stitches, inc) repeat around. (24 stitches)
- Round 5: (sc in next 3 stitches, inc) repeat around. (30 stitches)
- Rounds 6-10: Sc in each stitch around for 5 rounds. (30 stitches each round)
- Round 11: (sc in next 3 stitches, dec) repeat around. (24 stitches)
- Round 12: (sc in next 2 stitches, dec) repeat around. (18 stitches)
- Stuff firmly: Insert the plastic rattle insert or bell-filled egg into the head, ensuring it's centered. Add more stuffing around it to create a firm, rounded shape.
- Round 13: (sc in next stitch, dec) repeat around. (12 stitches)
- Round 14: Decrease in each stitch around. (6 stitches)
- FO: Fasten off, leaving a tail. Weave the end through the remaining stitches and pull tight to close. Weave in the end securely.
Body (Cream Yarn)
Using 4.0 mm hook
- Round 1: Make a magic ring, work 6 sc into the ring. (6 stitches)
- Round 2: Increase in each stitch around. (12 stitches)
- Round 3: (sc in next stitch, inc) repeat around. (18 stitches)
- Round 4: (sc in next 2 stitches, inc) repeat around. (24 stitches)
- Rounds 5-8: Sc in each stitch around for 4 rounds. (24 stitches each round)
- Round 9: (sc in next 2 stitches, dec) repeat around. (18 stitches)
- Round 10: (sc in next stitch, dec) repeat around. (12 stitches)
- Stuff firmly: Fill the body with polyester fiberfill, but leave a small opening at the top to attach to the head later.
- FO: Fasten off, leaving a long tail for sewing. Do not close the opening.
Ears (Make 2 – Blush Pink Yarn)
Using 5.0 mm hook for a slightly looser fabric (optional)
- Round 1: Make a magic ring, work 6 sc into the ring. (6 stitches)
- Round 2: Increase in each stitch around. (12 stitches)
- Rounds 3-5: Sc in each stitch around for 3 rounds. (12 stitches each round)
- Round 6: (sc in next stitch, dec) repeat around. (8 stitches)
- Rounds 7-8: Sc in each stitch around for 2 rounds. (8 stitches each round)
- FO: Fasten off, leaving a tail. Do not stuff the ears. Flatten them and sew to the top of the head, slightly angled outward for that adorable floppy look.
Arms (Make 2 – Cream Yarn)
Using 4.0 mm hook
- Round 1: Make a magic ring, work 6 sc into the ring. (6 stitches)
- Round 2: (sc in next stitch, inc) repeat around. (9 stitches)
- Rounds 3-5: Sc in each stitch around for 3 rounds. (9 stitches each round)
- Stuff lightly: Add a small amount of stuffing to give the arms shape.
- Round 6: Dec, then sc in the remaining 7 stitches. (8 stitches)
- Round 7: Sc in each stitch around. (8 stitches)
- FO: Fasten off, leaving a tail. Sew the arms to the sides of the body, just below the neck.
Legs (Make 2 – Cream Yarn)
Using 4.0 mm hook
- Round 1: Make a magic ring, work 6 sc into the ring. (6 stitches)
- Round 2: Increase in each stitch around. (12 stitches)
- Rounds 3-4: Sc in each stitch around for 2 rounds. (12 stitches each round)
- Stuff lightly: Add a small amount of stuffing.
- Round 5: (sc in next stitch, dec) repeat around. (8 stitches)
- Round 6: Sc in each stitch around. (8 stitches)
- FO: Fasten off, leaving a tail. Sew the legs to the bottom front of the body so the bunny can sit upright.
Cheeks (Make 2 – Blush Pink Yarn)
Using 4.0 mm hook
- Make a magic ring, work 6 sc into the ring.
- Slip stitch to close the ring, then fasten off, leaving a tail.
- Sew the cheeks onto the face, just below and to the sides of the eyes.
Leaf Accent (Sage Green Yarn)
Using 4.0 mm hook
- Chain 5.
- Sc in the 2nd chain from the hook.
- Hdc in the next chain.
- Dc in the next chain.
- Hdc in the last chain.
- Chain 1 and turn.
- Work back along the other side: hdc, dc, hdc, sc, then sl st to the end.
- Fasten off, leaving a tail. Sew the leaf onto the top of the head as a whimsical accent.
Assembly
Now that all your pieces are ready, it's time to bring Willow to life. Follow these steps carefully for a polished finish:
- Sew the head to the body: Position the head on top of the body, making sure the rattle is centered. Use the long tail from the body to sew the two pieces together securely, weaving the needle through both pieces in a circular motion.
- Attach the ears: Place the ears on the top of the head, slightly angled outward. Sew them securely using the tails left from the ears.
- Sew on the arms: Position the arms on the sides of the body, just below the neck. Sew them in place, making sure they're symmetrical.
- Attach the legs: Sew the legs to the bottom front of the body so the bunny can sit upright. Make sure they're evenly spaced.
- Add the eyes: If using safety eyes, position them between rounds 5-6 of the head, about 6 stitches apart. Push the safety eyes through the fabric and secure them with the washers on the inside. If embroidering, use black embroidery thread to create small, neat French knots or satin stitches.
- Sew on the cheeks: Attach the blush pink cheeks just below and to the sides of the eyes, using the tails left from the cheeks.
- Attach the leaf: Sew the sage green leaf to the top of the head, between the ears or slightly to one side for a playful look.
- Embroider the mouth: Using a small piece of blush pink or cream yarn, embroider a tiny "v" shape or a simple smile below the eyes.
- Weave in all ends: Use your yarn needle to carefully weave in any remaining loose ends to ensure a clean, professional finish.
Tips for a Perfect Finish
- Keep your tension consistent: Amigurumi looks best when stitches are tight and even. If your stitches are too loose, the stuffing may show through.
- Use a stitch marker: Since you're working in continuous rounds, a stitch marker will help you keep track of where each round begins.
- Stuff as you go: Don't wait until the end to stuff your pieces. Stuff each piece as you complete it to ensure even distribution.
- Secure the rattle well: Make sure the rattle insert is completely enclosed in stuffing so it doesn't shift or poke through the fabric.
Final Thoughts
Your Whimsical Willow the Bunny Rattle is now complete! This adorable, handmade companion is sure to bring joy to any little one and pride to you as the maker. The combination of soft cream, delicate blush pink, and fresh sage green creates a timeless, heirloom-quality aesthetic that will look beautiful in any nursery.
Whether you're making this for your own baby, a grandchild, or as a thoughtful gift, the love and care you've stitched into every single crochet will shine through. Don't forget to tag your creations online—we'd love to see your Whimsical Willow!
Happy crocheting, and may your hooks always be busy with joy!


