Sunset Serape Woven Collar Necklace Free Pattern
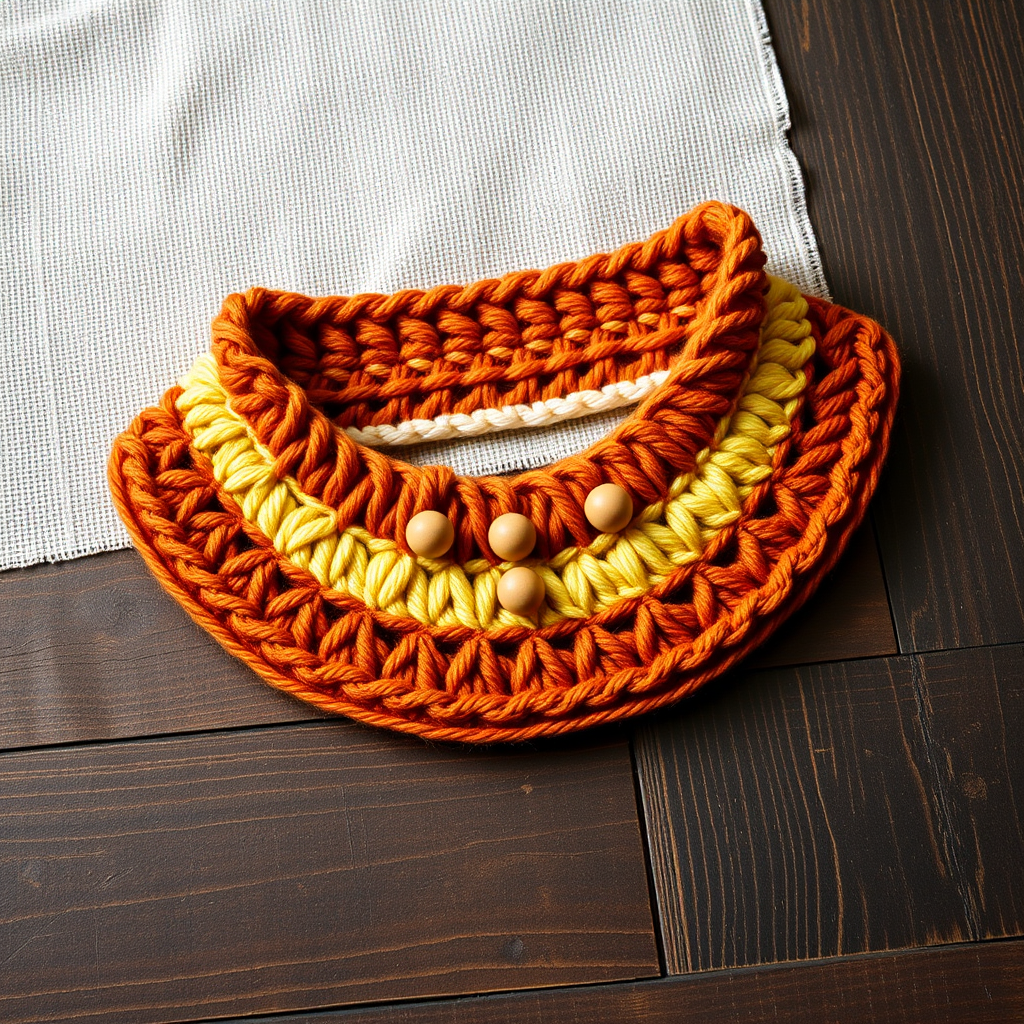
Sunset Serape Woven Collar Necklace: A Free Boho Knitting Pattern
Wrap yourself in the warm hues of a desert sunset with this stunning knitted collar necklace. Featuring a rich tapestry of earthy tones—terracotta, golden yellow, burnt orange, cream, and deep teal—this unique piece combines the comfort of a soft cowl with the elegance of statement jewelry. The woven slip-stitch texture creates a subtle geometric, diamond-like effect that mimics a miniature serape blanket, while five matte wooden beads add a natural, earthy accent at the center front. Perfect for adding a handcrafted, bohemian touch to any outfit, this pattern is approachable for confident beginners and makes a memorable handmade gift.
Materials Needed
Before you begin, gather the following supplies to ensure a smooth knitting experience:
- Yarn: Worsted weight cotton yarn in 5 colors (approximately 50 yards each):
- Color A: Terracotta
- Color B: Golden Yellow
- Color C: Burnt Orange
- Color D: Cream
- Color E: Deep Teal
- Needles: US Size 7 (4.5 mm) knitting needles
- Notions: Tapestry needle for weaving ends, 5 matte wooden beads (with holes large enough to fit your yarn), stitch markers (optional)
- Gauge: 20 stitches and 28 rows = 4 inches in stockinette stitch (for accurate sizing, always check your gauge)
Finished Size & Abbreviations
Finished Size: Approximately 16 inches around the neck and 4 inches wide at the center front, tapering to 2 inches at the back.
Abbreviations:
- CO: Cast on
- K: Knit
- P: Purl
- St(s): Stitch(es)
- Sl: Slip stitch (slip one stitch purlwise with yarn in back)
- M1: Make one (increase by picking up the bar between stitches and knitting through the back loop)
- K2tog: Knit two stitches together (decrease)
- RS: Right side
- WS: Wrong side
Step-by-Step Instructions
This knitted collar necklace is worked flat in one piece, then seamed at the back. The design uses a simple slip stitch technique to create a woven, tapestry-like fabric that lies flat and drapes beautifully. Follow each section carefully, and you'll have a gorgeous statement piece in no time.
Section 1: Back Left Strap
With Color A (Terracotta), CO 10 sts.
- Row 1 (WS): K all sts.
- Row 2 (RS): K all sts.
Repeat Rows 1-2 until piece measures 4 inches from CO edge, ending with a WS row. This creates a garter stitch strap that will sit at the back of your neck.
Section 2: Increase for Center Front
Now we'll shape the piece to widen toward the front of the necklace.
- Next Row (RS): K1, M1, K to last st, M1, K1. (12 sts)
- Next 2 Rows: Work in stockinette (K on RS, P on WS).
- Increase Row (RS): K1, M1, K to last st, M1, K1. (14 sts)
- Next 3 Rows: Work even in stockinette.
- Increase Row (RS): K1, M1, K to last st, M1, K1. (16 sts)
- Next 3 Rows: Work even in stockinette.
- Increase Row (RS): K1, M1, K to last st, M1, K1. (18 sts)
Work even in stockinette until piece measures 8 inches from CO edge, ending with a WS row. You now have 18 stitches and the piece is at its widest point, ready for the colorwork.
Section 3: Colorwork Pattern (First Panel)
Now begin the serape-inspired colorwork section. You will work in a slip stitch pattern, carrying the unused color along the side edge. Do not cut yarn between color changes—just pick up the new color and let the old one hang; you'll weave in ends later.
- Row 1 (RS): With Color B (Golden Yellow), K all sts.
- Row 2 (WS): With Color B, P all sts.
- Row 3 (RS): With Color C (Burnt Orange), K1, *Sl 1, K1; repeat from * to last st, K1.
- Row 4 (WS): With Color C, P1, *Sl 1, P1; repeat from * to last st, P1.
- Row 5 (RS): With Color B, K all sts.
- Row 6 (WS): With Color B, P all sts.
- Row 7 (RS): With Color D (Cream), K1, *Sl 1, K1; repeat from * to last st, K1.
- Row 8 (WS): With Color D, P1, *Sl 1, P1; repeat from * to last st, P1.
- Row 9 (RS): With Color C, K all sts.
- Row 10 (WS): With Color C, P all sts.
- Row 11 (RS): With Color E (Deep Teal), K1, *Sl 1, K1; repeat from * to last st, K1.
- Row 12 (WS): With Color E, P1, *Sl 1, P1; repeat from * to last st, P1.
- Row 13 (RS): With Color D, K all sts.
- Row 14 (WS): With Color D, P all sts.
- Row 15 (RS): With Color A, K1, *Sl 1, K1; repeat from * to last st, K1.
- Row 16 (WS): With Color A, P1, *Sl 1, P1; repeat from * to last st, P1.
Repeat Rows 1-16 once more, then repeat Rows 1-8 once. This creates a rich, striped woven texture. End after a WS row.
Section 4: Center Front Bead Accent
Now you'll add the beautiful bead accents along the center front. First, thread 5 beads onto your Color B yarn before starting this section. Slide them down out of the way.
- Next Row (RS): With Color B, K all sts.
- Next Row (WS): With Color B, P all sts.
- Row 1 (RS): With Color B, K1, *slide a bead up to the needle, K1; repeat from * to last st, K1. (You will have 5 beads evenly spaced across the row)
- Row 2 (WS): With Color B, P all sts.
- Row 3 (RS): With Color B, K all sts.
- Row 4 (WS): With Color B, P all sts.
The beads will sit on the right side of the work, creating a lovely natural accent at the center front.
Section 5: Second Colorwork Panel (Mirrored)
Now repeat the colorwork sequence to create a mirrored effect on the other side of the beads. This time, start with Color E and follow the sequence: E, D, C, B, A, then repeat.
- Row 1 (RS): With Color E, K all sts.
- Row 2 (WS): With Color E, P all sts.
- Row 3 (RS): With Color D, K1, *Sl 1, K1; repeat from * to last st, K1.
- Row 4 (WS): With Color D, P1, *Sl 1, P1; repeat from * to last st, P1.
- Row 5 (RS): With Color E, K all sts.
- Row 6 (WS): With Color E, P all sts.
- Row 7 (RS): With Color C, K1, *Sl 1, K1; repeat from * to last st, K1.
- Row 8 (WS): With Color C, P1, *Sl 1, P1; repeat from * to last st, P1.
- Row 9 (RS): With Color D, K all sts.
- Row 10 (WS): With Color D, P all sts.
- Row 11 (RS): With Color B, K1, *Sl 1, K1; repeat from * to last st, K1.
- Row 12 (WS): With Color B, P1, *Sl 1, P1; repeat from * to last st, P1.
- Row 13 (RS): With Color C, K all sts.
- Row 14 (WS): With Color C, P all sts.
- Row 15 (RS): With Color A, K1, *Sl 1, K1; repeat from * to last st, K1.
- Row 16 (WS): With Color A, P1, *Sl 1, P1; repeat from * to last st, P1.
Repeat Rows 1-16 once more, then repeat Rows 1-8 once. End after a WS row. This mirrored panel balances the design beautifully.
Section 6: Decrease for Back Right Strap
Now we'll shape the piece back down for the right strap that goes behind your neck.
- Next 2 Rows: With Color A, work in stockinette (K on RS, P on WS).
- Decrease Row (RS): K1, K2tog, K to last 3 sts, K2tog, K1. (16 sts)
- Next 3 Rows: Work even in stockinette.
- Decrease Row (RS): K1, K2tog, K to last 3 sts, K2tog, K1. (14 sts)
- Next 3 Rows: Work even in stockinette.
- Decrease Row (RS): K1, K2tog, K to last 3 sts, K2tog, K1. (12 sts)
- Next 3 Rows: Work even in stockinette.
- Decrease Row (RS): K1, K2tog, K to last 3 sts, K2tog, K1. (10 sts)
Work even in stockinette until piece measures 8 inches from the start of the decrease section, ending with a WS row. This strap should match the length of the first strap.
Section 7: Finishing
Your knitting is complete—now it's time to assemble your necklace.
- Bind Off: Bind off all sts loosely. Weave in all ends using a tapestry needle, being careful to secure them on the wrong side of the work.
- Seam: Fold the piece in half with the right sides together, matching the CO and BO edges. Sew the side seams together using a mattress stitch, but leave a 1-inch opening at the center back for easy on/off. This opening will be at the back of your neck.
- Turn: Turn the piece right side out through the opening.
- Block: Block gently to shape. Lay flat and lightly steam or mist with water, then allow to dry completely. This will help the slip-stitch pattern lie flat and even.
- Optional Closure: Add a small button or decorative clasp at the back opening for a secure closure, or simply leave it open for an easy pull-over style.
Your Sunset Serape Woven Collar Necklace is now ready to wear! The rich, earthy tones and textured weave make it a versatile accessory that pairs beautifully with denim, linen, or a simple tee. Enjoy your handcrafted piece of wearable art—and don't be surprised when friends ask where you bought it!


