Sunset Ombre Fingerless Gloves Free Pattern
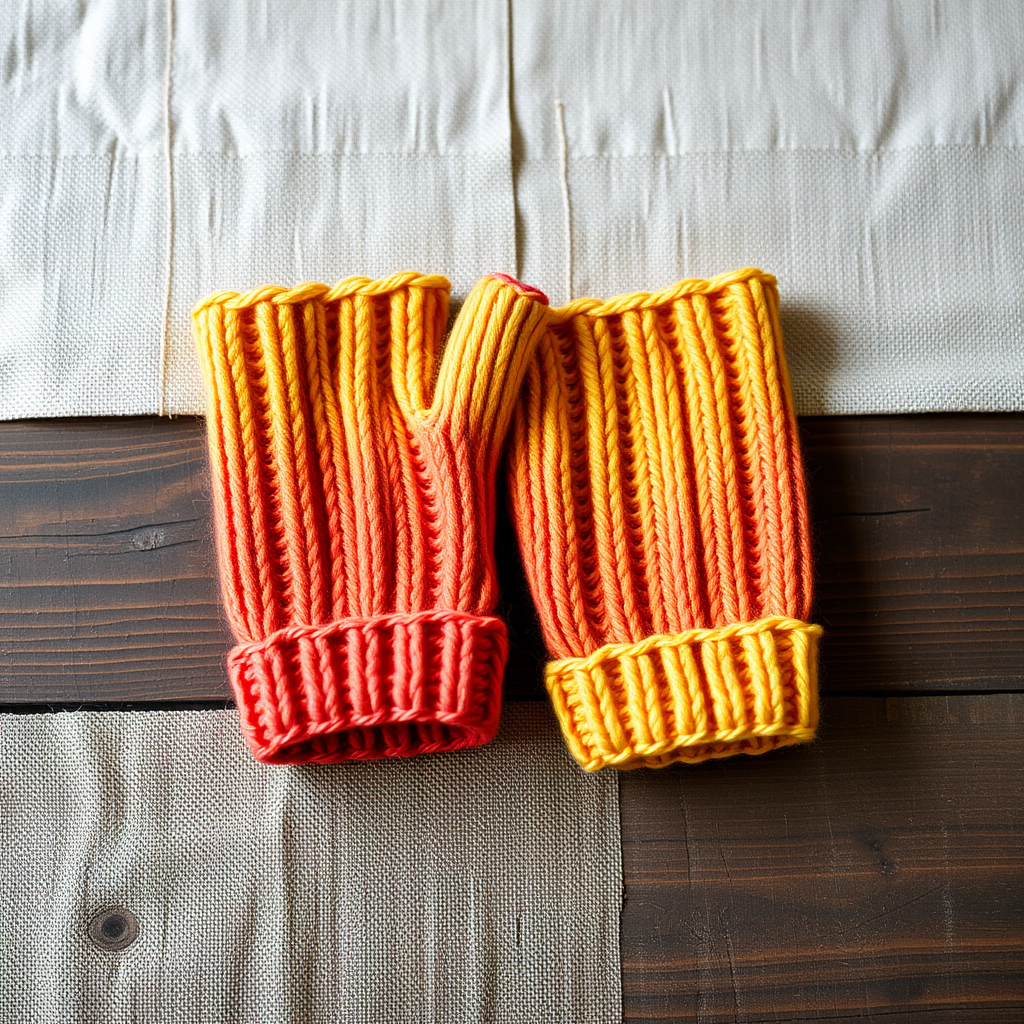
Sunset Ombre Fingerless Gloves: A Free Beginner-Friendly Knitting Pattern
Wrap your hands in the warm hues of a summer sunset with these absolutely stunning gradient fingerless gloves. This free knitting pattern is perfect for crafters looking to dip their toes into colorwork without the complexity of stranded knitting. By simply switching yarn colors at strategic points, you'll create a beautiful ombre effect that transitions from a vibrant coral at the wrist, through a soft peach, and finally to a rich golden yellow at the top of the hand.
Knitted in the round using a simple K2, P2 ribbed texture, these gloves are both stylish and incredibly practical for transitional weather. Whether you're typing at a desk, reading a book with a warm cup of tea, or heading out for a crisp autumn walk, these arm warmers will keep your hands cozy while leaving your fingers free. The pattern is rated as beginner-friendly, making it an excellent second or third project for new knitters who have mastered the basics and are ready to try working in the round.
The ribbed texture not only looks sophisticated but also provides excellent stretch and recovery, ensuring a snug yet comfortable fit. The gradient effect is achieved effortlessly through simple color changes, making this pattern accessible even to those who have never worked with multiple colors before. Let's dive into this delightful project that will have you creating a beautiful accessory that looks like it came straight from a high-end boutique.
Materials Needed
Before you begin your knitting journey, gather the following materials. This project requires minimal supplies, making it an affordable and accessible craft. Here is exactly what you will need:
Yarn
- Worsted weight yarn in 3 coordinating colors – approximately 150 yards total. For the sunset effect, choose colors like:
- Color A (Coral): A warm, vibrant coral orange – approximately 50 yards
- Color B (Peach): A soft, muted peach – approximately 50 yards
- Color C (Gold): A rich, sunny golden yellow – approximately 50 yards
Pro tip: Any worsted weight yarn (CYC #4) will work beautifully. Acrylic, wool, cotton, or blends are all suitable. Choose a yarn with good stitch definition to showcase the ribbed texture.
Needles
- US 7 (4.5 mm) double-pointed needles (DPNs) – a set of 4 or 5 needles
- OR a circular needle (16-inch or longer) if you prefer the magic loop method
Notions
- Stitch markers (at least 2)
- Stitch holder or scrap yarn for holding thumb stitches
- Tapestry needle for weaving in ends
- Scissors
Gauge
- 20 stitches and 26 rows = 4 inches in stockinette stitch (knit every round)
Important: While gauge is provided, this pattern is quite forgiving. The ribbed texture is stretchy, so slight variations in gauge will still result in a well-fitting glove. However, for the best results, take a moment to knit a small swatch to ensure your tension matches.
Step-by-Step Instructions
This pattern is worked from the wrist upward, in the round. The ombre effect is created by changing colors at specific intervals. Follow these detailed instructions carefully, and you'll have a beautiful pair of gloves in no time.
Pattern Information
- Finished Size: One size fits most women (approximately 7 inches circumference, 10 inches length)
- Abbreviations: CO = cast on, K = knit, P = purl, K2tog = knit two together, PM = place marker, SM = slip marker, M1 = make one (increase)
- Pattern Notes: Worked in the round from the wrist up. Use a stretchy cast-on like the long-tail method. Color changes create the ombre effect.
Getting Started: The Cuff (Color A – Coral)
Step 1: Cast On
Using Color A (Coral), CO 40 stitches using the long-tail cast-on method. This stretchy cast-on is essential for the cuff to easily slip over your hand. Take your time with this step to ensure an even, elastic edge.
Step 2: Distribute Stitches
If using double-pointed needles, distribute the 40 stitches evenly across 3 or 4 needles (for example, 13-13-14 stitches per needle). If using the magic loop method, slide half the stitches onto each side of the circular needle.
Step 3: Join in the Round
Place a stitch marker (PM) to indicate the beginning of the round. Join the round by knitting the first stitch from your left needle with the working yarn from your right needle. Critical: Be extremely careful not to twist your stitches when joining. Lay your work flat and ensure the cast-on edge is facing the same direction all the way around before joining.
Step 4: Work the Ribbing
Rounds 1-10: *K2, P2* repeat to end of round. This creates the classic ribbed cuff. Continue this pattern for a total of 10 rounds. The ribbing will naturally pull in slightly, creating a snug yet comfortable fit around your wrist.
Transition to Color B (Peach)
Step 5: Change Colors
At the end of Round 10, cut Color A, leaving a 6-inch tail for weaving in later. Join Color B (Peach) by simply starting to knit with the new yarn. You can tie a loose knot to secure it, or simply hold the new yarn alongside the old and knit a few stitches to secure it.
Step 6: Continue Ribbing
Rounds 11-20: *K2, P2* repeat to end of round. Continue the same ribbed pattern for 10 more rounds. You'll see the beautiful peach color begin to take over, creating the first color transition of your ombre effect.
Transition to Color C (Gold)
Step 7: Change Colors Again
At the end of Round 20, cut Color B, leaving a 6-inch tail. Join Color C (Gold) in the same manner as before.
Step 8: Continue Ribbing
Rounds 21-30: *K2, P2* repeat to end of round. Complete 10 more rounds of ribbing in the golden yellow. At this point, your work should measure approximately 4 inches from the cast-on edge, and you'll have a beautiful gradient from coral to peach to gold.
Thumb Gusset (Worked in Color C – Gold)
Now we'll create the thumb opening using a technique called a gusset. This involves increasing stitches gradually to create a wedge shape that accommodates your thumb.
Step 9: Begin Increases
Round 31: K20, PM, M1 (make one by lifting the bar between stitches and knitting through the back loop), K2, M1, PM, K18. (42 stitches total)
Explanation: You're placing markers around a 2-stitch section that will become the center of your thumb gusset. The M1 increases add one stitch on each side of this section.
Step 10: Work Even Round
Round 32: K all stitches. This round has no increases, allowing the gusset to form gradually.
Step 11: Continue Increasing
Round 33: K20, SM, M1, K4, M1, SM, K18. (44 stitches total)
Explanation: Notice that the section between markers has grown from 2 stitches to 4 stitches. Each increase round adds 2 stitches to this section.
Step 12: Work Even Round
Round 34: K all stitches.
Step 13: Continue the Pattern
Round 35: K20, SM, M1, K6, M1, SM, K18. (46 stitches total)
Round 36: K all stitches.
Step 14: Keep Increasing
Round 37: K20, SM, M1, K8, M1, SM, K18. (48 stitches total)
Round 38: K all stitches.
Step 15: Final Increase Round
Round 39: K20, SM, M1, K10, M1, SM, K18. (50 stitches total)
Round 40: K all stitches.
At this point, you should have 12 stitches between your markers (the original 2 stitches plus 10 increased stitches). This section will become your thumb.
Separate the Thumb
Step 16: Divide Stitches
Round 41: K20, remove marker, place next 12 stitches on a stitch holder or scrap yarn, remove marker, K18. (38 stitches remain on needles)
Explanation: You're now removing the thumb stitches from the main needle and holding them aside. The remaining 38 stitches will form the hand section of the glove.
Hand Section (Continuing in Color C – Gold)
Step 17: Resume Ribbing
Rounds 42-50: *K2, P2* repeat to end of round. Continue the ribbed pattern for 9 more rounds. This creates the section that covers your hand, just above the thumb.
Transition Back to Color B (Peach)
Step 18: Change Colors
At the end of Round 50, cut Color C, leaving a 6-inch tail. Join Color B (Peach) again.
Step 19: Continue Ribbing
Rounds 51-60: *K2, P2* repeat to end of round. Work 10 rounds in peach, creating the second color transition of your ombre effect.
Transition Back to Color A (Coral)
Step 20: Final Color Change
At the end of Round 60, cut Color B, leaving a 6-inch tail. Join Color A (Coral) for the final time.
Step 21: Complete the Hand Section
Rounds 61-70: *K2, P2* repeat to end of round. Work 10 rounds in coral to complete the hand section. Your glove should now measure approximately 9 inches from the cast-on edge.
Binding Off
Step 22: Stretchy Bind-Off
Bind off loosely in pattern (K2, P2) using a stretchy bind-off method. We recommend either the sewn bind-off or Jeny's Surprisingly Stretchy Bind-Off. A regular bind-off may be too tight and prevent the glove from fitting over your hand comfortably.
For the sewn bind-off: Cut yarn leaving a tail 3 times the circumference of your work. Thread onto a tapestry needle. Insert the needle purlwise into the first stitch, pull through. Then insert knitwise into the second stitch, pull through. Continue alternating, removing each stitch from the knitting needle as you go.
For Jeny's Surprisingly Stretchy Bind-Off: Before working each stitch, yarn over (increase) first. K2tog or P2tog through the back loop to decrease. This creates a very elastic edge.
Thumb
Step 23: Transfer Thumb Stitches
Transfer the 12 thumb stitches from the stitch holder or scrap yarn back onto your double-pointed needles or circular needle.
Step 24: Pick Up Gap Stitches
Pick up 2 stitches from the gap where the thumb meets the hand to avoid holes. (14 stitches total)
Explanation: Insert your needle into the space between the thumb and hand stitches, wrap the yarn around, and pull through to create a new stitch. This closes any gaps and makes the thumb opening seamless.
Step 25: Work Thumb Ribbing
Rounds 1-8: *K2, P2* repeat to end of round. Work 8 rounds of ribbing around the thumb opening.
Step 26: Bind Off Thumb
Bind off loosely in pattern (K2, P2) using the same stretchy bind-off method you used for the top of the glove.
Finishing
Step 27: Weave in Ends
Using your tapestry needle, weave in all loose ends carefully. Thread each tail through the inside of the glove, following the path of the stitches for about 2 inches. Trim any excess yarn.
Step 28: Block Lightly (Optional)
If desired, block your gloves lightly to even out the stitches and set the shape. To wet block, soak the gloves in lukewarm water with a mild wool wash, gently squeeze out excess water (do not wring), and lay flat to dry on a towel. Reshape gently while damp.
Step 29: Repeat for Second Glove
Repeat the entire pattern to create the second glove. Remember that the thumb gusset is worked on the same side for both gloves, so they will be identical rather than mirror images. This is perfectly fine for fingerless gloves and is actually the standard for this style.
Tips for Success
- Stitch markers are your friends: Don't skip placing markers at the beginning of the round and around the thumb gusset. They'll help you keep track of your progress and prevent mistakes.
- Keep your tension consistent: When changing colors, be careful not to pull the new yarn too tightly, as this can cause puckering. Give the work a gentle tug after each color change to ensure even tension.
- Try it on as you go: Once you've separated the thumb, try the glove on to check the fit. If it feels too tight, you can add a few extra rounds before binding off. If it's too loose, you can work fewer rounds.
- Choose your colors wisely: For the best sunset effect, select three shades that are close in tone but distinct in hue. Test your color combination by holding the yarns together before you begin.
These Sunset Ombre Fingerless Gloves make a wonderful gift for friends and family, or a delightful treat for yourself. The gradient effect is sure to draw compliments, and the simple ribbed pattern makes them a relaxing, meditative knit. Once you've mastered this pattern, you can experiment with different color combinations to create gloves for every season and occasion. Happy knitting!


