Sunny Meadow Sundress Free Knitting Pattern – Gathered Yoke & Flutter Sleeves
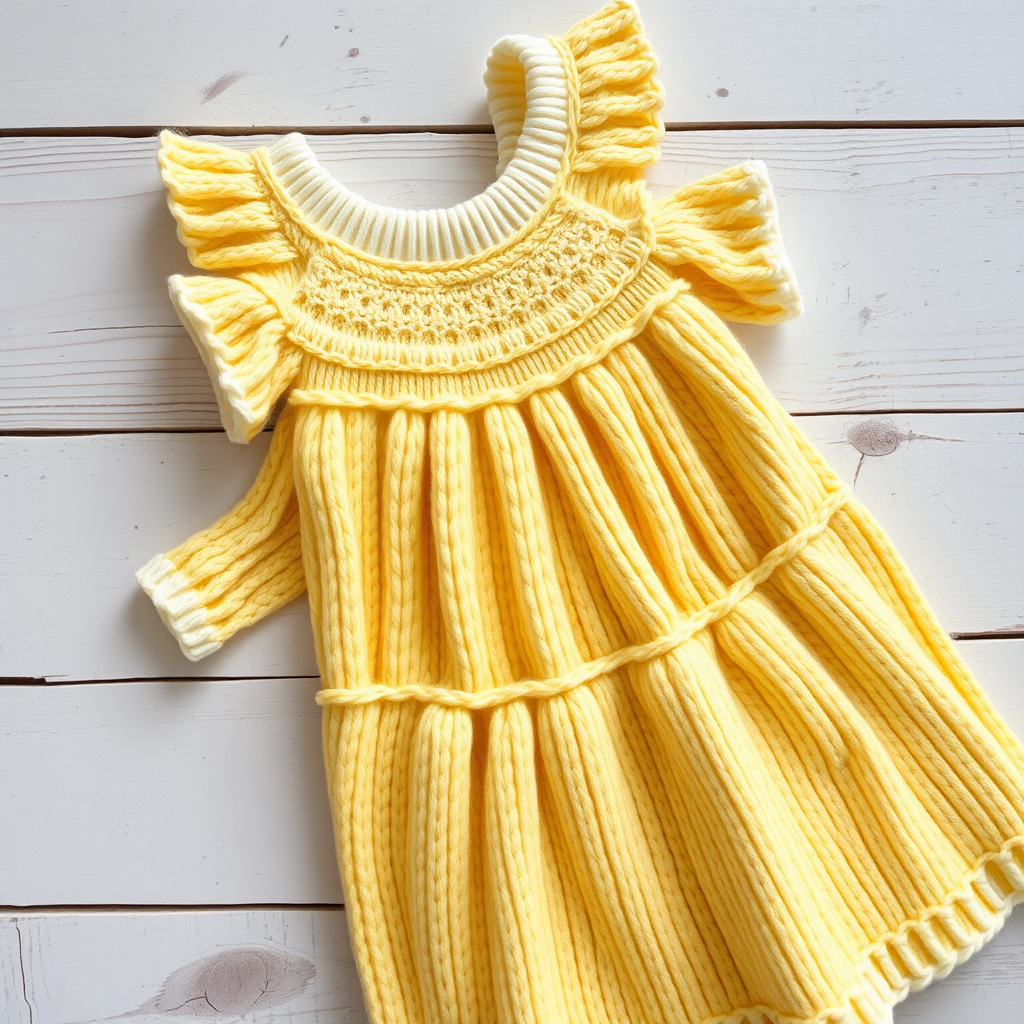
Sunny Meadow Sundress: A Heirloom Knitting Pattern for Little Ones
There's something truly magical about knitting a garment for a child—especially one that captures the carefree spirit of summer. The Sunny Meadow Sundress is a breezy, heirloom-quality piece designed for warm-weather playdates, family picnics, and everything in between. With its sweet gathered yoke, delicate eyelet lace, and flutter sleeves, this dress is knit in soft, breathable cotton that keeps little ones comfortable all day long. Whether you're a seasoned knitter or a confident beginner ready for a rewarding project, this free pattern will guide you through creating a charming wardrobe staple that will be treasured for years to come.
The design features a sunny yellow bodice with a cream-colored ribbed neckline and hem, creating a classic, timeless palette. The seed stitch texture and eyelet details add just the right amount of whimsy, making this dress perfect for both everyday wear and special occasions. Let's dive into this delightful knitting adventure!
Materials Needed
Before you begin, gather the following materials to ensure a smooth knitting experience:
- Yarn: Worsted weight cotton yarn (e.g., Lion Brand 24/7 Cotton) in 2 colors:
- Main Color (MC): Sunny Yellow
- Contrast Color (CC): Cream
- Needles:
- US 6 (4.0 mm) 16-inch circular needle and double-pointed needles (DPNs) for the yoke
- US 5 (3.75 mm) needles for ribbing
- Gauge: 20 stitches and 28 rows = 4 inches in stockinette stitch on US 6 needles
- Notions: Stitch markers, waste yarn, tapestry needle for weaving in ends, scissors
Pro tip: Always knit a gauge swatch before starting to ensure your finished dress matches the intended measurements. Blocking your swatch will give you the most accurate results.
Step-by-Step Instructions
Sizes & Measurements
This pattern is available in four sizes: 12-18 months (2T, 3T, 4T)—shown in 2T. Finished chest measurements are 20 (21, 22, 23) inches, with a length of 15 (16, 17, 18) inches from shoulder to hem.
Abbreviations
Familiarize yourself with these standard knitting abbreviations before you begin:
- k = knit
- p = purl
- k2tog = knit two together (decrease)
- yo = yarn over (increase and creates eyelet hole)
- pm = place marker
- sm = slip marker
- rnd = round
- RS = right side
- WS = wrong side
- kfb = knit front and back (increase)
Yoke (Knit in the Round from Neck Down)
Step 1: Cast On & Ribbing
With your Contrast Color (CC) and the smaller circular needle (US 5), cast on 72 (76, 80, 84) stitches. Join in the round, being very careful not to twist your stitches. Place a marker at the beginning of the round to track your progress.
Work k1, p1 ribbing for 4 rounds. This creates a neat, stretchy neckline that will sit comfortably against your little one's skin.
Step 2: Switch to Main Color & Eyelet Round
Switch to the larger needle (US 6) and your Main Color (MC) Sunny Yellow. Knit one round plain to establish the stockinette stitch.
Round 2 (Eyelet Round): *K1, yo, k2tog* repeat to end of round. This creates a delicate row of eyelet holes that will later be used to thread a ribbon if desired.
Rounds 3-4: Knit all stitches. You've now completed the first eyelet pattern repeat.
Step 3: Increase for Yoke
Now we'll shape the yoke to accommodate a growing chest. Place markers after every 18 (19, 20, 21) stitches—you'll have 4 markers total, including your beginning-of-round marker.
Increase Round: *Knit to 1 stitch before marker, kfb (knit front and back), slip marker, kfb* repeat 3 more times, then knit to end of round. This adds 8 stitches per increase round.
Repeat this increase round every 4th round 5 (6, 7, 8) more times. After all increases, you should have 120 (132, 144, 156) stitches on your needles.
Step 4: Work Even
Continue in stockinette stitch (knit every round) without further increases until the yoke measures 4.5 (5, 5.5, 6) inches from the cast-on edge. This creates the gathered look at the top of the dress.
Divide for Body and Sleeves
This is the exciting part where the dress begins to take shape! On your next round, you'll separate the sleeve stitches from the body:
Next Round: Knit 18 (20, 22, 24) stitches for the back, place the next 24 (26, 28, 30) stitches on waste yarn for the sleeve, cast on 6 (6, 8, 8) stitches under the arm, knit 36 (40, 44, 48) stitches for the front, place the next 24 (26, 28, 30) stitches on waste yarn for the second sleeve, cast on 6 (6, 8, 8) stitches under the arm, then knit the remaining 18 (20, 22, 24) stitches for the back.
You should now have 84 (92, 104, 112) stitches for the body. Place a marker to indicate the beginning of the round.
Body (Knit in the Round)
Step 1: Stockinette Base
Work in stockinette stitch (knit every round) for 2 inches from the underarm. This creates a smooth, comfortable fit around the chest.
Step 2: Eyelet Lace Pattern
Now we'll add the signature eyelet lace detail that gives this dress its charming, airy feel:
- Round 1: *K1, yo, k2tog* repeat to end of round.
- Rounds 2-4: Knit all stitches.
Repeat these 4 rounds until the body measures 8 (9, 10, 11) inches from the underarm, always ending with a Round 4 (plain knit round). This ensures the pattern flows seamlessly.
Step 3: Ribbed Hem
Switch to your Contrast Color (CC) and the smaller needle (US 5). Work k1, p1 ribbing for 6 rounds. This creates a sturdy, polished hem that won't roll. Bind off loosely in pattern—be careful not to bind off too tightly, or the hem will pucker.
Sleeves (Knit in the Round)
Now for those adorable flutter sleeves!
Step 1: Pick Up Stitches
Place the sleeve stitches from waste yarn onto double-pointed needles (DPNs). Pick up and knit 6 (6, 8, 8) stitches from the underarm cast-on edge. Your total sleeve stitches should be 30 (32, 36, 38). Place a marker at the underarm to mark the beginning of the round.
Step 2: Sleeve Body
Work in stockinette stitch for 1 inch. Then work one eyelet round: *K1, yo, k2tog* repeat to end. Knit 3 more plain rounds to complete the eyelet pattern.
Step 3: Ribbed Cuff
Switch to Contrast Color (CC) and smaller DPNs (US 5). Work k1, p1 ribbing for 3 rounds. Bind off loosely in pattern. Repeat for the second sleeve.
Finishing Touches
Step 1: Weave in Ends
Using a tapestry needle, carefully weave in all loose ends on the wrong side of the fabric. Take your time here—neat finishing makes a world of difference in the final look.
Step 2: Blocking
Block the dress gently to shape. For cotton yarn, a light steam block or wet block works beautifully. Lay the dress flat on a towel, gently shape it to the correct measurements, and allow it to dry completely. This will even out your stitches and give the dress a professional, polished appearance.
Step 3: Optional Ribbon Detail
For an extra-special touch, thread a satin ribbon through the eyelet row at the yoke and tie a sweet bow at the front. This adds a lovely finishing detail and allows you to adjust the fit slightly if needed.
Care Instructions
To keep your Sunny Meadow Sundress looking its best, hand wash in cold water with a gentle detergent and lay flat to dry. Cotton yarn softens beautifully with each wash, making the dress even more comfortable over time.
Final Thoughts
Knitting this sundress is more than just a project—it's an act of love. The combination of sunny yellow and cream, the delicate eyelet details, and the soft, breathable cotton make this a piece that will be worn, loved, and remembered. Whether you're gifting it to a special little one or creating it for your own child, the Sunny Meadow Sundress is sure to become a cherished heirloom.
Happy knitting, and enjoy watching this beautiful dress come to life stitch by stitch!


