Sunburst Meadow Coasters Free Pattern
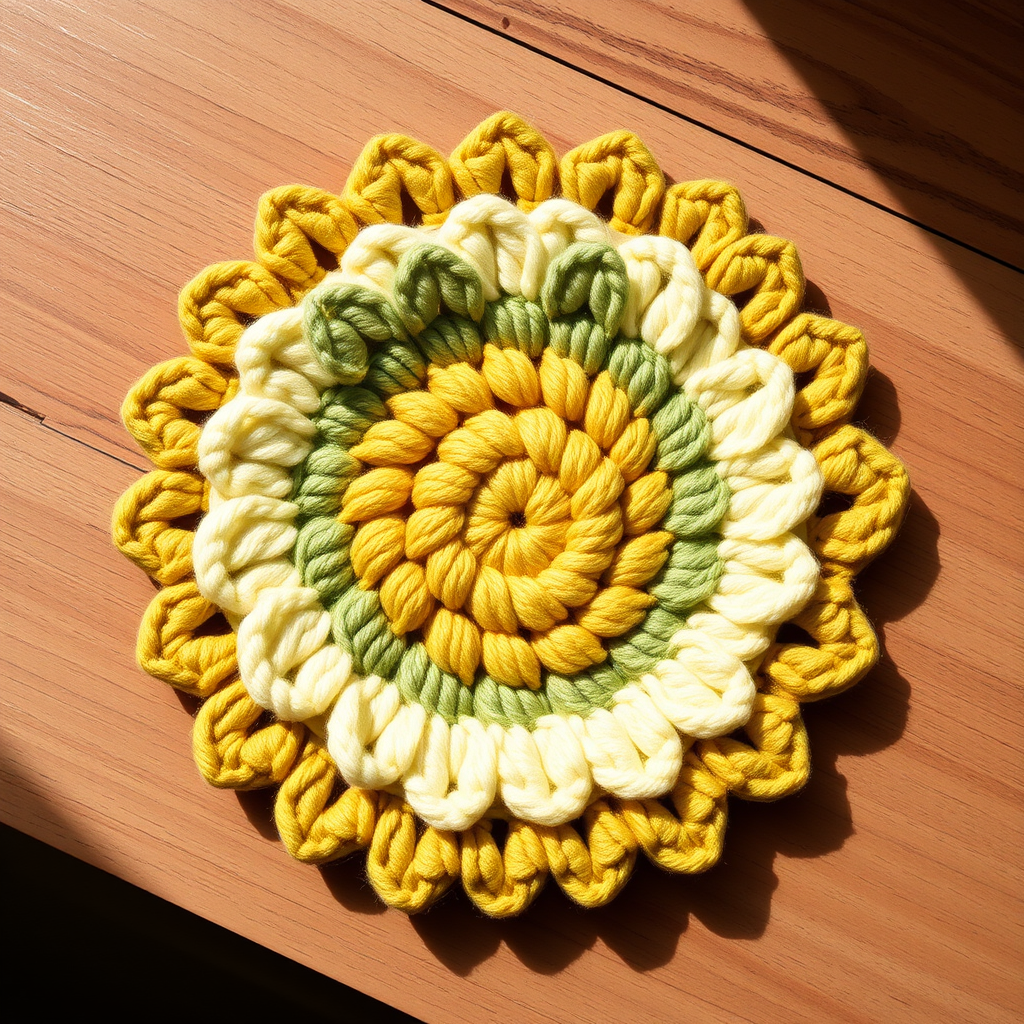
Bring the Meadow to Your Table: The Sunburst Meadow Coasters Free Pattern
Are you ready to add a handcrafted touch of nature to your home? The Sunburst Meadow Coasters are the perfect project to bring a pop of sunshine to your table. These vibrant, textured coasters mimic a blooming meadow, featuring a stunning geometric flower motif that is as delightful to create as it is to display. This free crochet pattern is designed with beginners in mind, using simple stitches and clear instructions to guide you through each round. Whether you're looking for a quick weekend project, a handmade gift, or a way to use up your cotton yarn stash, these coasters are a beautiful and functional choice. Let’s pick up your hook and start crafting this sunflower-inspired set!
Materials Needed
Before you begin, gather your materials. This project is portable and requires minimal supplies, making it a great on-the-go craft.
- Yarn: Worsted weight cotton yarn in three colors:
- Color A: Sunny Yellow (for the center and final border)
- Color B: Cream (for the first petal layer)
- Color C: Sage Green (for the second petal layer)
- Crochet Hook: 5.0 mm (H/8) crochet hook
- Other Tools: Yarn needle for weaving in ends, stitch marker (or a scrap of contrasting yarn), and scissors.
Note on Gauge: The first 3 rounds should measure approximately 2 inches in diameter. Gauge is not critical for this project, but maintaining a consistent tension will help your coaster lay flat and look neat.
Step-by-Step Instructions
This pattern is worked in continuous spirals. Do not join at the end of rounds unless specifically stated. Use a stitch marker to keep track of your rounds, moving it up as you complete each one.
Round 1: The Magic Center
With Color A (Sunny Yellow), make a magic ring. Work 8 single crochet (sc) into the ring. Pull the tail tight to close the center hole completely. (8 stitches)
Round 2: Growing the Center
Work 2 sc in each stitch around. This is a standard increase round that will flatten your circle. (16 stitches)
Round 3: Expanding the Circle
Continue with Color A. *Sc in the next stitch, 2 sc in the next stitch*; repeat from * to * around. This creates a wider base for your flower. (24 stitches)
Round 4: Final Center Round
Still in Color A. *Sc in the next 2 stitches, 2 sc in the next stitch*; repeat from * to * around. Your center should now be a flat, solid disc. (32 stitches)
Round 5: First Layer of Petals (Cream)
Switch to Color B (Cream). This round creates the first set of petals that fan outward.
- *Skip the next stitch, work 5 double crochet (dc) in the next stitch, skip the next stitch, then make a slip stitch (sl st) in the next stitch.*
- Repeat from * to * around the entire circle. You will have 8 distinct cream petals. Fasten off Color B and weave in the end.
Round 6: Setting the Stage for Green Petals
Switch to Color C (Sage Green). This round is worked behind the cream petals you just made. You will be working into the "skipped" stitches from Round 4.
- Attach Color C with a slip stitch in any of the skipped stitches from Round 4 (these are the stitches directly between the cream petals).
- *Chain 3, then make a sc in the next skipped stitch (the one between the next two petals).*
- Repeat from * to * around. You should create 8 chain spaces that sit behind the cream petals. (8 chain spaces)
Round 7: Second Layer of Petals (Sage Green)
Now you will work into the chain spaces you just created to form the larger, textured green petals.
- In each chain space around, work the following sequence: 1 sc, 1 half double crochet (hdc), 3 dc, 1 hdc, 1 sc.
- This forms a larger petal that overlaps the cream layer. Fasten off Color C and weave in the end.
Round 8: Preparing the Final Border
Switch back to Color A (Sunny Yellow). Similar to Round 6, you will work behind the petals you just made.
- Attach Color A with a slip stitch in any of the sc stitches from Round 6 (the base stitches between the green petals).
- *Chain 4, then make a sc in the next sc from Round 6.*
- Repeat from * to * around. This creates a larger set of chain spaces for the final border. (8 chain spaces)
Round 9: The Scalloped Edge
This final round creates the beautiful, scalloped edge of the coaster.
- In each chain space around, work the following sequence: 1 sc, 1 hdc, 5 dc, 1 hdc, 1 sc.
- This creates a large, dramatic petal that gives the coaster its finished, sunflower-like silhouette. Fasten off and weave in all remaining ends securely.
Finishing Touches
To give your coaster a professional look and ensure it lays perfectly flat, block it lightly. You can do this by pinning the coaster to a flat surface and misting it with water, or by gently pressing it with a warm (not hot) iron over a damp cloth. This will help flatten the petals and enhance the overall shape. Repeat these steps to create a full set of coasters for your home or to give as a thoughtful, handmade gift.
Enjoy your beautiful Sunburst Meadow Coasters! They are perfect for adding a touch of handmade warmth to any room.


