Sleepy Star Bunny Crochet Backpack Free Pattern
Introduction
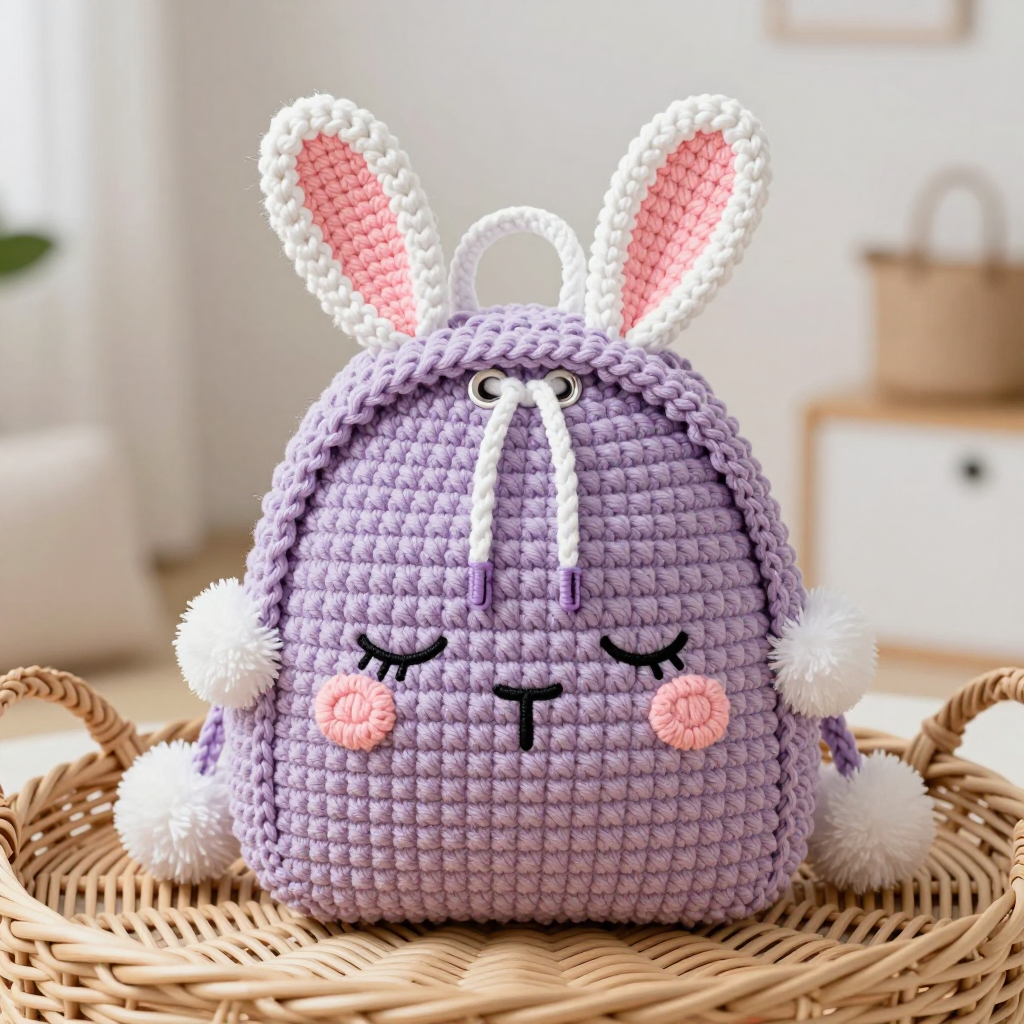
Meet the Sleepy Star Bunny Backpack — a soft, round, lavender drawstring bag with long floppy bunny ears, a fluffy pom-pom tail, and a drowsy little embroidered face with blush-pink cheeks. It is the perfect project for someone who has just learned the basic single crochet stitch and wants to make something they will actually use and show off. The finished bag is about 11.5 inches wide and 16 inches tall including the ears, with a flat circular body and a short side wall that holds everything snugly inside. The yarn is worsted-weight acrylic, so it feels squishy and smooth in your hands, and the whole thing works up in a weekend. Best of all, there is no complicated shaping — just a flat circle, a few straight rounds, and a couple of simple rectangles for ears.
Materials Needed
- Yarn: Worsted weight (category 4) acrylic yarn — lavender approx. 300 yds (main color), white approx. 60 yds (ears, tail, eyelet round, drawstring), pale pink approx. 20 yds (cheeks and inner ears), black (small amount for eyes and nose).
- Crochet hook: I/9 (5.5 mm).
- Stitch marker (one, to mark the start of each round).
- Tapestry needle (a large blunt needle with a big eye for sewing yarn).
- Scissors.
- Polyester fiberfill (a small handful for the pom-pom tail).
- Drawstring: a purchased cord approx. 36 inches long, OR you will crochet one (instructions included).
- Finished size: approx. 11.5 inches wide x 16 inches tall including ears. The body circle is approx. 11.5 inches in diameter.
Abbreviations and Beginner Glossary
- ch — chain. Wrap yarn over hook, pull it through the loop on your hook. Makes a small "V" of yarn.
- sc — single crochet. Insert hook into stitch, yarn over, pull up a loop (2 loops on hook), yarn over, pull through both loops. One loop remains.
- sl st — slip stitch. Insert hook into stitch, yarn over, pull through both the stitch and the loop on your hook at the same time. Creates a nearly invisible join.
- sc2tog — single crochet 2 together (a decrease). Insert hook into first stitch, pull up a loop; insert hook into next stitch, pull up a loop (3 loops on hook); yarn over and pull through all 3 loops. Turns 2 stitches into 1.
- 2 sc in next st — an increase. Work two single crochets into the same stitch, making the circle wider.
- st(s) — stitch(es).
- rnd — round. One full trip around the circle.
- MR — magic ring (also called magic circle). A loop of yarn you wrap around your fingers, then work stitches into, so the center pulls closed tight with no hole.
- [ ] — brackets mean "repeat everything inside the brackets" the number of times stated after them.
- turn — flip your work over so you work back the other direction (used for flat pieces like ears).
- whipstitch — a simple sewing stitch: pass the needle over the edge and back through, over and back, like a spiral of small stitches.
Gauge
Gauge: 4 sc x 4 rounds = 1 inch (2.5 cm) in single crochet worked in the round.
Gauge means how big your stitches turn out. If your stitches are bigger than mine, your bag will be bigger than 11.5 inches; if smaller, it will be smaller. That is why we check first. To make a gauge swatch: chain 2, work 6 sc into the first chain, then work 4 rounds of single crochet in a spiral (increasing as needed so it lies flat). Measure across 4 stitches and 4 rounds with a ruler. If you get more than 4 stitches per inch, try a larger hook; if fewer, try a smaller hook. The body circle needs 46 rounds to reach 11.5 inches — so getting gauge right keeps every count in this pattern accurate.
Beginner Tips Before You Start
- Use your stitch marker every single round. Place it in the first stitch of each round and move it up as you go. In a spiral there is no seam to guide you, and the marker is your only landmark.
- Do not pull your yarn tight. Keep an easy, relaxed tension. Tight stitches make a stiff, small bag and make it hard to insert your hook.
- Count out loud at the end of each round. The stitch count in parentheses tells you exactly how many stitches you should have. If you are off by one or two, fix it now rather than 20 rounds later.
- Work the increase rounds slowly. Each round adds one more plain stitch before the increase, so read the round number carefully — Round 20 has 18 plain stitches, not 8.
- Keep your magic ring tail handy. After Round 3, pull the starting tail firmly to close the center hole completely.
- Steam-block the circle before sewing on ears. A flat circle makes a neat bag and makes the face sit straight.
Step-by-Step Instructions
Body (worked in a continuous spiral — do not join rounds)
Use lavender yarn. Place your stitch marker in the first stitch of each round.
Rnd 1: Make a magic ring, work 6 sc into the ring. (6 sts)
Rnd 2: 2 sc in each st around. (12 sts)
Rnd 3: [Sc in next st, 2 sc in next st] around. (18 sts)
Rnd 4: [Sc in next 2 sts, 2 sc in next st] around. (24 sts)
Rnd 5: [Sc in next 3 sts, 2 sc in next st] around. (30 sts)
Rnd 6: [Sc in next 4 sts, 2 sc in next st] around. (36 sts)
Rnd 7: [Sc in next 5 sts, 2 sc in next st] around. (42 sts)
Rnd 8: [Sc in next 6 sts, 2 sc in next st] around. (48 sts)
Rnd 9: [Sc in next 7 sts, 2 sc in next st] around. (54 sts)
Rnd 10: [Sc in next 8 sts, 2 sc in next st] around. (60 sts)
Rnd 11: [Sc in next 9 sts, 2 sc in next st] around. (66 sts)
Rnd 12: [Sc in next 10 sts, 2 sc in next st] around. (72 sts)
Rnd 13: [Sc in next 11 sts, 2 sc in next st] around. (78 sts)
Rnd 14: [Sc in next 12 sts, 2 sc in next st] around. (84 sts)
Rnd 15: [Sc in next 13 sts, 2 sc in next st] around. (90 sts)
Rnd 16: [Sc in next 14 sts, 2 sc in next st] around. (96 sts)
Rnd 17: [Sc in next 15 sts, 2 sc in next st] around. (102 sts)
Rnd 18: [Sc in next 16 sts, 2 sc in next st] around. (108 sts)
Rnd 19: [Sc in next 17 sts, 2 sc in next st] around. (114 sts)
Rnd 20: [Sc in next 18 sts, 2 sc in next st] around. (120 sts)
Rnd 21: [Sc in next 19 sts, 2 sc in next st] around. (126 sts)
Rnd 22: [Sc in next 20 sts, 2 sc in next st] around. (132 sts)
Rnd 23: [Sc in next 21 sts, 2 sc in next st] around. (138 sts)
Rnd 24: [Sc in next 22 sts, 2 sc in next st] around. (144 sts)
Rnd 25: [Sc in next 23 sts, 2 sc in next st] around. (150 sts)
Rnd 26: [Sc in next 24 sts, 2 sc in next st] around. (156 sts)
Rnd 27: [Sc in next 25 sts, 2 sc in next st] around. (162 sts)
Rnd 28: [Sc in next 26 sts, 2 sc in next st] around. (168 sts)
Rnd 29: [Sc in next 27 sts, 2 sc in next st] around. (174 sts)
Rnd 30: [Sc in next 28 sts, 2 sc in next st] around. (180 sts)
Rnd 31: [Sc in next 29 sts, 2 sc in next st] around. (186 sts)
Rnd 32: [Sc in next 30 sts, 2 sc in next st] around. (192 sts)
Rnd 33: [Sc in next 31 sts, 2 sc in next st] around. (198 sts)
Rnd 34: [Sc in next 32 sts, 2 sc in next st] around. (204 sts)
Rnd 35: [Sc in next 33 sts, 2 sc in next st] around. (210 sts)
Rnd 36: [Sc in next 34 sts, 2 sc in next st] around. (216 sts)
Rnd 37: [Sc in next 35 sts, 2 sc in next st] around. (222 sts)
Rnd 38: [Sc in next 36 sts, 2 sc in next st] around. (228 sts)
Rnd 39: [Sc in next 37 sts, 2 sc in next st] around. (234 sts)
Rnd 40: [Sc in next 38 sts, 2 sc in next st] around. (240 sts)
Rnd 41: [Sc in next 39 sts, 2 sc in next st] around. (246 sts)
Rnd 42: [Sc in next 40 sts, 2 sc in next st] around. (252 sts)
Rnd 43: [Sc in next 41 sts, 2 sc in next st] around. (258 sts)
Rnd 44: [Sc in next 42 sts, 2 sc in next st] around. (264 sts)
Rnd 45: [Sc in next 43 sts, 2 sc in next st] around. (270 sts)
Rnd 46: [Sc in next 44 sts, 2 sc in next st] around. (276 sts)
The circle should now measure approx. 11.5 inches across. If it is slightly smaller, work one more increase round; if larger, stop one round earlier. Do not fasten off.
Sides and Drawstring Channel
Rnds 47–54: Sc in each st around without increasing. (276 sts)
Rnd 55: Ch 1, sc in each st around, join with sl st to first sc. Fasten off lavender.
Rnd 56 (eyelet round): Join white yarn with sl st in any st. Ch 1, [sc in next 2 sts, ch 1, skip next st] around, join with sl st to first sc. Fasten off white.
Rnd 57: Join lavender in any ch-1 space. Ch 1, sc in each st and each ch-1 space around, join with sl st. Fasten off and weave in ends.
Drawstring Cord
With white yarn, ch 90. Sl st in second ch from hook and in each ch across. Fasten off, leaving a 6-inch tail. Thread the cord through the eyelet round, beginning and ending at the center front. Tie the ends together to form a loop for hanging.
Bunny Ears (make 2)
Worked flat in rows, then folded and seamed. With white yarn, ch 13.
Row 1: Sc in second ch from hook and in each ch across. (12 sts)
Row 2: Ch 1, turn. Sc in each st across. (12 sts)
Rows 3–24: Repeat Row 2. (12 sts)
Row 25: Ch 1, turn. Sc2tog, sc in next 8 sts, sc2tog. (10 sts)
Row 26: Ch 1, turn. Sc in each st across. (10 sts)
Row 27: Ch 1, turn. Sc2tog, sc in next 6 sts, sc2tog. (8 sts)
Row 28: Ch 1, turn. Sc in each st across. (8 sts)
Row 29: Ch 1, turn. Sc2tog, sc in next 4 sts, sc2tog. (6 sts)
Row 30: Ch 1, turn. Sc in each st across. (6 sts)
Fasten off, leaving a long tail. Fold the ear in half lengthwise with right sides together and whipstitch the long edges closed. Turn right side out. Repeat for the second ear.
Inner Ear (make 2, optional contrast)
With pale pink yarn, ch 9.
Row 1: Sc in second ch from hook and in each ch across. (8 sts)
Rows 2–16: Ch 1, turn. Sc in each st across. (8 sts)
Fasten off. Pin one inner ear centered on the front of each white ear and whipstitch in place.
Pom-Pom Tail
With white yarn, make a pom-pom approx. 2 inches in diameter using a pom-pom maker, or by wrapping yarn around a 2-inch piece of cardboard approx. 40 times. Tie tightly in the center, cut the loops, and trim to a neat sphere. Sew securely to the center back of the backpack, about 2 inches up from the bottom edge.
Sleepy Face Appliqués
Eyes (make 2): With black yarn, ch 8. Sl st in second ch from hook and in each ch across. Fasten off. Curve each eye into a gentle downward arc and pin to the front of the backpack, about 3 inches apart and 4 inches down from the top edge of the body. Whipstitch in place.
Cheeks (make 2): With pale pink yarn, make a magic ring, work 6 sc into the ring, join with sl st. Fasten off. Sew one cheek below and slightly outside each eye.
Nose: With black yarn, embroider a small horizontal satin stitch between and slightly below the eyes.
Assembly and Finishing
1. Attach the ears. Thread a tapestry needle with the long tail left on each ear. Place the base of each ear at the top edge of the backpack, about 2 inches apart, with the ears pointing upward and slightly outward. Sew through the base of the ear and the top edge of the bag, going back and forth several times to make it secure. Knot on the inside and trim.
2. Attach the tail. Sew the pom-pom to the center back, about 2 inches up from the bottom edge, using the same back-and-forth motion through the center of the pom-pom.
3. Add the drawstring. Thread the crocheted cord (or purchased cord) through the eyelet round, weaving in and out of every ch-1 space, beginning and ending at the center front. Tie the ends together.
4. Weave in ends. Thread each loose yarn tail onto the tapestry needle and run it through the back of several stitches (about 1 inch), then trim close. Never knot on the outside — knots work loose and show.
5. Block. Pin the bag flat, right side up, on a towel. Hold a steam iron 1–2 inches above the surface (never touch the iron to acrylic — it melts) and let the steam relax the circle. Leave it to dry completely. This smooths the circle and makes the face sit straight.
Pro Tips and Variations
- Change the colors. Make the body mint green with white ears for a spring bunny, or grey with pink inner ears for a classic look. Change color at the end of a round by pulling the new color through the last loop.
- Make it bigger or smaller. Keep increasing in the same pattern (one more plain stitch before each increase) for a larger bag, or stop a few rounds earlier for a smaller one. Add or remove rounds in the straight sides (Rnds 47–54) to change the depth.
- Substitute the yarn. Cotton yarn gives a sturdier, washable bag; bulky yarn makes a bigger, fluffier one. Always check your gauge again when you change yarn.
- Add a lining. Cut a fabric circle slightly smaller than the bag, sew it inside the top edge by hand, and your backpack becomes sturdy enough for everyday adventures.