Serpentine Scales: Crochet Textured Wall Hanging Free Pattern
Serpentine Scales: Crochet Textured Wall Hanging Free Pattern
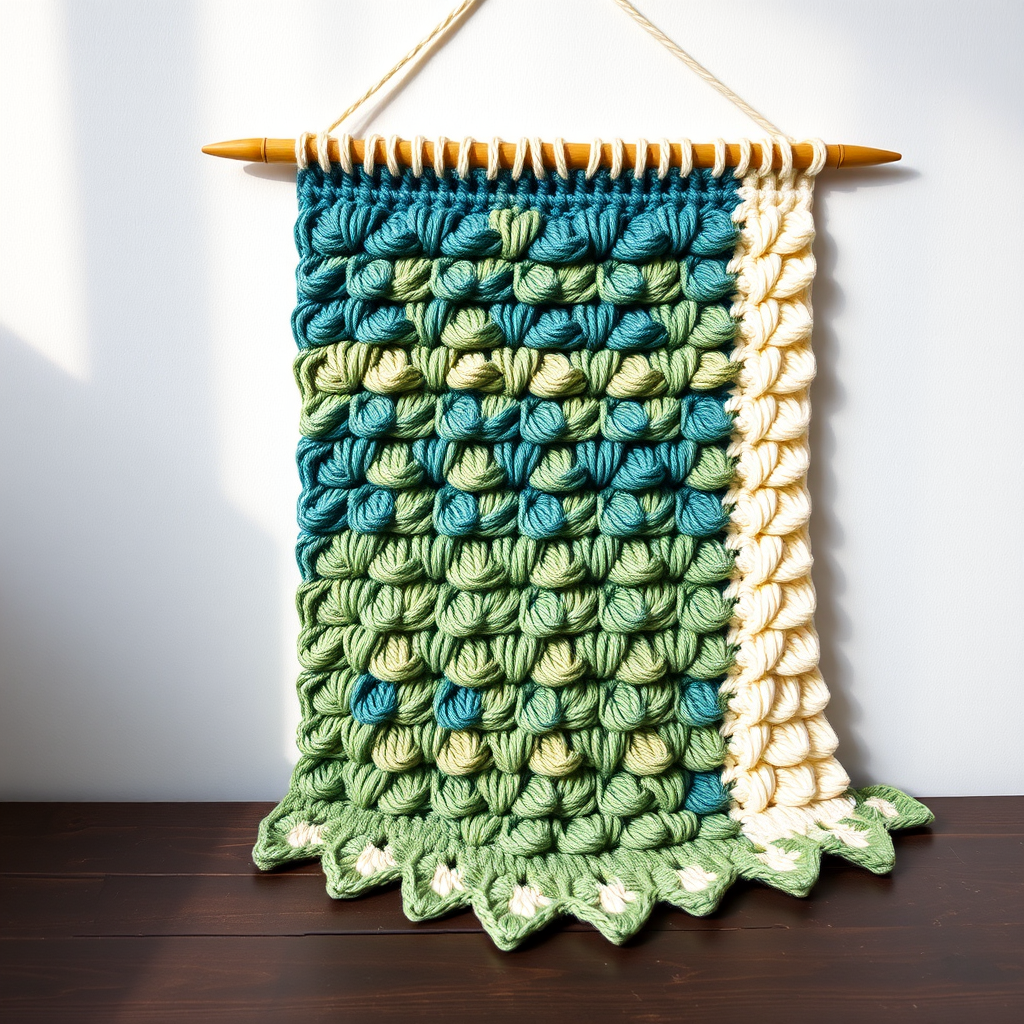
Transform your living space with this sculptural crochet wall hanging that mimics the shimmering movement of overlapping serpent scales. The dimensional crocodile stitch creates a lush, tactile surface that catches light beautifully, adding depth and organic texture to any room. This modern-boho fiber art piece is surprisingly beginner-friendly once you master the signature scale stitch—and the result is a stunning, gallery-worthy statement piece that you made entirely by hand.
Whether you're drawn to earthy forest tones or coastal ocean vibes, the three-panel color layout (solid deep teal, teal-and-sage bands, and cream-and-sage bands) offers a harmonious gradient that feels both grounded and refined. Hang it above a console table, in a reading nook, or as a focal point in a minimalist entryway. Let's dive into this rewarding project.
Materials Needed
Before you begin, gather the following supplies. All items are standard and easily found at craft stores or online.
- Yarn: Worsted weight (Category 4) cotton or cotton-blend yarn in 3 coordinating shades:
- Deep teal (approx. 100g)
- Sage green (approx. 100g)
- Cream (approx. 50g)
- Crochet Hook: 5.5mm (I-9) or size needed to obtain gauge.
- Tapestry Needle: For weaving in ends and whip stitching panels together.
- Wooden Dowel or Branch: 12–14 inches long, for the hanging mechanism. Sanded smooth if using a branch.
- Scissors: Sharp pair for cutting yarn.
- Measuring Tape: To check gauge and panel dimensions.
Gauge & Finished Dimensions
- Gauge: First 4 rows of the crocodile stitch pattern = 4 inches wide x 3 inches tall. Always check your gauge—if your swatch is too small, go up a hook size; if too large, go down.
- Finished Size: Each panel is approximately 4 inches wide and 16 inches tall. Three panels joined together create a wall hanging about 12 inches wide x 16 inches tall (plus the dowel casing).
Step-by-Step Instructions
This wall hanging is worked in three vertical panels from the bottom up, then joined together. Each panel features the crocodile stitch, which creates overlapping, scale-like fans. Work each panel separately, then seam them side-by-side.
Understanding the Crocodile Stitch (Scale Stitch)
The crocodile stitch is a post-stitch technique that creates a raised, overlapping fan. The key is working 5 double crochets into a single stitch, then wrapping the "fan" around the post of that same stitch to create a 3D scale. Don't worry—the step-by-step below breaks it down clearly.
Panel A (Solid Deep Teal)
Foundation Row: Chain 18. Work 1 double crochet (dc) in the 4th chain from the hook. Work 1 dc in each of the next 13 chains. You should have 15 dc total (counting the initial chain-3 as a dc). Chain 3 and turn your work.
Row 1 (Scale Row): Skip the first 2 dc. *Work 5 dc in the next dc (this is the center of the scale base). Remove your hook from the loop, leaving the loop live. Insert your hook from front to back between the first and second dc of the 5-dc group you just made. Grab the dropped loop with your hook and pull it through to the front. Chain 1 to secure (this creates the scale point). Skip the next 2 dc.* Repeat from * to * across the row. You should have 3 complete scales. Chain 3 and turn.
Row 2: Work 1 dc in each dc and 1 dc in each chain-1 space across the row. You should have 15 dc total. Chain 3 and turn.
Row 3 (Offset Scale Row): Skip the first dc. Work a scale in the next dc (5 dc, pull loop through between 1st and 2nd dc, ch 1). Skip 2 dc. Work a scale in the next dc. Skip 2 dc. Work a scale in the next dc. Skip 1 dc. End the row with 1 dc in the top of the turning chain. Chain 3 and turn.
Row 4: Repeat Row 2 (1 dc in each dc and ch-1 space = 15 dc). Chain 3 and turn.
Rows 5–20: Repeat Rows 1–4 four more times (a total of 16 additional rows). This will alternate the scale positions in a staggered, brick-like pattern. After Row 20, fasten off and weave in the yarn end.
Panel B (Deep Teal & Sage Green Bands)
Follow the exact same stitch pattern as Panel A, but change colors in horizontal bands:
- Work Rows 1–4 in deep teal.
- Work Rows 5–8 in sage green.
- Work Rows 9–12 in deep teal.
- Work Rows 13–16 in sage green.
- Work Rows 17–20 in deep teal.
Tip: When changing colors, do so at the end of the last row before the color change. Work the final yarn-over of the last dc with the new color, then chain 3 and turn with the new color. Carry the unused yarn loosely up the side or cut and weave in ends—carrying is cleaner for this project.
Panel C (Cream & Sage Green Bands)
Follow the same stitch pattern with these color bands:
- Work Rows 1–4 in cream.
- Work Rows 5–8 in sage green.
- Work Rows 9–12 in cream.
- Work Rows 13–16 in sage green.
- Work Rows 17–20 in cream.
Joining the Panels
Lay all three panels flat with the right sides facing up. Arrange them in this order from left to right: Panel A (solid teal), Panel B (teal/sage bands), Panel C (cream/sage bands). The long edges should be touching.
Thread a tapestry needle with a length of cream yarn. Using a whip stitch, sew the long edges of Panel A and Panel B together, matching the row lines carefully. Repeat to attach Panel C to the other side of Panel B. Weave in all yarn ends securely on the back of the piece.
Finishing & Hanging Mechanism
Lay the joined panels flat with the wrong side facing up. Fold the top edge down over the wooden dowel (about 1 inch of fabric). The dowel should sit snugly inside the fold.
Using matching cream yarn and a tapestry needle, whip stitch the folded edge to the back of the hanging, creating a neat casing for the dowel. Leave 1 inch open at each end so the dowel ends are visible and can rest on wall hooks. Ensure your stitches catch both the folded fabric and the back layer securely, but do not pull too tight—the dowel needs to slide through easily.
Trim any excess yarn and weave in all remaining ends. Slide the dowel through the casing. Hang your new wall art using two small nails or adhesive hooks placed at the exposed ends of the dowel. Step back and admire your handiwork!
Pro Tips for Success
- Count your stitches: After each scale row, you should always return to 15 dc on the following row. If the count is off, check that you didn't accidentally skip or add a stitch.
- Keep tension consistent: The crocodile stitch is naturally dense. Avoid pulling the "pulled-through" loop too tight when securing the scale point—this can pucker the fabric.
- Blocking (optional): If your panels curl at the edges, lightly steam block them before joining. Pin to the correct dimensions and steam gently without touching the yarn directly.
- Customize: Feel free to swap the color palette to match your decor. The pattern works beautifully in any three coordinating shades.
This serpentine wall hanging is a gorgeous way to bring texture and artisan charm into your home. The rhythmic, repetitive nature of the crocodile stitch makes it a meditative project—perfect for cozy evenings with a cup of tea. Once you've mastered the scale, you'll find yourself wanting to make more panels for a wider installation. Happy crocheting!