Rustic Harvest Table Runner Free Knitting Pattern – Textured Farmhouse Décor
Rustic Harvest Table Runner Free Knitting Pattern – Textured Farmhouse Décor
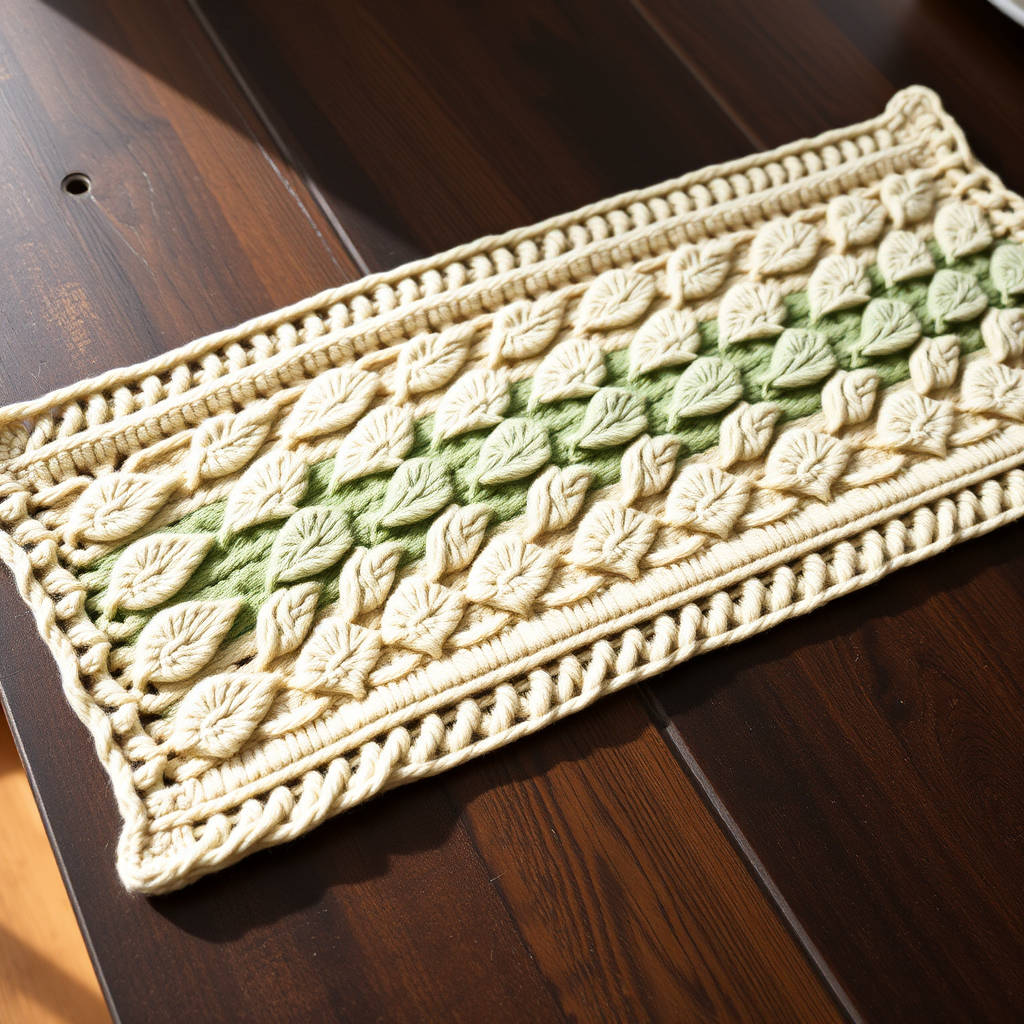
Bring the charm of a countryside kitchen to your table with this beautifully textured runner, featuring a subtle leaf motif and warm earthy tones. Knitted in soft cotton, it's both practical and a stunning centerpiece for any farmhouse-style home. This free knitting pattern is perfect for intermediate beginners looking to expand their skills with lace-like decreases and yarn overs, all while creating a gorgeous, functional piece for their dining space.
The Rustic Harvest Table Runner is designed to be both beautiful and durable. Using worsted weight cotton yarn, it can withstand daily use, spills, and frequent washing, making it the perfect addition to your farmhouse kitchen or dining room. The gentle leaf pattern, created with simple yarn overs and decreases, adds a dimensional, handcrafted texture that will impress your guests and bring warmth to every meal.
Materials Needed
Before you begin, gather the following supplies to ensure a smooth and enjoyable knitting experience:
- Yarn: Worsted weight cotton yarn (e.g., Lion Brand Kitchen Cotton) in Oatmeal (MC) and Sage (CC), approx. 400g MC and 100g CC. The cotton fiber is essential for absorbency and durability, making it ideal for a table runner that will see regular use.
- Needles: US 7 (4.5 mm) knitting needles. A straight pair is perfectly fine for this project, though you may also use circular needles if you prefer the flexibility they offer.
- Stitch markers: Two markers to delineate the border sections from the main body pattern.
- Tapestry needle: For weaving in ends and blocking.
- Measuring tape: To check your gauge and track the length of your runner.
Gauge: 20 stitches and 26 rows = 4 inches in stockinette stitch. Always knit a gauge swatch before starting to ensure your finished runner matches the intended dimensions. If your gauge is off, adjust your needle size accordingly.
Step-by-Step Instructions
Finished Size
Approximately 14 inches wide x 36 inches long. This size is perfect for a standard farmhouse table, but you can easily adjust the length by working more or fewer repeats of the leaf pattern.
Abbreviations
- CO: Cast on
- K: Knit
- P: Purl
- K2tog: Knit two together (right-leaning decrease)
- SSK: Slip, slip, knit (left-leaning decrease)
- YO: Yarn over (creates an eyelet hole)
- Sl: Slip stitch purlwise
- MC: Main color (Oatmeal)
- CC: Contrast color (Sage)
Border (Worked First)
With MC, cast on 70 stitches loosely. This will form the foundation of your runner. The garter stitch border will frame the leaf pattern beautifully and prevent curling at the edges.
Rows 1-6: Knit all stitches (garter stitch). This creates a sturdy, non-curling edge that will anchor your table runner.
Main Body
Row 7 (Right Side): K5 (border), place marker, work Row 1 of Leaf Chart across next 60 stitches, place marker, K5 (border). The markers will help you keep track of where the border ends and the main pattern begins.
Leaf Chart (Multiple of 10 + 2, Repeat 6 Times Across 60 Stitches)
This is the heart of your table runner. The leaf pattern is created through a combination of yarn overs and decreases, which form delicate, raised leaf shapes across the fabric. Follow these rows carefully, repeating the section between asterisks (*) as indicated.
Row 1 (RS): K2, *K2tog, YO, K1, YO, SSK, K5; repeat from * to last 2 stitches, K2.
Row 2 (WS): Purl all stitches. This purl row creates the smooth background that makes the leaf motifs pop.
Row 3: K2, *K2tog, YO, K3, YO, SSK, K3; repeat from * to last 2 stitches, K2.
Row 4: Purl all stitches.
Row 5: K2, *K2tog, YO, K5, YO, SSK, K1; repeat from * to last 2 stitches, K2.
Row 6: Purl all stitches.
Row 7: K2, *K2tog, YO, K7, YO, SSK; repeat from * to last 2 stitches, K2.
Row 8: Purl all stitches.
Row 9: K2, *K1, YO, SSK, K3, K2tog, YO, K2; repeat from * to last 2 stitches, K2.
Row 10: Purl all stitches.
Row 11: K2, *K2, YO, SSK, K1, K2tog, YO, K3; repeat from * to last 2 stitches, K2.
Row 12: Purl all stitches.
Row 13: K2, *K3, YO, K3tog, YO, K4; repeat from * to last 2 stitches, K2. Note: K3tog means knit three stitches together, a double decrease that forms the tip of the leaf.
Row 14: Purl all stitches.
Repeat Rows 1-14 for the leaf pattern until the runner measures approximately 34 inches from the cast-on edge, ending with a Row 14. This ensures your pattern is complete before adding the accent stripe. If you want a longer runner, simply continue repeating these 14 rows until you reach your desired length, always ending on a Row 14.
Color Accent Stripe
This is where the Sage green adds a beautiful farmhouse touch to your runner. The contrast stripe near each end creates visual interest and ties the whole design together.
Switch to CC (Sage). Knit 6 rows in stockinette stitch (Row 1: knit across, Row 2: purl across, repeat for 6 total rows). The stockinette will create a smooth, solid band that contrasts nicely with the textured leaf pattern.
Switch back to MC (Oatmeal) and knit 6 rows in stockinette stitch. This creates a balanced, symmetrical look with the oatmeal stripe framing the sage.
Border (Worked Last)
With MC, knit 6 rows of garter stitch (all knit on every row). This mirrors the border you created at the beginning, ensuring your runner is perfectly symmetrical.
Bind off loosely in knit. A loose bind-off is crucial here to prevent the edge from pulling in and distorting the shape of your runner. If you tend to bind off tightly, consider using a larger needle for this step.
Finishing
Weave in all ends carefully using your tapestry needle. Make sure to weave in ends on the wrong side of the work, following the path of the yarn to keep them invisible.
Block gently to shape, pinning to measurements. Cotton yarn responds beautifully to wet blocking. Soak your runner in lukewarm water with a mild wool wash, gently squeeze out excess water (never wring), and lay flat on a towel. Roll up the towel to remove more water, then pin your runner to the correct dimensions on a blocking mat. Allow to dry completely.
The garter borders will naturally curl slightly, adding to the rustic charm. This is a desirable feature of the design, giving it that handmade, lived-in farmhouse feel. Don't try to flatten them completely – embrace the organic texture!
Tips for Success
- Count your stitches: After each pattern row, count your stitches to ensure you haven't accidentally dropped or added a yarn over. The stitch count should remain constant at 70 stitches throughout the main body.
- Use stitch markers: The markers between the border and main pattern are essential. They prevent you from accidentally working the leaf pattern into your garter borders.
- Keep your tension even: Cotton yarn has no give, so maintaining consistent tension is important. Try to knit at a relaxed, even pace.
- Check your gauge: Taking the time to knit a gauge swatch will save you from disappointment later. Your runner should measure approximately 14 inches wide – if it's wider or narrower, adjust your needle size.
This Rustic Harvest Table Runner is a rewarding project that will become a cherished piece in your home. Whether you're knitting it for yourself or as a thoughtful handmade gift, the textured leaf pattern and warm earthy tones will bring a touch of countryside charm to any table. Happy knitting!


