Rainbow Brights Crochet Phone Sleeve Free Pattern: Rustic Farmhouse Single Crochet Decrease Pouch
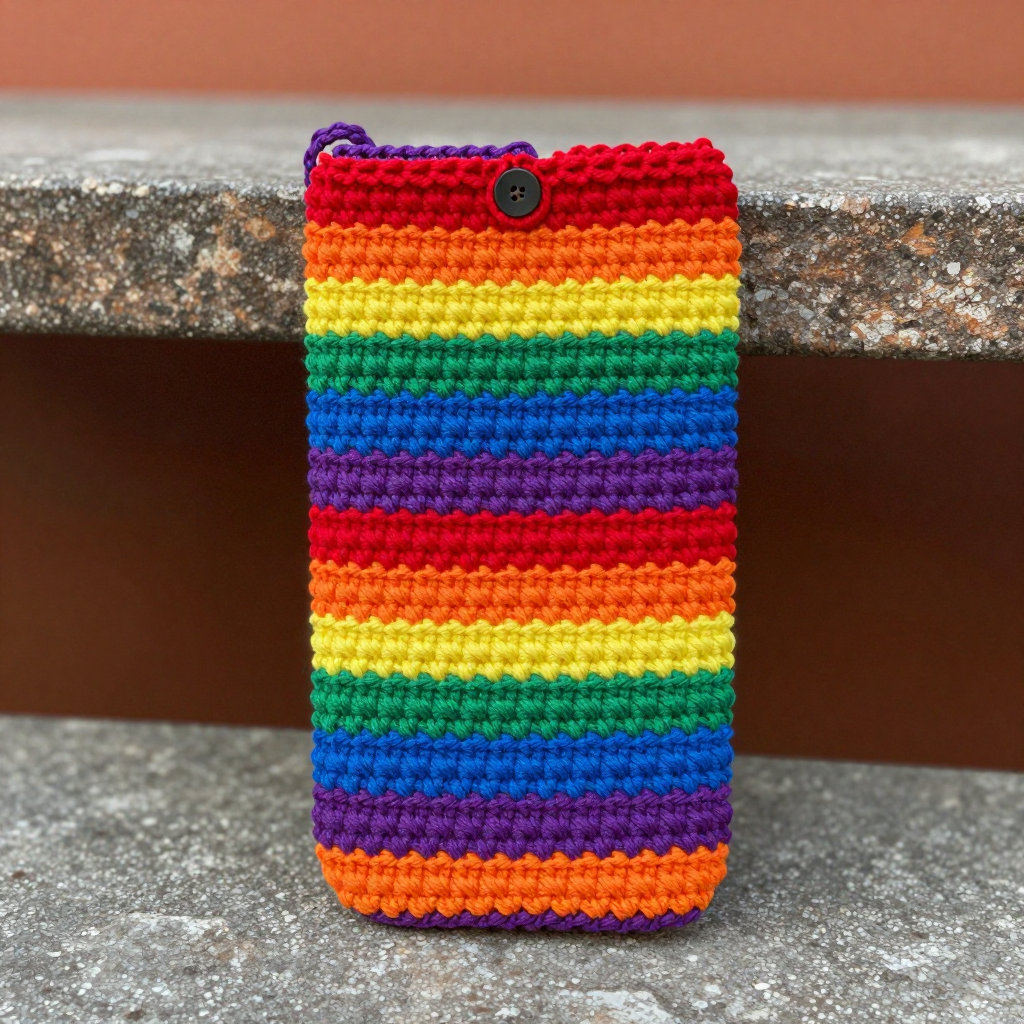
Rainbow Brights Crochet Phone Sleeve: A Rustic Farmhouse Single Crochet Decrease Pouch
Introduction
If you have never held a crochet hook before, this Rainbow Brights Phone Sleeve is the perfect very first project for you. It uses only one stitch, one hook, and six small balls of cheerful yarn, and it works up in just a few cozy evenings. The finished sleeve is a snug little pouch about 3.5 inches wide and 6.5 inches tall, with a gently rounded bottom and a straight top opening that hugs your phone. The fabric feels dense, soft, and slightly ridged, with a rustic handmade texture that looks lovely sitting on a farmhouse kitchen counter. Best of all, those vivid rainbow stripes mean you get to practice changing colors while you watch a bright, happy rainbow grow row by row.
Materials Needed
- Yarn: Worsted weight (category 4) acrylic or cotton yarn, approximately 90–110 yards total, in 6 bright rainbow colors: red, orange, yellow, green, blue, and purple (about 15–18 yards of each color).
- Crochet hook: Size H-8 (5.0 mm). The “H-8” is the US size and “5.0 mm” is the metric size — they are the same hook.
- Stitch markers: At least 2. These are small clips or loops you slide onto a stitch so you can find it again later.
- Tapestry needle: A large, blunt-tipped sewing needle with an eye big enough for yarn. Used for seaming and weaving in ends.
- Scissors: Any small sharp pair for cutting yarn.
- Optional: One small button (about ½ inch) if you want the rustic farmhouse closure loop.
- Finished size: Approximately 3.5 inches (9 cm) wide x 6.5 inches (16.5 cm) tall, fitting most standard smartphones.
Abbreviations and Beginner Glossary
- ch – chain. Make a loop with the yarn on your hook, wrap the yarn over the hook, and pull it through the loop. That is one chain.
- sc – single crochet. Insert your hook into the stitch, wrap the yarn over the hook, pull up a loop (you now have 2 loops on the hook), wrap the yarn over again, and pull it through both loops. That is one single crochet.
- sc2tog – single crochet two stitches together, also called a single crochet decrease. Insert your hook into the first stitch, wrap yarn over, pull up a loop (2 loops on hook). Insert your hook into the next stitch, wrap yarn over, pull up a loop (3 loops on hook). Wrap yarn over and pull through all 3 loops. Two stitches have become one. This is how the rounded bottom is shaped.
- sl st – slip stitch. Insert your hook into the stitch, wrap the yarn over, and pull it straight through both the stitch and the loop on your hook in one motion. It makes a nearly invisible join.
- st / sts – stitch / stitches. One completed single crochet is one stitch.
- turn – flip your work over so you can crochet back along the row you just finished.
- fasten off – cut the yarn a few inches from your work, then pull the tail all the way through the last loop to lock it.
- right sides together – the pretty, outward-facing side of the fabric placed against itself, so the seam ends up hidden inside.
- whipstitch – a simple seaming stitch: bring the needle through both edges from front to back, over and over, like a spiral of small stitches.
- weave in ends – thread a yarn tail onto the tapestry needle and run it back and forth through the fabric so it disappears.
Gauge
Gauge: 16 single crochet stitches x 18 rows = 4 inches (10 cm) in single crochet worked flat.
Gauge simply means how big your stitches turn out. If your stitches are bigger than this, your sleeve will be too loose for the phone; if they are smaller, it may be too tight. To check, crochet a small square about 5 inches wide and 5 inches tall in single crochet, lay it flat, and measure 4 inches across the middle. Count how many stitches fit in those 4 inches. If you have more than 16, try a larger hook; if you have fewer, try a smaller hook. This swatch also gives you free practice with the single crochet before you begin the real thing.
Beginner Tips Before You Start
- Count every row. Single crochet rows are easy to lose track of. Say the count out loud as you go, and place a stitch marker in the first stitch of each row so you always know where the row begins.
- Do not pull the yarn too tight. Tension is how firmly you hold the yarn. Hold it gently — if the fabric feels stiff and squeaky, you are pulling too hard. Relaxed stitches are easier to work into.
- The turning chain does not count. The chain 1 at the start of each row is just a little step up; it is never a stitch. Your first single crochet goes into the very first stitch of the row.
- Change colors on the last stitch. To switch colors, work the final single crochet of the row but pull the new color through the last two loops. Then chain 1 with the new color and turn.
- Keep your tails long. Leave at least 6 inches of yarn whenever you fasten off, so you have plenty to weave in later.
- Trust the process on the bottom. The first 13 rows shrink from 13 stitches down to 1. That is correct — it creates the rounded base. It will look like a little triangle, and that is exactly right.
Step-by-Step Instructions
Notes: The sleeve is worked flat in rows from the bottom up, then seamed along one side. The rounded bottom is created with single crochet decreases at the beginning and end of the first few rows. Chain 1 at the beginning of each row does not count as a stitch. Color sequence: Red, Orange, Yellow, Green, Blue, Purple, repeating.
Part 1: Rounded Bottom (Red)
With RED yarn, chain 14.
Row 1: Single crochet in the 2nd chain from hook and in each chain across. (13 sc)
Row 2: Chain 1, turn. Single crochet decrease over the first 2 stitches, single crochet in each stitch across to the last 2 stitches, single crochet decrease over the last 2 stitches. (11 sc)
Row 3: Chain 1, turn. Single crochet in each stitch across. (11 sc)
Row 4: Chain 1, turn. Decrease over the first 2 stitches, single crochet across to the last 2 stitches, decrease over the last 2 stitches. (9 sc)
Row 5: Chain 1, turn. Single crochet in each stitch across. (9 sc)
Row 6: Chain 1, turn. Decrease over the first 2 stitches, single crochet across to the last 2 stitches, decrease over the last 2 stitches. (7 sc)
Row 7: Chain 1, turn. Single crochet in each stitch across. (7 sc)
Row 8: Chain 1, turn. Decrease over the first 2 stitches, single crochet across to the last 2 stitches, decrease over the last 2 stitches. (5 sc)
Row 9: Chain 1, turn. Single crochet in each stitch across. (5 sc)
Row 10: Chain 1, turn. Decrease over the first 2 stitches, single crochet in the next stitch, decrease over the last 2 stitches. (3 sc)
Row 11: Chain 1, turn. Single crochet in each stitch across. (3 sc)
Row 12: Chain 1, turn. Decrease over the first 2 stitches, single crochet in the last stitch. (2 sc)
Row 13: Chain 1, turn. Decrease over the 2 stitches. (1 sc) Fasten off red.
Part 2: Body Stripes (Worked Even)
Join ORANGE yarn to the last stitch of Row 13 with a slip stitch, chain 1.
Row 14: Work 1 single crochet in the same stitch, then work 2 single crochet along the side edge of the shaped base to reach the full width. You should have 13 stitches across the top edge of the base. (13 sc)
Rows 15–16: Chain 1, turn. Single crochet in each stitch across. (13 sc)
Change to YELLOW.
Rows 17–19: Chain 1, turn. Single crochet in each stitch across. (13 sc)
Change to GREEN.
Rows 20–22: Chain 1, turn. Single crochet in each stitch across. (13 sc)
Change to BLUE.
Rows 23–25: Chain 1, turn. Single crochet in each stitch across. (13 sc)
Change to PURPLE.
Rows 26–28: Chain 1, turn. Single crochet in each stitch across. (13 sc)
Change to RED.
Rows 29–31: Chain 1, turn. Single crochet in each stitch across. (13 sc)
Change to ORANGE.
Rows 32–34: Chain 1, turn. Single crochet in each stitch across. (13 sc)
Change to YELLOW.
Rows 35–37: Chain 1, turn. Single crochet in each stitch across. (13 sc)
Change to GREEN.
Rows 38–40: Chain 1, turn. Single crochet in each stitch across. (13 sc)
Change to BLUE.
Rows 41–43: Chain 1, turn. Single crochet in each stitch across. (13 sc)
Change to PURPLE.
Rows 44–46: Chain 1, turn. Single crochet in each stitch across. (13 sc)
Change to RED.
Rows 47–49: Chain 1, turn. Single crochet in each stitch across. (13 sc)
Change to ORANGE.
Rows 50–52: Chain 1, turn. Single crochet in each stitch across. (13 sc)
Change to YELLOW.
Rows 53–55: Chain 1, turn. Single crochet in each stitch across. (13 sc)
Change to GREEN.
Rows 56–58: Chain 1, turn. Single crochet in each stitch across. (13 sc)
Change to BLUE.
Rows 59–61: Chain 1, turn. Single crochet in each stitch across. (13 sc)
Change to PURPLE.
Rows 62–64: Chain 1, turn. Single crochet in each stitch across. (13 sc) Fasten off purple, leaving a long tail for seaming.
Part 3: Optional Closure Loop
With any color, join yarn at the top corner of the sleeve. Chain 8, then slip stitch back into the same corner stitch to form a small loop. Fasten off and weave in the ends. Sew a small button to the opposite top corner so the loop can hook over it.
Assembly and Finishing
- Fold: Fold the piece in half lengthwise with right sides together, matching the side edges. The rounded bottom should form a soft curve.
- Seam: Thread the long purple tail onto the tapestry needle. Whipstitch the side edges together from the bottom point up to the top opening. To whipstitch, bring the needle through both edges from front to back, then repeat, keeping the stitches close and even. Do not pull too tightly or the seam will pucker.
- Weave in ends: Thread each yarn tail onto the needle and run it back and forth through the inside of the fabric for about an inch, then trim close to the fabric.
- Turn: Turn the sleeve right side out and gently poke out the bottom curve with your fingers.
- Block: Lightly steam the sleeve with an iron held an inch above the fabric (never press the iron directly onto acrylic, which can melt). Let it dry flat. This settles the stitches and smooths the seams.
Pro Tips and Variations
- Change the stripes: Make each color block 2 rows or 5 rows tall instead of 3 for a different rhythm. Just keep the total rows the same so the height stays 6.5 inches.
- Adjust the size: For a larger phone, begin with chain 16 instead of 14 and add 2 extra rows to each color block. For a smaller phone, begin with chain 12 and work 2 rows per color block.
- Substitute yarn: Cotton gives a crisper, more rustic farmhouse look; acrylic is softer and more affordable. Either works as long as you match the gauge.
- Add a farmhouse touch: Work the final row in a contrasting cream or oatmeal color, or add the button loop in natural twine for extra rustic charm.