Prickly Pear Pouch Sachet Free Crochet Pattern
Prickly Pear Pouch Sachet: A Tiny Desert Treasure for Total Beginners
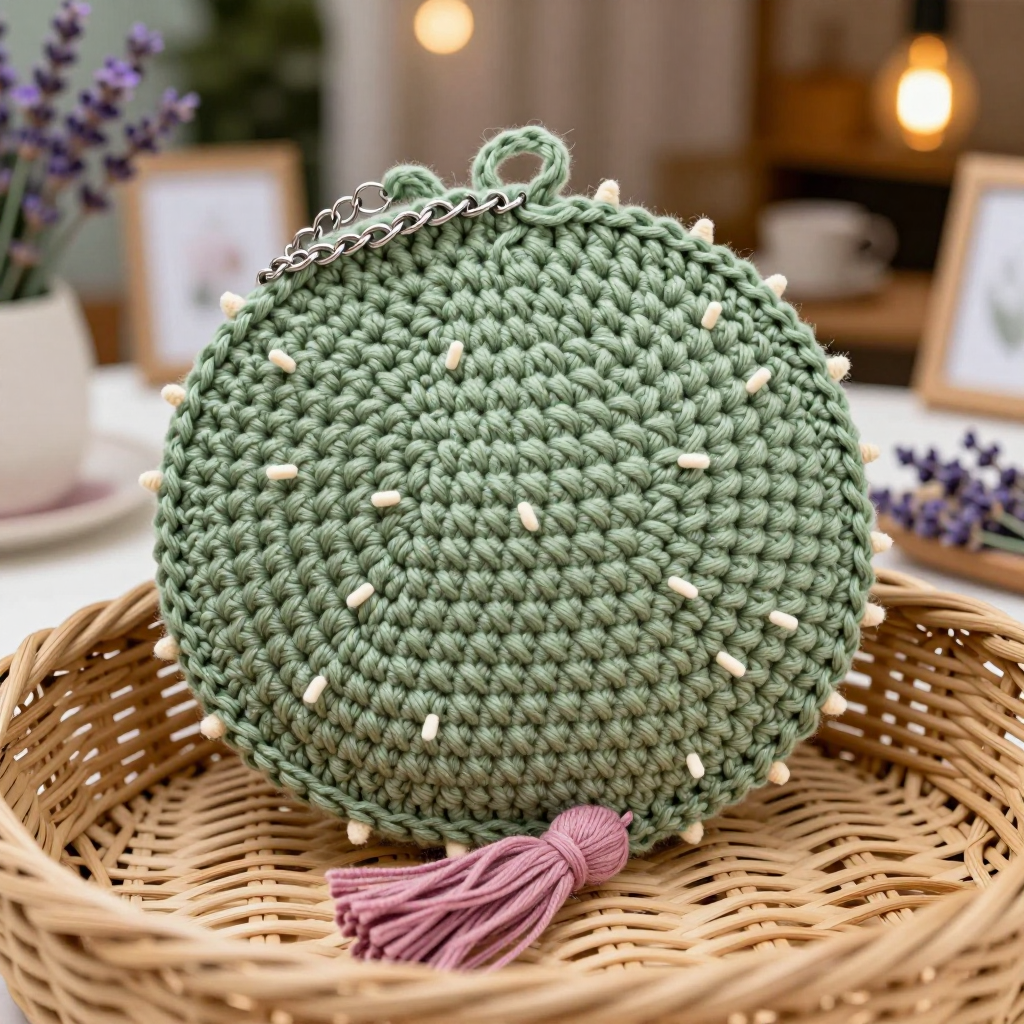
If you have never held a crochet hook before, this is the perfect first project for you. The Prickly Pear Pouch Sachet is a small, flat crocheted circle that you simply fold in half and stitch up the sides, transforming it into an adorable little cactus pad pouch. It works up in about an hour, uses only a few yards of fine cotton thread, and teaches you the two most important beginner skills: the single crochet and the magic ring. The finished piece is a soft, sage-green pouch about 2 inches wide and 2.5 inches tall, with a little chain loop "stem" at the top, a dusty rose tassel at the bottom, and tiny cream stitches that look like prickles. Fill it with dried lavender to make a sachet, or use it as a gift pouch or hanging ornament. It feels handmade, desert-boho, and completely charming, and you made it yourself.
Materials Needed
- Yarn: Size 10 crochet cotton thread (lace weight, approximately 33–40 stitches to 4 inches). You will need about 15 yards of sage green (main color), about 4 yards of dusty rose (for the tassel), and about 2 yards of cream (optional, for the prickles).
- Crochet hook: Size B/1 (2.25 mm).
- Stitch marker (one is enough, or use a scrap of contrasting thread).
- Tapestry needle (a blunt-tipped needle with a large eye, for seaming and weaving in ends).
- Scissors.
- Filling: a small amount of polyester fiberfill or dried lavender (about a teaspoon).
- Finished size: about 2 inches (5 cm) wide by 2.5 inches (6.5 cm) tall, excluding the stem loop and tassel.
Abbreviations and Beginner Glossary
- ch – chain. Make a loop of yarn over your hook and pull it through the loop already on your hook. This creates a small "chain" link. It is the foundation of most crochet.
- sc – single crochet. Insert your hook into the next stitch, wrap the yarn over the hook, pull up a loop (you now have 2 loops on your hook), wrap the yarn over again, and pull it through both loops. One single crochet made.
- sl st – slip stitch. Insert your hook into the stitch, wrap the yarn over, and pull it through both the stitch and the loop on your hook in one motion. It joins rounds together without adding height.
- st / sts – stitch / stitches. One completed loop or "V" shape in your fabric.
- sc2tog – single crochet 2 together. A decrease: insert your hook into the first stitch, pull up a loop, insert your hook into the next stitch, pull up a loop, then wrap the yarn over and pull through all three loops on your hook. Two stitches become one. (You will not need this for this pattern, but it is good to know.)
- rnd – round. One complete circle of stitches worked in the round (spiraling around), as opposed to a "row," which goes back and forth.
- magic ring – an adjustable loop of yarn that you crochet into, then pull tight to close the center hole. It is the neatest way to start a circle.
- 2 sc in next sc – work two single crochets into the same stitch. This is an increase and makes your circle grow.
- [ ] – brackets mean "repeat everything inside the brackets the number of times stated after the brackets."
- fasten off – cut the yarn a few inches from your work, then pull the tail through the last loop on your hook to lock it.
- whipstitch – a simple seaming stitch: bring your needle up through both layers, then over the edge and back down, making small diagonal stitches that wrap the edge.
Gauge
Gauge: 9 single crochet stitches and 10 rounds = 1 inch (2.5 cm) in single crochet worked in the round.
Why gauge matters: Gauge is how tightly or loosely you crochet. If your stitches are bigger than the gauge, your pouch will come out larger than 2 inches wide; if they are smaller, it will come out tiny. Because this pouch is small, gauge is not critical for fit, but it does affect the final size and how firmly the stuffing holds.
How to make a gauge swatch: With your sage green thread and B/1 hook, make a magic ring, then work 4 rounds of single crochet increases just like the pattern below. Measure the circle across. If your 4 rounds measure about 1 inch across, you are on track. If it is much bigger, try a smaller hook; if much smaller, try a larger hook. You can unravel the swatch and use the thread for the real pouch.
Beginner Tips Before You Start
- Use a stitch marker. Place it in the first stitch of each round so you always know where the round begins. In the round, it is easy to lose your place.
- Do not pull the yarn too tight. Tension should be relaxed. If your stitches are so tight you can barely insert the hook, your hands are working too hard and the fabric will pucker.
- Count every round. The stitch counts in parentheses are your safety net. If a round does not match, undo it and try again. It is much easier to fix now than later.
- Keep the magic ring tail handy. After Round 1, pull the short tail firmly to close the center hole, then hold it out of the way while you work.
- Work with good light. Fine cotton thread is thin, and good light makes the stitches much easier to see.
- Do not stuff too firmly. A light stuffing holds the shape without stretching the stitches apart.
Step-by-Step Instructions
Pad (make 1 flat circle, then fold)
With sage green, make a magic ring.
Rnd 1: Ch 1, work 6 sc into the ring, join with sl st to the first sc. (6 sc)
Rnd 2: Ch 1, 2 sc in each sc around, join with sl st. (12 sc)
Rnd 3: Ch 1, [2 sc in next sc, sc in next sc] 6 times, join with sl st. (18 sc)
Rnd 4: Ch 1, [2 sc in next sc, sc in next 2 sc] 6 times, join with sl st. (24 sc)
Rnd 5: Ch 1, [2 sc in next sc, sc in next 3 sc] 6 times, join with sl st. (30 sc)
Rnd 6: Ch 1, [2 sc in next sc, sc in next 4 sc] 6 times, join with sl st. (36 sc)
Rnd 7: Ch 1, [2 sc in next sc, sc in next 5 sc] 6 times, join with sl st. (42 sc)
Rnd 8: Ch 1, sc in each sc around, join with sl st. (42 sc)
Fasten off, leaving a 12-inch tail for seaming. Do not weave in yet.
Shaping the Pad
Fold the circle in half with the right sides facing out (the smooth, textured side you want to show), aligning the starting ring at the top center. The folded edge forms the rounded bottom of the pear pad; the open edges form the sides.
Using the long tail and tapestry needle, whipstitch the two open side edges together from the bottom fold up to the top, leaving a 1-inch opening at the top center for stuffing. Do not sew across the top opening yet.
Stem Loop
With sage green, join the thread at the top center of the pad (at the starting ring). Ch 10, then sl st back into the same join point to form a loop. Fasten off and weave in the ends securely.
Optional Surface Dots (Prickles)
With cream thread and tapestry needle, make 5–7 small straight stitches scattered over the front of the pad to suggest prickles. A straight stitch is simply bringing the needle up through the fabric at one point and down at another, leaving a short line of thread on the surface. Weave in the ends.
Filling
Lightly stuff the pouch through the top opening with fiberfill or dried lavender, using just enough to hold the shape without stretching the stitches. With the remaining sage tail, whipstitch the top opening closed.
Tassel
With dusty rose, cut 8 strands of thread about 4 inches long. Fold the bundle in half and tie a 6-inch length of thread tightly around the bundle about 1/2 inch below the fold to form the tassel head. Wrap the tie thread around the bundle 3–4 times and knot securely. Trim the bottom ends evenly. Using the long tie ends, attach the tassel to the bottom fold of the pad, knotting on the inside and weaving in the ends.
Assembly and Finishing
Seaming: Your side seams were already whipstitched in the Shaping step. To make them neat, keep your stitches small and even, and do not pull them tight, or the edge will pucker. The seam should lie flat.
Closing the top: After stuffing, whipstitch the top opening closed with the remaining sage tail. Work from one side to the other, catching both layers, then knot on the inside.
Weaving in ends: Thread each loose tail onto the tapestry needle and run it through the back of several stitches (about 1/2 inch), then trim close to the fabric. Never knot on the outside, as knots can work loose.
Blocking: Lightly mist the finished pouch with water and shape it with your fingers into a rounded pad. Let it air-dry completely. Do not soak it, since the stuffing may clump. Blocking smooths the stitches and helps the pouch hold its shape.
Pro Tips and Variations
- Change the colors: Use any cotton thread colors you like. A blush-pink pad with a cream tassel makes a sweet gift, and a deep green pad with a mustard tassel feels autumnal.
- Adjust the size: To make a larger pouch, continue the increase pattern (each round adds 6 stitches) for one or two more rounds, then work one plain round of sc. Remember that a larger pouch needs more stuffing and a longer seam.
- Substitute the yarn: Size 10 cotton thread can be replaced with size 3 cotton and a larger hook (such as a D/3 or E/4 hook) for a chunkier, faster pouch. Check your gauge and adjust the hook size to keep the finished size close to 2 inches.
- Make it a sachet: Fill with dried lavender or a few drops of essential oil on the fiberfill for a lovely scent. Sew the top closed securely so the filling stays inside.