Mossy Meadow Turtle Coaster Free Crochet Pattern – Textured Shell Coasters
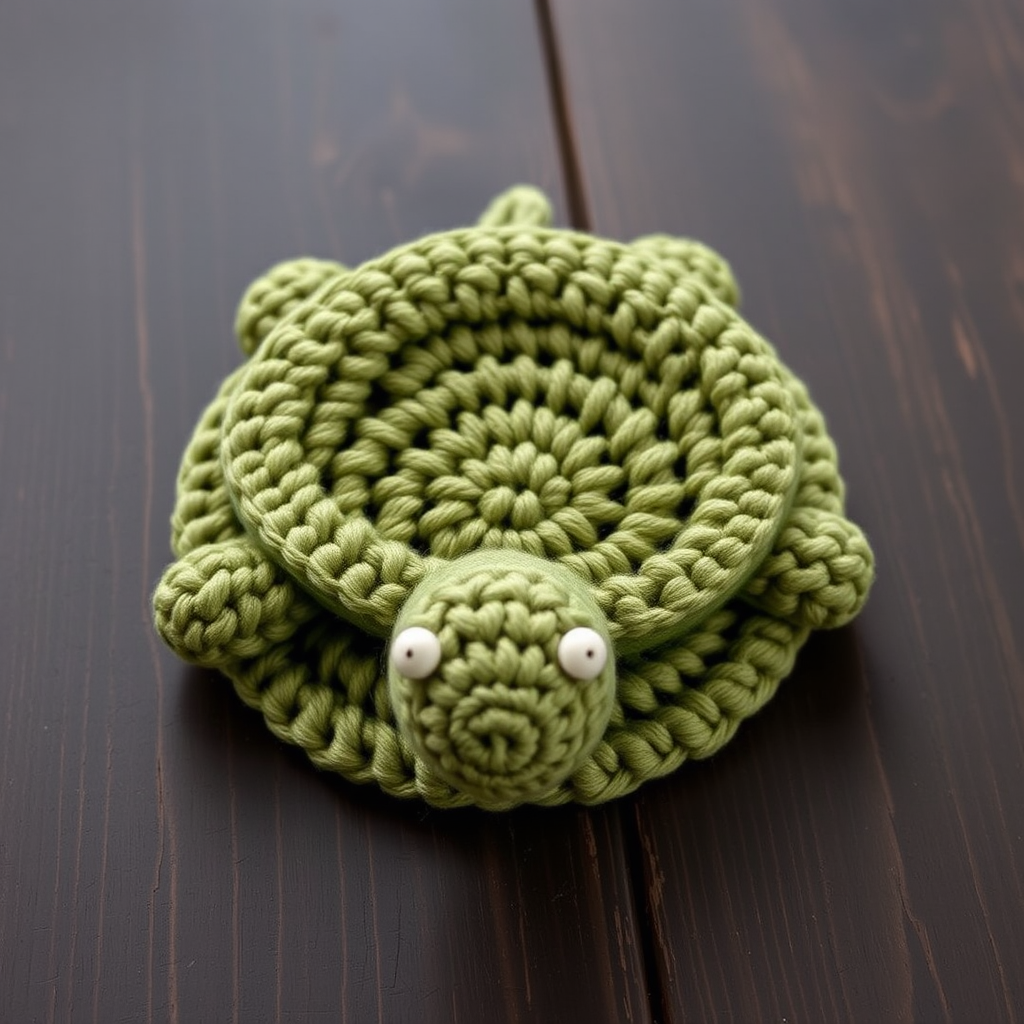
Mossy Meadow Turtle Coaster Free Crochet Pattern – Textured Shell Coasters
Bring a touch of woodland charm to your table with these adorable turtle coasters, featuring a richly textured shell and soft, earthy colors. Each coaster is a quick, satisfying project that adds cozy, handmade warmth to any space. Whether you're an experienced crocheter or just starting your amigurumi journey, this pattern is designed to be beginner-friendly while still producing a stunning, professional-looking result. The combination of moss green and sage green creates a natural, rustic aesthetic that pairs beautifully with any home decor style.
These charming coasters make wonderful handmade gifts for nature lovers, turtle enthusiasts, or anyone who appreciates the cozy warmth of handcrafted items. The dense single crochet texture not only looks beautiful but also provides excellent protection for your tabletops. With clear instructions and detailed steps, you'll be able to create a whole family of these delightful turtles in no time!
Materials Needed
Before you begin, gather the following materials to ensure a smooth and enjoyable crochet experience:
- Yarn: Worsted weight cotton yarn in sage green, moss green, and cream (approximately 30g of each color per coaster). Cotton yarn is recommended for its durability, absorbency, and ability to hold shape well.
- Hook: 3.5mm (E) crochet hook – this size creates a tight, dense fabric perfect for amigurumi and coasters.
- Fiberfill: Small amount of polyester fiberfill for stuffing the shell and body pieces.
- Stitch markers: To track your rounds, especially when working in continuous spirals.
- Yarn needle: For sewing pieces together and weaving in ends.
- Scissors: For cutting yarn.
- Optional: Blocking mats and pins if you choose to block your finished coaster.
Gauge: 4 sc x 4 rows = 1 inch (not critical, but keep consistent tension throughout your work for the best results).
Step-by-Step Instructions
This pattern is worked in continuous spirals unless otherwise noted. Use a stitch marker to track your rounds. The continuous spiral technique creates a seamless, smooth finish that's perfect for amigurumi pieces.
Turtle Shell (make 1)
The shell is the most prominent part of your turtle coaster, featuring a beautiful domed shape with dense texture. Work this piece in moss green yarn.
Round 1: With moss green, make a magic ring, 6 sc in ring. (6)
Tip: If you're new to magic rings, wrap the yarn around your finger twice, insert your hook, and pull up a loop. Then chain 1 and work your single crochets into the ring. Pull the tail to tighten.
Round 2: 2 sc in each st around. (12)
This is an increase round – you'll be working two single crochets into every stitch from the previous round.
Round 3: (Sc in next st, 2 sc in next st) around. (18)
This creates the classic increase pattern: one single crochet in the first stitch, then two single crochets in the next stitch. Repeat this sequence all the way around.
Round 4: (Sc in next 2 sts, 2 sc in next st) around. (24)
Round 5: (Sc in next 3 sts, 2 sc in next st) around. (30)
Round 6: (Sc in next 4 sts, 2 sc in next st) around. (36)
Round 7: (Sc in next 5 sts, 2 sc in next st) around. (42)
Round 8: (Sc in next 6 sts, 2 sc in next st) around. (48)
Round 9: (Sc in next 7 sts, 2 sc in next st) around. (54)
Round 10: (Sc in next 8 sts, 2 sc in next st) around. (60)
Notice how each round adds one more single crochet before the increase. This creates a perfectly flat circle that gradually forms a dome as you continue.
Rounds 11-13: Sc in each st around. (60)
These are straight rounds with no increases – simply work one single crochet in every stitch around. This creates the height of your shell dome.
Round 14: (Sc in next 8 sts, sc2tog) around. (54)
Now we begin decreasing. The sc2tog (single crochet two together) is worked by inserting your hook into the next stitch, pulling up a loop, inserting into the following stitch, pulling up another loop, then yarn over and pull through all three loops on your hook. This decreases your stitch count by one.
Round 15: (Sc in next 7 sts, sc2tog) around. (48)
Round 16: (Sc in next 6 sts, sc2tog) around. (42)
Round 17: (Sc in next 5 sts, sc2tog) around. (36)
Round 18: (Sc in next 4 sts, sc2tog) around. (30)
Round 19: (Sc in next 3 sts, sc2tog) around. (24)
Round 20: (Sc in next 2 sts, sc2tog) around. (18)
Stuff lightly with fiberfill to give a plush shape. The shell should be soft but firm enough to hold its dome shape. Don't overstuff – you want it to feel squishy and pleasant to the touch.
Round 21: (Sc in next st, sc2tog) around. (12)
Round 22: Sc2tog around. (6)
Fasten off, leaving a long tail. Thread the tail through a yarn needle and weave it through the front loops of the remaining 6 stitches. Pull tight to close the opening, then secure and weave in the end.
Turtle Body (make 1)
The body forms the base of your coaster and will be visible from underneath. Work this piece in sage green yarn.
Round 1: With sage green, make a magic ring, 6 sc in ring. (6)
Round 2: 2 sc in each st around. (12)
Round 3: (Sc in next st, 2 sc in next st) around. (18)
Round 4: (Sc in next 2 sts, 2 sc in next st) around. (24)
Rounds 5-7: Sc in each st around. (24)
These straight rounds create the flat, wide base of the body that will sit nicely on your table.
Round 8: (Sc in next 2 sts, sc2tog) around. (18)
Round 9: (Sc in next st, sc2tog) around. (12)
Fasten off, leaving a long tail for sewing. Stuff lightly with fiberfill – just enough to give it a soft, rounded shape without being too bulky.
Head (make 1)
The head gives your turtle its charming personality. Work this piece in sage green yarn.
Round 1: With sage green, make a magic ring, 6 sc in ring. (6)
Round 2: 2 sc in each st around. (12)
Rounds 3-5: Sc in each st around. (12)
These straight rounds create the length of the head, giving it a cute, slightly elongated shape.
Round 6: (Sc in next st, sc2tog) around. (8)
Round 7: Sc in each st around. (8)
Fasten off, leaving a long tail. Stuff lightly with fiberfill. The head should be soft and slightly squishy, not too firm.
Legs (make 4)
These little stubby legs add character and help your coaster sit flat. Work them in sage green yarn.
Round 1: With sage green, make a magic ring, 6 sc in ring. (6)
Round 2: (Sc in next st, 2 sc in next st) around. (9)
Rounds 3-4: Sc in each st around. (9)
Fasten off, leaving a long tail. Stuff lightly with fiberfill. The legs should be small and compact – they're meant to be cute and stubby!
Tail (make 1)
The tiny tail completes your turtle's silhouette. Work it in sage green yarn.
Round 1: With sage green, make a magic ring, 4 sc in ring. (4)
Round 2: Sc in each st around. (4)
Round 3: Sc in next st, 2 sc in next st, sc in next 2 sts. (5)
Fasten off, leaving a long tail. Stuff lightly with fiberfill. The tail should be small and pointed, adding a cute finishing touch.
Assembly
Now it's time to bring all your pieces together to create your adorable turtle coaster!
Step 1: Position the body under the shell, aligning the flat edges. The body should be centered beneath the shell dome. Sew the body to the shell using the long tail from the body, stitching around the perimeter with small, even stitches. Leave a small opening to add a bit more stuffing if needed, then close the opening securely.
Step 2: Sew the head to the front of the body, centered. The head should protrude outward from the body, creating the classic turtle silhouette. Use the long tail from the head to sew it securely in place, making sure it's well-attached.
Step 3: Sew the legs to the sides of the body, two on each side, evenly spaced. Position them so they extend outward slightly, giving your turtle a stable, balanced look. Use the long tails from each leg to sew them securely.
Step 4: Sew the tail to the back of the body, centered. The tail should point outward and slightly upward for that authentic turtle look.
Step 5: With cream yarn, embroider small eyes on the head using a French knot or a few straight stitches. For a French knot: bring the yarn up through the head, wrap the yarn around the needle twice, then insert the needle back down close to where it came up. Pull gently to create a small, round knot. Place the eyes about 2-3 stitches apart, centered on the head.
Step 6: Optionally, add a small smile with a backstitch using the cream yarn. This adds extra charm and personality to your turtle's face.
Step 7: Weave in all ends carefully, making sure no loose threads are visible. Trim any excess yarn.
Step 8: Block gently if desired. To block, lightly mist your coaster with water and shape it, then allow it to dry completely. This helps even out your stitches and gives a more polished finish.
Tips for Perfect Results
To ensure your turtle coasters turn out beautifully, keep these helpful tips in mind:
- Maintain consistent tension: This is key to creating an even, professional-looking fabric. Try to keep your stitches uniform throughout the project.
- Use stitch markers: Since you're working in continuous spirals, it's easy to lose track of where each round begins. Place a stitch marker in the first stitch of each round and move it up as you go.
- Count your stitches: After each round, count your stitches to ensure you have the correct number before moving on. This prevents mistakes from compounding.
- Stuff gradually: When stuffing the shell, add fiberfill gradually and check the firmness as you go. You want it soft enough to be squishy but firm enough to hold its shape.
- Take your time with assembly: Proper placement of the head, legs, and tail makes a big difference in the final look. Step back and check the positioning before sewing each piece in place.
These charming turtle coasters make wonderful additions to your home or thoughtful handmade gifts for friends and family. They're perfect for nature-themed table settings, cottagecore aesthetics, or simply adding a touch of whimsy to your daily coffee or tea time. The textured shell and sweet expression are sure to bring smiles to everyone who sees them!
Happy crocheting, and enjoy your new mossy meadow companions!


