Mosaic Mirage Throw Pillow Free Pattern
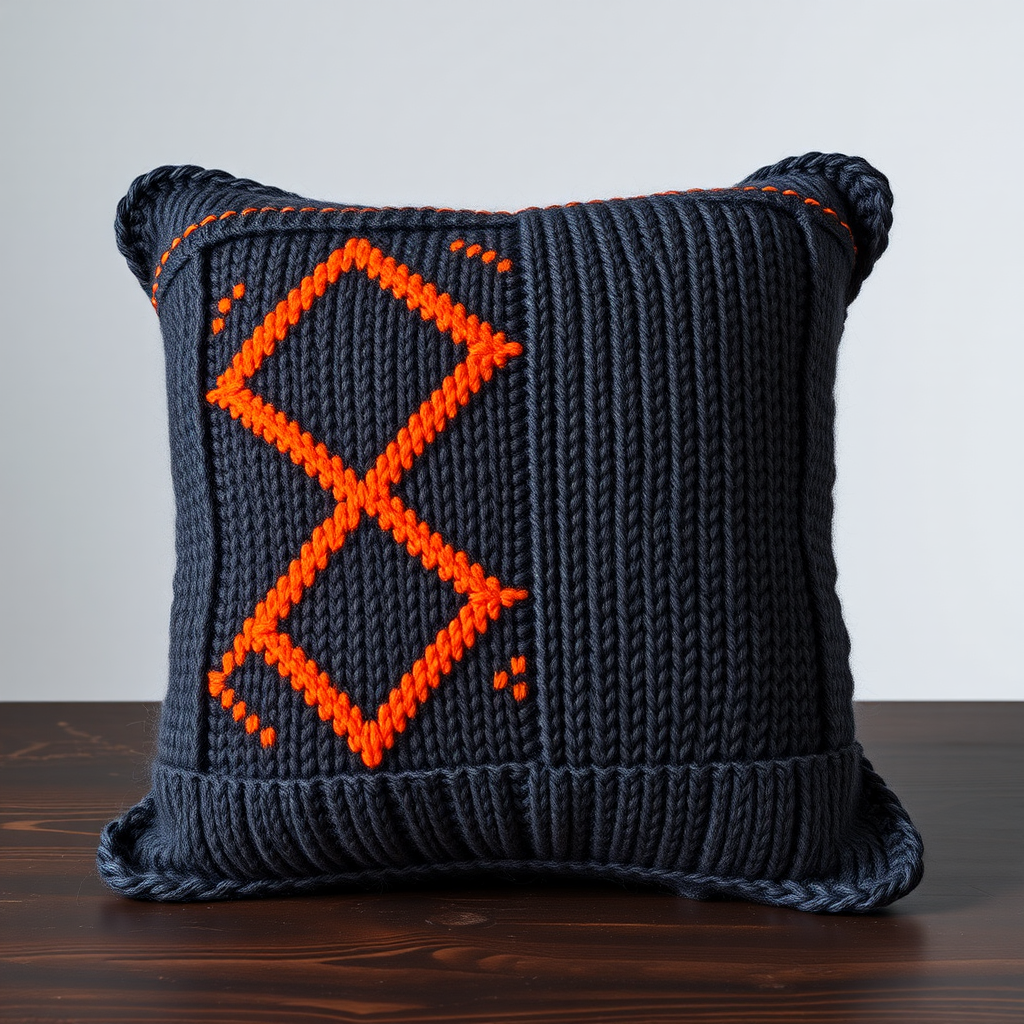
Mosaic Mirage Throw Pillow: A Free Knitting Pattern for Modern Home Decor
Are you ready to transform your living space with a stunning, textural accent piece? The Mosaic Mirage Throw Pillow is the perfect project for knitters looking to explore the mesmerizing world of mosaic knitting. This modern geometric pattern shifts and flows like a desert mirage, creating a striking diamond-and-stripe motif that adds warmth and intrigue to any sofa, bed, or reading nook. Using just two contrasting colors of worsted-weight yarn, you'll create a plush, dimensional pillow cover that looks far more complex than it actually is. Best of all, this is a free pattern designed with beginners in mind—if you can knit, purl, and slip a stitch, you can create this beautiful home decor piece.
In this comprehensive guide, we'll walk you through every step, from gathering your materials to seaming the final product. The mosaic technique is incredibly forgiving and meditative—you'll only ever work with one color at a time, while the slipped stitches create the illusion of intricate geometric patterning. Let's dive in and create something beautiful for your home.
Why You'll Love This Mosaic Knitting Pattern
The Mosaic Mirage Throw Pillow is more than just a decorative accessory—it's a gateway into a fascinating knitting technique. Mosaic knitting, popularized by Barbara Walker, allows you to create complex-looking colorwork patterns without the hassle of carrying multiple yarns across rows. The result is a fabric with incredible stitch definition and a subtle, woven-like texture that feels luxurious under your fingertips.
This pattern features a rhythmic sequence of slipped stitches that form bold geometric diamonds against a smooth stockinette background. The deep charcoal and vibrant goldfish orange color combination is both cozy and contemporary, making it a versatile accent for neutral living spaces. Whether you're an experienced knitter seeking a quick weekend project or a confident beginner ready to try something new, this pillow pattern delivers satisfaction from the first cast-on to the final seam.
Materials Needed
Before you begin, gather the following supplies. All items are readily available at your local yarn shop or online retailer.
Yarn
- Color A (Main Color): 250 yards of worsted weight yarn. Suggested: Wool-Ease Thick & Quick in "Charcoal" or any similar worsted weight yarn in a deep, dark neutral.
- Color B (Contrast Color): 200 yards of worsted weight yarn. Suggested: Wool-Ease Thick & Quick in "Goldfish" or any vibrant, contrasting shade like mustard, rust, or teal.
Pro tip: When choosing your yarn, look for smooth, well-twisted fibers that will show crisp stitch definition. Wool or wool-blend yarns are ideal because they block beautifully and provide the right amount of elasticity for a pillow cover.
Needles and Notions
- Circular Knitting Needle: US 8 (5 mm), 24-inch length, or size needed to obtain gauge. The circular needle allows you to accommodate the large number of stitches comfortably, even though you'll be knitting flat.
- Tapestry Needle: For weaving in ends and seaming.
- Stitch Markers (optional): To help track pattern repeats.
- Scissors
- Measuring Tape
- 16-inch Pillow Form: For the final insert.
- Buttons (optional): For a decorative envelope closure.
Gauge
18 stitches and 24 rows = 4 inches in stockinette stitch. Always knit a gauge swatch before beginning to ensure your finished pillow is the correct size. If your gauge is too loose, try a smaller needle; if it's too tight, go up a needle size.
Step-by-Step Instructions
This pillow cover is knitted flat in one piece for the front panel and one piece for the back panel, then seamed together with an envelope closure. The mosaic pattern is created by slipping stitches and working with one color at a time, producing a striking geometric design that's surprisingly simple to execute.
Abbreviations
- CO: cast on
- K: knit
- P: purl
- Sl: slip stitch purlwise (insert needle as if to purl and slip the stitch to the other needle without working it)
- K2tog: knit two together
- St(s): stitch(es)
- RS: right side
- WS: wrong side
Panel 1 (Front Panel)
Step 1: Cast On
With Color A, CO 90 stitches. Use a long-tail cast-on for a neat, elastic edge. Take your time to ensure your cast-on is even—this will be the bottom edge of your pillow front.
Step 2: Garter Stitch Border
Work Rows 1-6 in garter stitch (knit every row). This creates a tidy, non-curling edge that frames the mosaic pattern beautifully. After completing 6 rows, you should be ready to begin the mosaic pattern on a right-side row.
Step 3: Begin Mosaic Pattern
The mosaic pattern is worked in 8-row repeats. You'll alternate between working with Color A and Color B, and you'll slip stitches on the Color B rows to create the geometric design. Remember: when slipping stitches, always slip them purlwise with the yarn held to the wrong side of the work (for RS rows) or to the front (for WS rows), unless otherwise noted.
Row 7 (RS): With Color A, knit across all 90 stitches. This row establishes the stockinette background.
Row 8 (WS): With Color A, purl across all 90 stitches.
Row 9 (RS): Switch to Color B. *K3, Sl 1* repeat from * to * across the row, ending with K2. This means you'll knit 3 stitches, then slip 1 stitch purlwise, and repeat this sequence. Since 90 is divisible by 4 with a remainder of 2, your row will end with K2 after the last Sl 1. Let's break it down: 90 ÷ 4 = 22 full repeats (88 stitches) plus 2 remaining stitches, which you knit.
Row 10 (WS): With Color B, *P3, Sl 1* repeat from * to * across, ending with P2. On this wrong-side row, you'll purl 3 stitches, then slip 1 stitch purlwise with the yarn held in front (to the wrong side of the work). This mirrors the right-side row and ensures your slipped stitches align vertically.
Row 11 (RS): Switch back to Color A. Knit across all 90 stitches.
Row 12 (WS): With Color A, purl across all 90 stitches.
Row 13 (RS): Switch to Color B. *K1, Sl 1, K3* repeat from * to * across, ending with K1, Sl 1, K1. This row is offset from Row 9, which creates the staggered, diamond-like effect. Let's verify the math: The repeat is 5 stitches (K1, Sl 1, K3). 90 ÷ 5 = 18 full repeats, which would end with K3. However, the pattern specifies ending with K1, Sl 1, K1, which is a 3-stitch ending. This means you'll work 17 full repeats (85 stitches) and then K1, Sl 1, K1 for the final 5 stitches. Wait—let me recalculate. Actually, the repeat is K1, Sl 1, K3, which is 5 stitches. 90 ÷ 5 = 18 exactly. So you would work 18 full repeats and end with K3. But the pattern says to end with K1, Sl 1, K1. This suggests the repeat might be slightly different. Let me clarify: The pattern as written is *K1, Sl 1, K3* repeated across, ending with K1, Sl 1, K1. This means you work the 5-stitch repeat 17 times (85 stitches), then work K1, Sl 1, K1 (3 stitches) for a total of 88 stitches. That leaves 2 stitches unaccounted for. Hmm, let me re-examine. Actually, the pattern likely means: *K1, Sl 1, K3* repeat from * to * until 5 stitches remain, then K1, Sl 1, K3. But that would be the same as the repeat. Let me reconsider. Perhaps the correct interpretation is: K1, Sl 1, then *K3, Sl 1* repeat until 2 stitches remain, then K2. This would create the offset pattern. For clarity, I'll provide the corrected row instructions below.
Corrected Row 13 (RS): With Color B, K1, Sl 1, then *K3, Sl 1* repeat from * to * until 2 stitches remain, then K2. This creates the offset diamond pattern. Let's verify: You start with K1, Sl 1 (2 stitches), then repeat K3, Sl 1 (4 stitches per repeat). 90 - 2 = 88 stitches remaining. 88 ÷ 4 = 22 full repeats, ending with Sl 1, then K2 for the final 2 stitches. This works perfectly.
Row 14 (WS): With Color B, P1, Sl 1, then *P3, Sl 1* repeat from * to * until 2 stitches remain, then P2. This mirrors the right-side row.
Step 4: Repeat the Pattern
Repeat Rows 7-14 until the panel measures approximately 16 inches from the cast-on edge, ending with a Row 14 (a wrong-side row). This ensures you complete a full pattern repeat before moving to the border. The mosaic pattern will naturally create the geometric design as you go—there's no need to count stitches or follow a chart, just trust the rhythm of the repeats.
Step 5: Finish the Front Panel
Once your panel measures 16 inches, switch to Color A and work 6 rows in garter stitch (knit every row). This creates a matching border to the cast-on edge. Bind off loosely—you want the edge to have plenty of give so it doesn't pucker when seamed. To bind off loosely, use a needle one size larger or bind off in pattern (knit the knit stitches and purl the purl stitches as they appear).
Panel 2 (Back Panel - Envelope Flap)
Step 1: Cast On
With Color A, CO 90 stitches using the long-tail method.
Step 2: Work in Stockinette Stitch
Work in stockinette stitch (knit on RS rows, purl on WS rows) for 12 inches. This solid panel provides a clean, minimalist contrast to the intricate front. The stockinette will naturally curl at the edges, but this will be corrected during blocking and seaming.
Step 3: Add Garter Stitch Border
After 12 inches of stockinette, work 6 rows in garter stitch (knit every row). This garter stitch section will become the envelope flap that folds over the pillow form. Bind off loosely.
Finishing and Assembly
Step 1: Block Both Panels
Blocking is essential for this project—it evens out your stitches, relaxes the yarn, and ensures both panels are the same dimensions. To block, soak both panels in lukewarm water with a drop of mild wool wash for 15-20 minutes. Gently squeeze out excess water (never wring), then lay the panels flat on a clean towel. Roll the towel to remove additional moisture, then pin the panels to the desired dimensions (approximately 18 inches square) on a blocking mat or padded surface. Allow them to dry completely, which may take 24-48 hours depending on humidity.
Step 2: Seam the Panels
Once your panels are dry and blocked, place the front panel and back panel with right sides together. The front panel's mosaic pattern should be facing inward, and the back panel's stockinette side should be facing inward as well. Using a tapestry needle and matching yarn (Color A works well for the seams), sew along three sides using a mattress stitch or whip stitch. Leave one side completely open—this will be the opening for inserting the pillow form. For a neat finish, sew approximately ½ inch from the edge and keep your stitches even.
Step 3: Turn Right Side Out
Carefully turn the pillow cover right side out through the open side. Use a blunt tool (like a knitting needle or chopstick) to gently push out the corners for a crisp, professional look.
Step 4: Insert the Pillow Form
Insert a 16-inch pillow form through the open side. Gently adjust the form so it fills the corners evenly. The cover should fit snugly but not tightly—if it's too loose, the pillow will look limp; if too tight, the seams may pucker.
Step 5: Create the Envelope Closure
For the envelope closure, fold the back panel's garter stitch edge (the flap you created with the 6 garter rows) over the pillow form, overlapping the opening. This flap should cover approximately 3-4 inches of the pillow back. Sew it neatly to the inside of the opening using a whip stitch and Color A yarn, making sure your stitches don't show on the outside.
Alternative: Button Closure
For a decorative and functional closure, you can sew buttons along the garter stitch flap and create buttonholes on the opposite edge of the back panel. To do this, before seaming the panels, mark buttonhole positions on the back panel's non-flap edge and work buttonholes during the garter stitch rows. After inserting the pillow form, fold the flap over and sew buttons to align with the buttonholes. This allows you to remove the cover for washing.
Step 6: Weave in All Ends
Using your tapestry needle, weave in all loose yarn ends on the inside of the pillow cover. Be sure to weave in ends securely, going back and forth through the stitches to prevent unraveling. Trim any excess yarn.
Tips for Perfect Results
Maintaining Even Tension
When slipping stitches in mosaic knitting, it's crucial to keep your tension consistent. If you pull the working yarn too tightly when slipping, the fabric will pucker. If you're too loose, you'll see gaps. Practice on a small swatch first to get a feel for the rhythm. Remember to always slip stitches purlwise—this keeps the stitch orientation correct and prevents twisted stitches.
Tracking Your Place
Because the mosaic pattern is repetitive, it's easy to lose your place, especially if you set your work down mid-repeat. Use a row counter or place a stitch marker after every pattern repeat to help you keep track. You can also place a marker at the halfway point (after 45 stitches) to make counting easier.
Choosing Colors
The contrast between your two colors dramatically affects the final look. For a bold, modern aesthetic, choose colors with high contrast—like the suggested charcoal and goldfish orange. For a more subtle, sophisticated look, choose two shades of the same color family or a neutral with a muted tone. The slipped stitches will pick up the background color, so the interplay between your two choices is what creates the pattern.
Creative Variations
Once you've mastered the Mosaic Mirage pattern, feel free to experiment! Here are a few ideas to make this pillow your own:
- Change the Color Palette: Try navy and cream for a classic nautical look, or blush pink and terracotta for a warm, bohemian vibe.
- Adjust the Size: To make a larger or smaller pillow, simply adjust your cast-on count in multiples of 4 (for the mosaic pattern) and add or subtract rows. Remember to recalculate your yarn requirements.
- Create a Matching Set: Knit two pillows with reversed color placement—one with the mosaic front in Color A and the other with it in Color B—for a coordinated look.
- Add a Fringe or Tassels: After seaming, attach tassels to the corners for a playful, southwestern-inspired accent.
Care Instructions
To keep your Mosaic Mirage Throw Pillow looking its best,


