Meadow Mist Lace Crochet Scarf Free Pattern
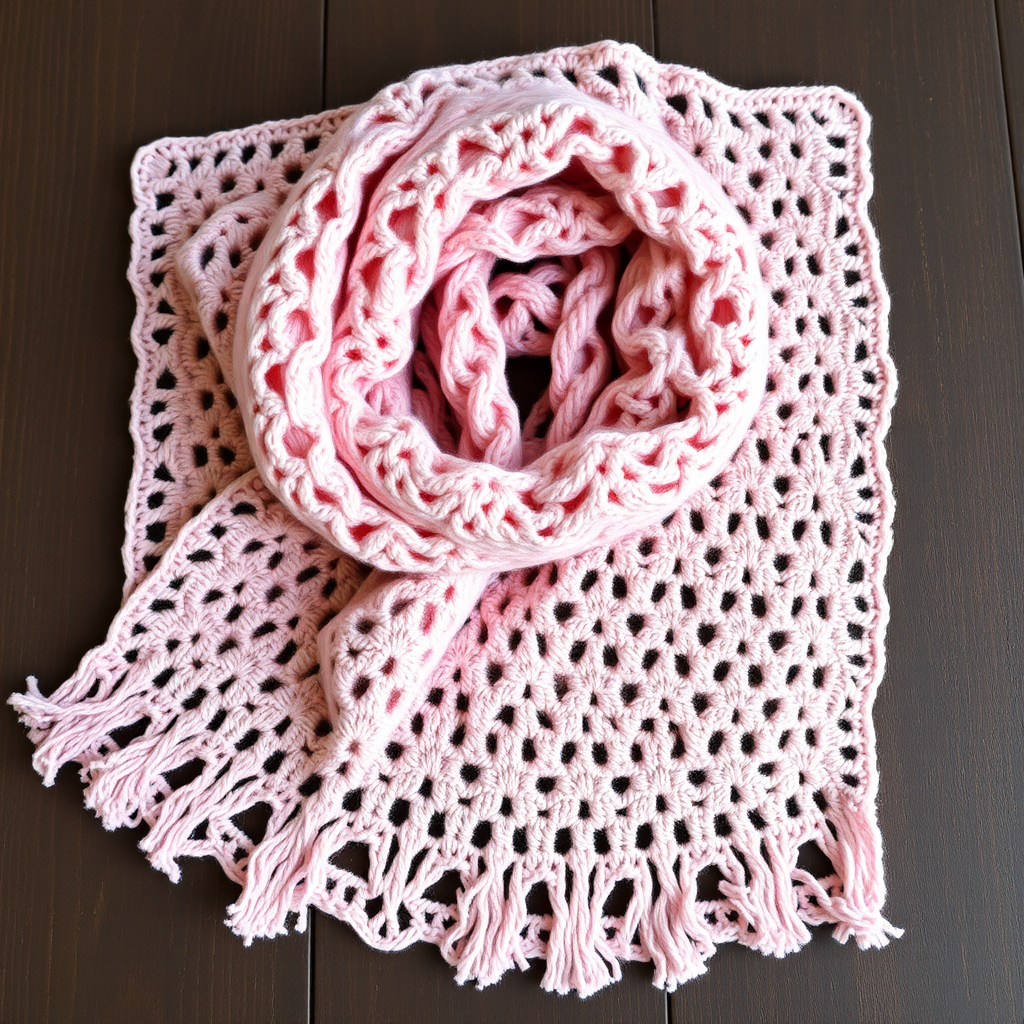
Meadow Mist Lace Crochet Scarf: A Free Pattern for Beginners
Wrap yourself in the delicate beauty of a lacy crochet scarf that mimics the soft petals of spring wildflowers. The Meadow Mist Lace Scarf is an airy, romantic accessory that adds a touch of handmade elegance to any outfit—whether draped over a sundress or paired with a cozy cardigan. This free pattern is designed with beginners in mind, using simple stitches like double crochet and chains to create a stunning, floral-like texture. The result is a lightweight, breathable scarf that drapes gracefully and feels like a gentle spring breeze against your skin.
With its open shells and V-stitches, this pattern creates a mesmerizing openwork design that resembles misty wildflowers. The soft, muted blush pink shade enhances the stitch definition, giving the scarf a subtle sheen that catches the light beautifully. Whether you're crafting for yourself or creating a heartfelt handmade gift, this scarf is sure to become a treasured piece in any wardrobe.
Materials Needed
Before you begin, gather the following supplies to ensure a smooth and enjoyable crochet experience:
- Yarn: DK weight (3) cotton or cotton-blend yarn in a soft pastel shade, such as blush pink or sage green (approx. 350-400 yards). The sample uses a beautiful muted blush pink with a subtle sheen.
- Crochet Hook: I/9 (5.5 mm) crochet hook—a comfortable size that works well with DK weight yarn.
- Scissors: For cutting yarn and trimming fringe.
- Tapestry Needle: For weaving in ends and finishing touches.
- Measuring Tape: To check your gauge and finished measurements.
- Blocking Mats and Pins (optional but recommended): For wet blocking to open up the lace pattern beautifully.
Gauge Information
Gauge: 4 pattern repeats (each repeat is 8 stitches) and 8 rows = 4 inches in the lace pattern (after blocking). While gauge is important for exact sizing, this scarf is forgiving—even if your gauge is slightly off, the scarf will still look lovely. However, for the best drape and to achieve the stated finished measurements, it's worth checking your gauge first.
Step-by-Step Instructions
Finished Measurements
Approx. 12 inches wide and 70 inches long (excluding fringe). This is easily adjustable—simply work more or fewer rows for a shorter or longer scarf, or adjust your starting chain for a different width.
Special Stitches
You'll only need to know two special stitches for this pattern, both of which are simple variations of basic crochet stitches:
- Shell (sh): Work 5 double crochet (dc) in the same stitch or space. This creates a fan-like shape that forms the "petals" of your wildflowers.
- V-stitch (v-st): (Dc, ch 1, dc) in the same stitch or space. This creates a subtle "V" shape that adds airy texture between the shells.
Pattern Notes
- Worked flat in rows. Chain counts at the beginning of rows count as the first stitch unless otherwise noted.
- The pattern is a multiple of 8 + 1 stitches. This means your starting chain should be a number that, when divided by 8, leaves a remainder of 1 (like 49, 57, 65, etc.).
- Always turn your work at the end of each row as indicated.
- Take your time with the first few rows—once you see the pattern emerging, it becomes very intuitive and rhythmic.
Foundation Chain
Chain 49 (or any multiple of 8 + 1 for your desired width). For a wider scarf, add 8 chains at a time. For a narrower scarf, subtract 8 chains. The sample uses 49 chains, which creates a scarf approximately 12 inches wide.
Row 1: Establishing the Pattern
This first row sets up the entire lace pattern, so take your time and count your stitches carefully.
- Dc in the 4th ch from your hook. (The skipped 3 chains count as your first dc, so you now have 2 dc at the beginning of the row.)
- *Ch 2, skip the next 3 chains.
- Work a shell (5 dc) in the next chain.
- Ch 2, skip the next 3 chains.
- Work a v-st (dc, ch 1, dc) in the next chain.
- Repeat from * across the row, ending with a dc in the very last chain.
- Turn your work.
You should have 6 full pattern repeats plus a half-repeat at each end. Don't worry if this doesn't look like much yet—the magic happens in the next rows!
Row 2: Building the Lace
Now you'll start working into the spaces created in Row 1, which builds the vertical columns of your lace pattern.
- Ch 3 (this counts as your first dc).
- *Ch 2, skip the next ch-2 space.
- Work a shell (5 dc) in the center dc of the next shell from the previous row. Important: The center dc is the 3rd dc of the 5-dc shell. This stacks your shells on top of each other, creating the floral columns.
- Ch 2, skip the next ch-2 space.
- Work a v-st (dc, ch 1, dc) in the ch-1 space of the next v-st from the previous row.
- Repeat from * across the row, ending with a dc in the top of the turning chain from the previous row.
- Turn your work.
Row 3: Continuing the Rhythm
Row 3 is identical to Row 2. This repetition is what creates the beautiful, consistent lace pattern.
- Ch 3 (counts as first dc).
- *Ch 2, skip the next ch-2 space.
- Work a shell (5 dc) in the center dc of the next shell.
- Ch 2, skip the next ch-2 space.
- Work a v-st (dc, ch 1, dc) in the ch-1 space of the next v-st.
- Repeat from * across, ending with a dc in the top of the turning chain.
- Turn your work.
Rows 4-100: Achieving Your Desired Length
Now that you've established the pattern, the rest is pure relaxation and rhythm! Here's what to do:
- Repeat Row 3 for all subsequent rows until your scarf reaches your desired length. The sample scarf uses approximately 100 rows to achieve a length of 70 inches, but you can easily make it shorter or longer to suit your preference.
- Important: Always end after completing a full pattern repeat. This means you should finish on a row that ends with a dc in the top of the turning chain, with the shells and v-sts aligned properly. A good way to check is to ensure your last row looks identical to Row 3 in structure.
- When you reach your desired length, fasten off by cutting your yarn, leaving a 6-inch tail. Pull the tail through the loop on your hook and tighten gently.
- Weave in all loose ends using your tapestry needle. Thread the needle with the yarn tail and weave it through the back of several stitches, then trim the excess. Repeat for all ends.
Adding Fringe (Optional but Beautiful)
Fringe adds a playful, boho touch to the scarf and helps anchor the delicate lace edges. Here's how to add it perfectly:
- Cut your yarn into 12-inch strands. You'll need approximately 3 strands per fringe, and you'll want fringe every 1 inch along both short ends of the scarf.
- For each fringe: Take 3 strands and fold them in half to create a loop at the midpoint.
- Insert your crochet hook through the edge stitch of the scarf (along the short end), from front to back.
- Catch the folded loop of yarn with your hook and pull it through the edge stitch, creating a loop on the front of your work.
- Take the loose ends of the yarn strands and pull them through the loop you just created.
- Pull the ends gently to tighten the fringe knot against the edge of the scarf.
- Repeat this process along both short ends, spacing each fringe about 1 inch apart.
- Once all fringe is attached, trim the ends evenly with sharp scissors to create a clean, polished look.
Blocking: The Final Magic Touch
Blocking is essential for lace patterns—it opens up the stitches, evens out your tension, and transforms your scarf from "pretty" to "professional." Don't skip this step!
- Fill a clean sink or basin with cool water and add a drop of mild wool wash or gentle detergent.
- Submerge your scarf completely and let it soak for 15-20 minutes. Gently press the water through the fabric—do not wring or twist, as this can distort the stitches.
- Drain the water and gently press excess moisture out of the scarf. You can roll it in a clean towel to remove additional water.
- Lay the scarf flat on blocking mats or a clean, dry towel.
- Gently stretch the scarf to your desired measurements (12 inches wide by 70 inches long). Use rust-proof pins to secure the edges, especially along the scalloped shell edges, to open up the lace pattern.
- Allow the scarf to dry completely—this can take 24-48 hours depending on humidity.
- Once completely dry, remove the pins and admire your beautiful, professionally finished scarf!
Tips for Success
- Count your stitches at the end of each row for the first few rows. It's much easier to fix a mistake early than to rip out many rows later.
- Use stitch markers at the center dc of each shell if you find it challenging to locate the 3rd dc. This is especially helpful when you're first learning the pattern.
- Choose the right yarn. Cotton or cotton-blend yarns hold their shape beautifully and show stitch definition well. The subtle sheen of a mercerized cotton adds extra elegance to the lace.
- Be patient with blocking. The transformation is remarkable—the scarf will look much more open and delicate after blocking.
- Make it yours. Try different colors like sage green, lavender, or soft butter yellow. You can also adjust the width by adding or subtracting multiples of 8 chains.
This Meadow Mist Lace Scarf is more than just an accessory—it's a wearable piece of art that showcases the beauty of crochet. The rhythmic repetition of shells and V-stitches makes it a meditative project, perfect for relaxing evenings or mindful crafting sessions. Whether you're a beginner looking to expand your skills or an experienced crocheter seeking a quick, satisfying project, this scarf delivers beauty, elegance, and practicality in every stitch.
So grab your hook, choose your favorite pastel yarn, and let the misty meadow inspire your next handmade creation. Happy crocheting!


