Meadow Mates Gnome Free Pattern
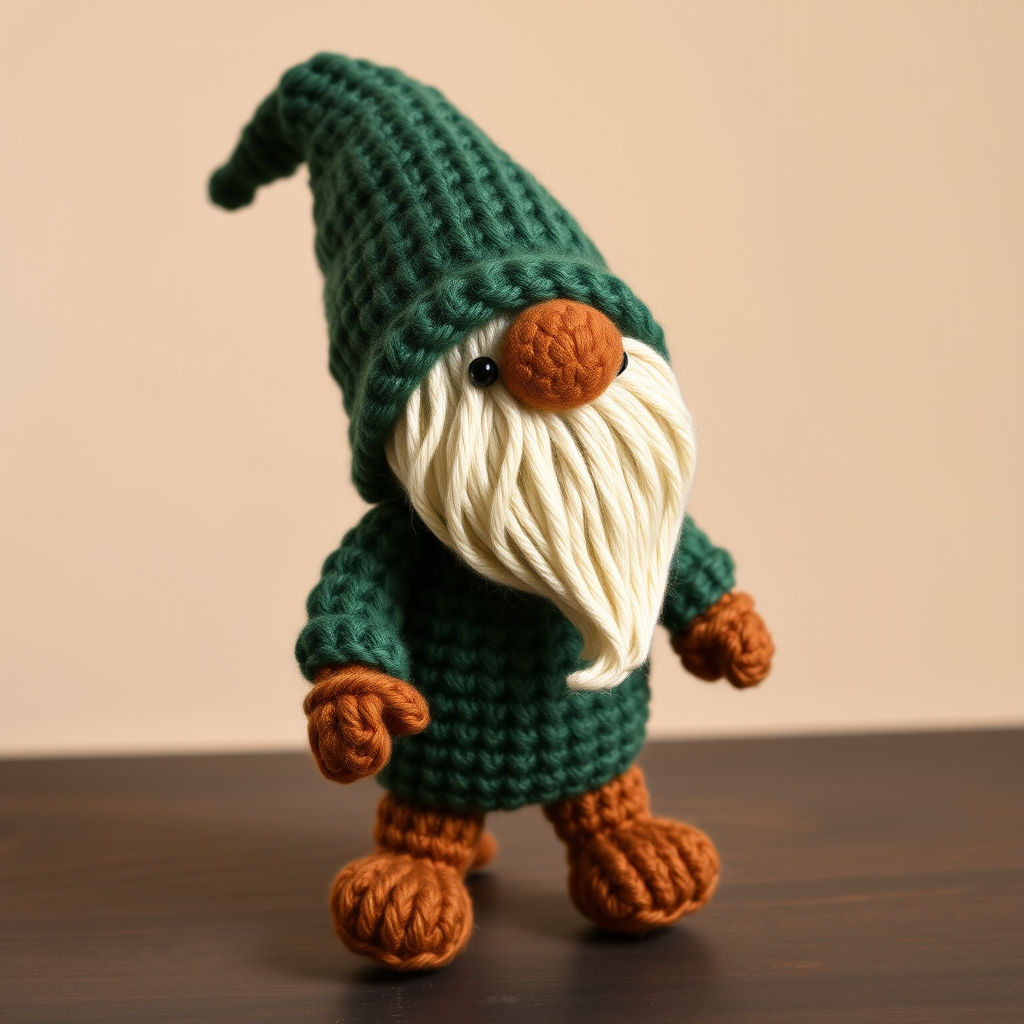
Meet the Meadow Mates Gnome: A Whimsical Crochet Project for Beginners
Bring a touch of woodland magic into your home with the Meadow Mates Gnome! This detailed crochet pattern guides you through creating a charming set of tiny garden gnomes, each featuring a delightfully textured beard and a cozy, earthy color palette. Standing at approximately 4 inches tall, these little fellows are perfect for shelf decor, table centerpieces, or heartfelt handmade gifts. Whether you're a seasoned crocheter or a curious beginner, this amigurumi project is designed to be both rewarding and enjoyable. Let's gather our supplies and start crafting this rustic, whimsical friend!
Materials Needed
Before you begin, ensure you have all the necessary materials on hand. This project uses simple, readily available supplies:
- Yarn: Worsted weight yarn in the following colors:
- Forest Green (for the body, hat, and arms)
- Cream (for the beard and head)
- Rust Orange (for the nose)
- Soft Brown (for the legs)
- Crochet Hook: 3.5 mm (E-4) crochet hook.
- Other Tools: Stitch marker, yarn needle, scissors, and polyester fiberfill for stuffing.
- Optional: Black yarn or safety eyes for the face, and a small piece of contrasting yarn for a decorative flower.
Note: Gauge is 4 sc x 4 rows = 1 inch. While gauge isn't critical for this project, maintaining consistent tension will ensure your gnome turns out evenly shaped.
Step-by-Step Instructions
This pattern is worked in continuous rounds unless otherwise stated. Always use a stitch marker to track the beginning of each round. Let's break down the process into manageable parts.
Part 1: Head and Body (Worked as One Piece)
We'll start with the head and body, using your cream yarn.
- Round 1: Make a magic ring, work 6 single crochet (sc) into the ring. (6 stitches)
- Round 2: Work 2 sc in each stitch around. (12 stitches)
- Round 3: *Sc in the next stitch, 2 sc in the next stitch*; repeat from * to * around. (18 stitches)
- Round 4: *Sc in the next 2 stitches, 2 sc in the next stitch*; repeat from * to * around. (24 stitches)
- Rounds 5-8: Sc in each stitch around. (24 stitches)
- Round 9: *Sc in the next 2 stitches, sc2tog (single crochet two together)*; repeat from * to * around. (18 stitches)
- Round 10: *Sc in the next stitch, sc2tog*; repeat from * to * around. (12 stitches)
- Stuff the head firmly with polyester fiberfill to give it a nice, round shape.
- Round 11: Sc2tog around. (6 stitches)
- Fasten off, leaving a long tail. Thread the tail through a yarn needle, weave it through the front loops of the remaining 6 stitches, and pull tight to close the hole. Secure and set aside.
Part 2: The Nose
Next, we'll create the prominent rust orange nose.
- Round 1: With rust orange yarn, make a magic ring, work 6 sc into the ring. (6 stitches)
- Round 2: Sc in each stitch around. (6 stitches)
- Fasten off, leaving a tail for sewing. Stuff the nose lightly with a tiny amount of fiberfill.
- Assembly: Sew the nose to the center of the face, positioning it about 3 rounds above the bottom of the head (where the neck would be).
Part 3: The Textured Beard
Now for the signature feature—the beard! Attach your cream yarn to the bottom of the face, just below the nose. We'll work in rows back and forth.
- Row 1: Chain 1, sc in the same stitch, sc in the next 5 stitches across the face. (6 stitches)
- Row 2: Chain 1, turn, sc in each stitch across. (6 stitches)
- Row 3: Chain 1, turn, sc2tog, sc in the next 2 stitches, sc2tog. (4 stitches)
- Row 4: Chain 1, turn, sc2tog twice. (2 stitches)
- Fasten off and weave in the ends. You can trim the beard with scissors to shape it into a neat, bushy point.
Part 4: The Forest Green Hat
The hat is a key visual element. Use your forest green yarn.
- Round 1: Make a magic ring, work 6 sc into the ring. (6 stitches)
- Round 2: 2 sc in each stitch around. (12 stitches)
- Round 3: *Sc in the next stitch, 2 sc in the next stitch*; repeat around. (18 stitches)
- Rounds 4-6: Sc in each stitch around. (18 stitches)
- Round 7: *Sc in the next 2 stitches, 2 sc in the next stitch*; repeat around. (24 stitches)
- Rounds 8-10: Sc in each stitch around. (24 stitches)
- Round 11: *Sc in the next 3 stitches, 2 sc in the next stitch*; repeat around. (30 stitches)
- Rounds 12-14: Sc in each stitch around. (30 stitches)
- Round 15: *Sc in the next 4 stitches, 2 sc in the next stitch*; repeat around. (36 stitches)
- Rounds 16-18: Sc in each stitch around. (36 stitches)
- Round 19: *Sc in the next 5 stitches, 2 sc in the next stitch*; repeat around. (42 stitches)
- Rounds 20-22: Sc in each stitch around. (42 stitches)
- Fasten off, leaving a long tail for sewing.
- Assembly: Place the hat on the head, positioning it so the brim covers the top of the beard. Sew the hat securely to the head around the brim. Finally, fold the top of the hat down to one side and tack it down with a few hidden stitches to give it that classic, jaunty gnome look.
Part 5: Arms (Make 2)
Create two little arms in forest green.
- Round 1: Make a magic ring, work 6 sc into the ring. (6 stitches)
- Rounds 2-4: Sc in each stitch around. (6 stitches)
- Fasten off, leaving a tail. Stuff the arms very lightly.
- Assembly: Sew the arms to the sides of the body, positioning them about 2 rounds below the neck.
Part 6: Legs (Make 2)
Finally, let's make the soft brown legs.
- Round 1: With soft brown yarn, make a magic ring, work 6 sc into the ring. (6 stitches)
- Round 2: 2 sc in each stitch around. (12 stitches)
- Rounds 3-4: Sc in each stitch around. (12 stitches)
- Fasten off, leaving a tail. Stuff the legs lightly.
- Assembly: Sew the legs to the bottom of the body, spacing them evenly so the gnome can sit or stand stably.
Finishing Touches
Your gnome is almost complete! Here are the final steps to bring him to life:
- Face: Embroider the eyes using black yarn or attach safety eyes. If using safety eyes, attach them before closing the head (during Round 10 of the Head and Body). Add a small, subtle smile using brown yarn.
- Weave in Ends: Carefully weave in all remaining yarn tails to ensure a neat finish.
- Optional Embellishment: For extra charm, crochet a tiny flower or leaf motif and sew it to the side of the hat.
Congratulations! You've just completed your very own Meadow Mates Gnome. This pattern is wonderfully versatile—make a whole family of gnomes by varying the hat colors or adding different embellishments. They make perfect gifts for garden lovers, whimsical home decor, or a delightful project for a cozy afternoon. Happy crocheting!


