Little Robin Egg Cozy Free Knitting Pattern: A Cottagecore Spring Treasure
Little Robin Egg Cozy: A Tiny Nest for a Spring Treasure
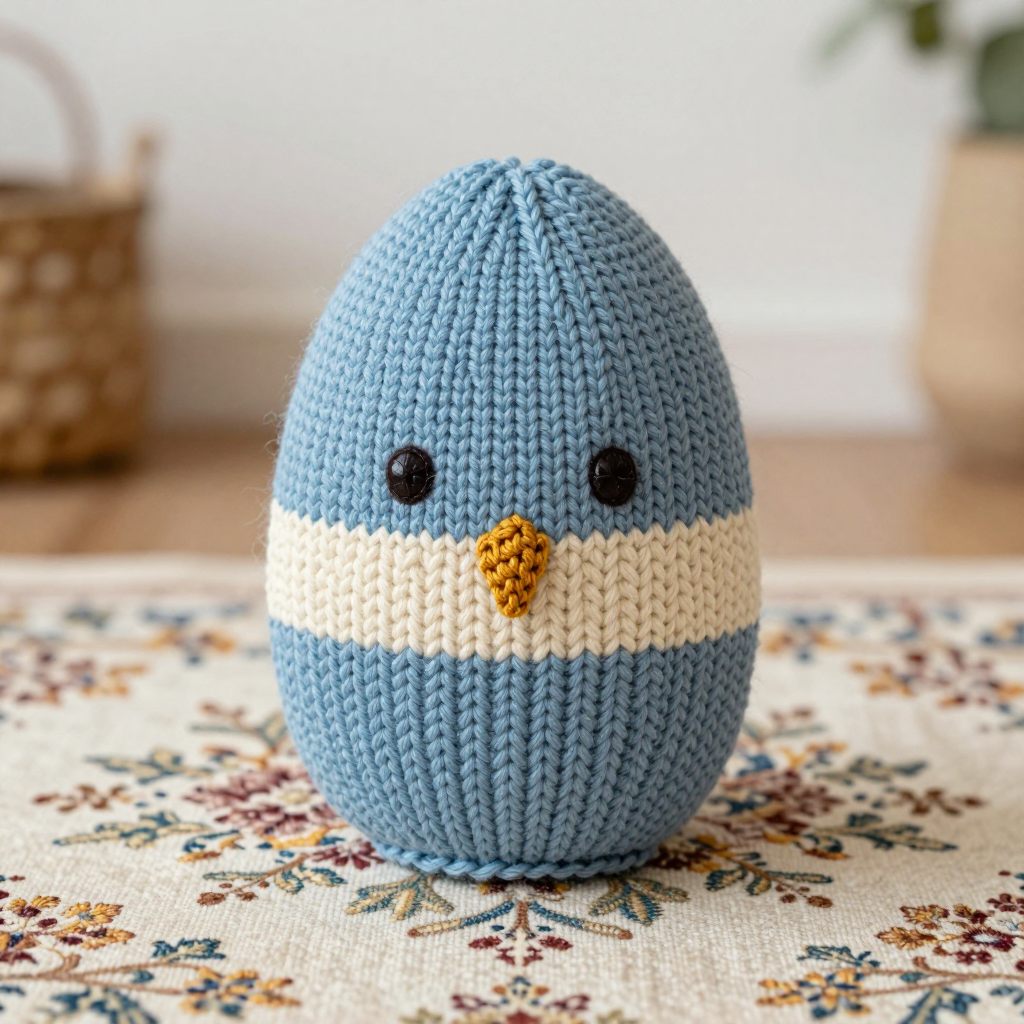
If you have never held knitting needles before, this is the perfect first project to fall in love with. The Little Robin Egg Cozy is a tiny, tender nest for a single egg, knit flat in one simple piece and seamed up the side. It looks like a soft robin's-egg-blue shell with a cream chest stripe, a tiny mustard beak, and two little embroidered eyes, and it feels like a smooth, squishy wool pebble in your hand. It is small enough to finish in one cozy afternoon, which makes it ideal for absolute beginners, for gift-giving, and for adding a whisper of cottagecore charm to your spring table. By the end you will have practiced casting on, knitting, purling, decreasing, and seaming, all in a project no bigger than your palm.
Materials Needed
- Yarn (main color, MC): Worsted-weight wool or wool-blend yarn, about 15 yd / 14 m of soft robin's-egg blue.
- Yarn (contrast color, CC): Worsted-weight wool or wool-blend yarn, about 3 yd / 3 m of cream.
- Yarn (beak): A 6 in / 15 cm scrap of worsted-weight mustard-gold yarn.
- Yarn (eyes): About 12 in / 30 cm of dark brown or black yarn.
- Knitting needles: US 6 (4.0 mm) single-point knitting needles.
- Crochet hook: US 6 (4.0 mm) crochet hook (used only for the beak).
- Stitch markers: 2 removable stitch markers (helpful for tracking the stripe and the decrease edges).
- Tapestry needle: One blunt-tipped tapestry needle for seaming, weaving in ends, and embroidering the eyes.
- Scissors: Small sharp scissors for cutting yarn.
- Stuffing: A small amount of polyester fiberfill, or a plastic egg insert (optional).
- Finished size: Approx. 3 in / 7.5 cm tall and 2.5 in / 6.5 cm wide when flat, before seaming. It fits a standard hen or robin-sized egg (about 2.25 in / 5.7 cm tall).
Abbreviations and Beginner Glossary
- k – knit. With the yarn behind your work, insert the right needle into the front of the stitch from left to right, wrap the yarn around the needle, and pull it through to make a new stitch.
- p – purl. With the yarn in front of your work, insert the right needle into the front of the stitch from right to left, wrap the yarn, and pull it through.
- st(s) – stitch(es). One loop of yarn on your needle.
- MC – main color (the robin's-egg blue).
- CC – contrast color (the cream stripe).
- RS – right side. The front, public face of your knitting.
- WS – wrong side. The back, hidden face of your knitting.
- k2tog – knit 2 stitches together. Insert your needle through two stitches at once and knit them as one, which decreases your stitch count by one.
- BO – bind off. A way of finishing stitches so they do not unravel (not used in this pattern, but you will see it in others).
- stockinette stitch – knit every stitch on right-side rows and purl every stitch on wrong-side rows. This creates the smooth, flat "V" texture.
- intarsia – a colorwork method where you use a separate small ball of yarn for each color block, twisting the yarns where they meet so no hole forms.
- mattress stitch – an invisible seaming technique that joins two edges neatly.
- ch – chain. In crochet, pull a loop through the loop on your hook to make one chain.
- French knot – a tiny embroidered dot made by wrapping yarn around the needle before pulling it through.
Gauge
20 stitches and 28 rows = 4 in / 10 cm in stockinette stitch, blocked.
Gauge means how many stitches and rows fit into a square of fabric. It matters because it tells you whether your cozy will come out the right size to hug an egg. If your stitches are too loose, the cozy will be baggy; if too tight, it may not stretch over the egg. To check, cast on about 30 stitches, knit a small square in stockinette stitch (knit one row, purl one row), and measure the middle 4 inches. If you have more than 20 stitches in 4 inches, try larger needles; if fewer, try smaller needles. Gauge is not critical for this tiny project, but a slightly tighter gauge gives a snugger fit.
Beginner Tips Before You Start
- Count your stitches after every decrease row. The stitch counts in parentheses are your safety net; if a number is off, fix it before moving on.
- Use stitch markers to track the stripe. Place one marker before the first cream stitch and one after the last cream stitch so you never lose your place.
- Do not pull your yarn too tight. Tension should feel relaxed; tight stitches make the cozy stiff and hard to seam.
- Keep your intarsia yarns untangled. Use a small separate ball or butterfly of cream and twist the yarns at each color change so no gap appears.
- Work the decreases two stitches in from each edge. That little border of knit stitches keeps the seam edges neat and easy to sew.
- Block before seaming. A light steam or damp block smooths the stockinette and makes the finished cozy look professional.
Step-by-Step Instructions
Body (Worked Flat, Bottom Up)
With MC, cast on 24 sts.
Row 1 (RS): k all sts. (24 sts)
Row 2 (WS): p all sts. (24 sts)
Rows 3–8: Work in stockinette stitch (k on RS, p on WS), ending with a WS row. Piece measures approx. 1 in / 2.5 cm. (24 sts)
Chest Stripe (Intarsia)
Row 9 (RS): With MC, k8; join CC and k8; with MC, k8. (24 sts)
Row 10 (WS): With MC, p8; with CC, p8; with MC, p8. (24 sts)
Rows 11–14: Repeat Rows 9–10 twice more. The stripe is 8 sts wide and 6 rows tall. (24 sts)
Row 15 (RS): With MC, k8; with CC, k8; with MC, k8. (24 sts)
Cut CC, leaving a 4 in / 10 cm tail to weave in later.
Shaping the Top
Row 16 (WS): p all sts with MC. (24 sts)
Row 17 (RS): k2, k2tog, k to last 4 sts, k2tog, k2. (22 sts)
Row 18 (WS): p all sts. (22 sts)
Row 19 (RS): k2, k2tog, k to last 4 sts, k2tog, k2. (20 sts)
Row 20 (WS): p all sts. (20 sts)
Row 21 (RS): k2, k2tog, k to last 4 sts, k2tog, k2. (18 sts)
Row 22 (WS): p all sts. (18 sts)
Row 23 (RS): k2, k2tog, k to last 4 sts, k2tog, k2. (16 sts)
Row 24 (WS): p all sts. (16 sts)
Row 25 (RS): k2, k2tog, k to last 4 sts, k2tog, k2. (14 sts)
Row 26 (WS): p all sts. (14 sts)
Row 27 (RS): k2, k2tog, k to last 4 sts, k2tog, k2. (12 sts)
Row 28 (WS): p all sts. (12 sts)
Row 29 (RS): k2, k2tog, k to last 4 sts, k2tog, k2. (10 sts)
Row 30 (WS): p all sts. (10 sts)
Row 31 (RS): k2, k2tog, k to last 4 sts, k2tog, k2. (8 sts)
Row 32 (WS): p all sts. (8 sts)
Row 33 (RS): k2, k2tog, k to last 4 sts, k2tog, k2. (6 sts)
Row 34 (WS): p all sts. (6 sts)
Row 35 (RS): k2, k2tog, k2tog, k2. (4 sts)
Row 36 (WS): p all sts. (4 sts)
Row 37 (RS): k2tog, k2tog. (2 sts)
Row 38 (WS): p all sts. (2 sts)
Row 39 (RS): k2tog. (1 st)
Cut yarn, leaving a 6 in / 15 cm tail. Pull through last st and tighten.
Beak (Crocheted, Felted)
With mustard-gold scrap and the US 6 (4.0 mm) crochet hook, ch 4. Fasten off, leaving a 4 in / 10 cm tail. Lightly felt by rubbing between damp fingers for 30 seconds, then let dry. Sew the beak to the front of the cozy just below the cream stripe, pointing downward, using the tail. Secure firmly.
Eyes (Embroidered)
With a 12 in / 30 cm length of dark brown or black yarn and a tapestry needle, embroider two small French knots or straight stitches on either side of the beak, approx. 0.5 in / 1.3 cm apart and 0.25 in / 6 mm above the beak. Secure on the inside.
Assembly and Finishing
Weave in ends: Thread each yarn tail onto the tapestry needle and run it through the back of several stitches, then trim close. Leave the long cast-on tail for seaming.
Block: Lightly steam or damp-block the flat piece to the finished measurements (3 in / 7.5 cm tall by 2.5 in / 6.5 cm wide) and let it dry completely.
Seam: With RS facing, fold the piece in half and seam the side edges together using mattress stitch, leaving the bottom edge open. To do mattress stitch, bring the needle under the horizontal bar between the first and second stitch on each edge, alternating sides, and pull gently every few stitches so the seam disappears.
Stuff or insert: Turn RS out. Lightly stuff with a small amount of fiberfill, or insert a plastic egg.
Close the bottom: Thread a tapestry needle with MC and run a gathering stitch around the bottom opening; pull gently to close, then secure. If using a plastic egg insert, leave the bottom open for removal.
Final touches: Weave in any remaining ends. Lightly steam the seam and beak. Slip the cozy over a robin's egg or display it as a tiny spring ornament.
Pro Tips and Variations
- Change the colors: Swap the blue for speckled pastel yarn, or make the stripe a different contrast color for a personalized egg.
- Adjust the size: For a larger egg, cast on 28 sts and add one extra decrease row; for a smaller egg, cast on 20 sts and stop the shaping two rows earlier.
- Substitute yarn: Cotton or acrylic works too, but wool gives the softest, most cottagecore finish and blocks beautifully.
- Make a set: Knit several cozies in different pastel shades and display them in a small basket as a spring centerpiece or gift.