Jolly Gnome Kitchen Towel Free Pattern
Jolly Gnome Kitchen Towel Free Crochet Pattern
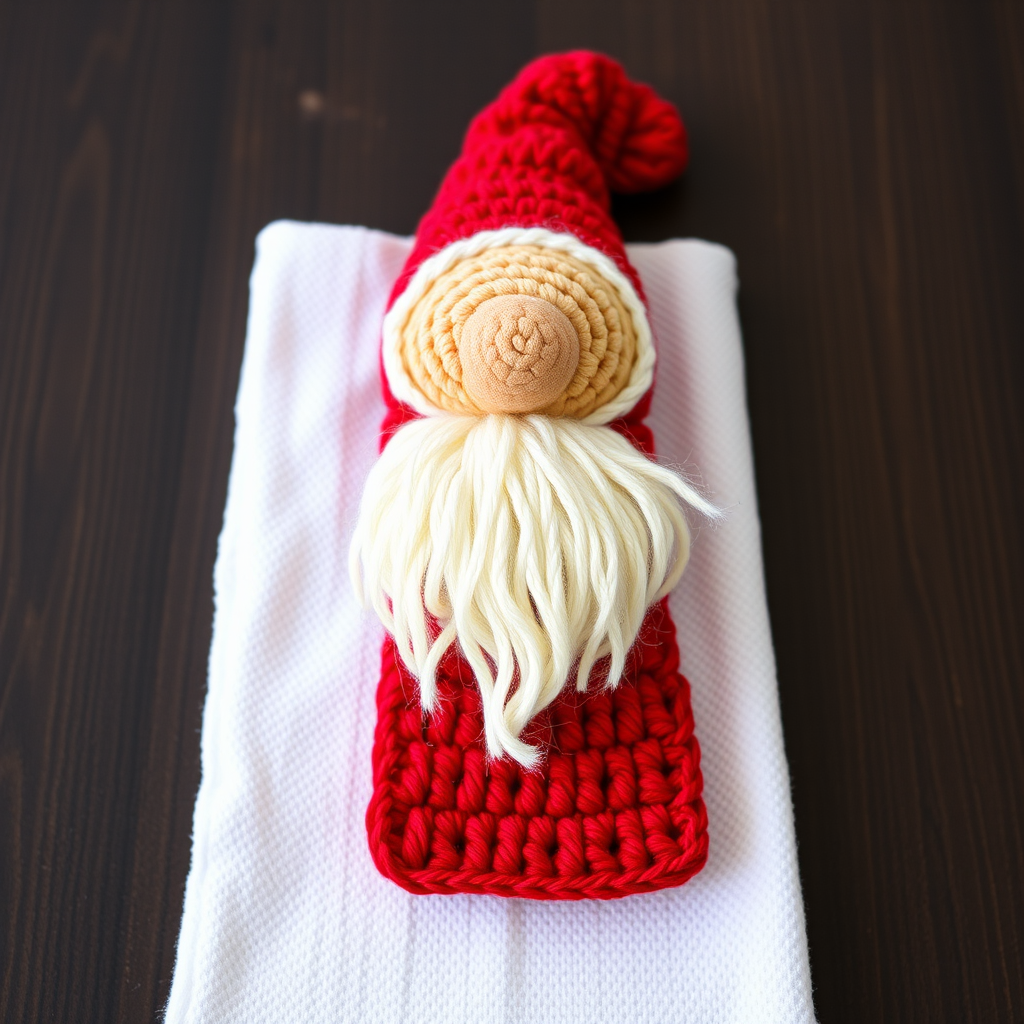
Bring a touch of whimsy and holiday cheer to your kitchen with this adorable crochet gnome towel topper! Featuring a fluffy white beard, a rosy-cheeked face, and a jaunty pointed red hat, this quick and easy project is perfect for beginners and experienced crocheters alike. Whether you're looking for a festive addition to your own home or a heartfelt handmade gift, this charming gnome is sure to bring smiles all season long.
Introduction
This delightful pattern combines functionality with folk-art charm. The crocheted gnome sits atop a simple red base that folds over a standard kitchen towel, creating a practical and decorative piece. The design uses basic stitches—single crochet, double crochet, increases, and decreases—making it an excellent project for those new to amigurumi-style shaping. With worsted weight cotton yarn, this project is durable, absorbent-friendly, and machine washable, ensuring it will be a beloved kitchen companion for years to come.
Materials Needed
Before you begin, gather the following supplies:
- Yarn: Worsted weight cotton yarn in three colors:
- Color A (Red): For the hat and towel topper base (approx. 100 yards)
- Color B (White): For the beard (approx. 50 yards)
- Color C (Skin tone): For the face (approx. 30 yards)
- Crochet Hook: Size G/6 (4.0 mm)
- Yarn needle for weaving in ends and assembly
- Scissors
- Kitchen towel: Standard size, approximately 18 x 28 inches (the pattern works with any towel width up to about 16 inches)
- Polyester fiberfill (small amount for stuffing the head)
Gauge & Abbreviations
Gauge: 14 double crochet stitches x 8 rows = 4 inches (10 cm) square. Gauge is important for the towel topper base to fit properly, but the gnome head and hat are forgiving.
Abbreviations:
- ch = chain
- sc = single crochet
- dc = double crochet
- sl st = slip stitch
- st(s) = stitch(es)
- inc = increase (2 sc in same stitch)
- dec = decrease (sc2tog – single crochet two stitches together)
Step-by-Step Instructions
Part 1: Towel Topper Base (Worked Flat)
This rectangular piece will fold over the top of your kitchen towel and hold it securely.
Row 1: With Color A (red), chain 16. Double crochet in the 4th chain from the hook (the skipped chains count as your first double crochet) and in each chain across. You should have 14 double crochet stitches total.
Row 2: Chain 3 (this counts as your first double crochet), turn your work. Double crochet in each stitch across. (14 dc)
Rows 3-8: Repeat Row 2 five more times. You will have a total of 8 rows. (14 dc each row)
Fasten off Color A, leaving a 12-inch tail for sewing. This base will be folded in half over the towel edge later.
Part 2: Gnome Head (Worked in the Round)
This creates a round, stuffed ball for the gnome's face. Work continuously in a spiral—do not join rounds unless instructed.
Round 1: With Color C (skin tone), make a magic ring. Work 6 single crochet into the ring. Pull the tail to close tightly. (6 sts)
Round 2: Increase in each stitch around. (12 sts)
Round 3: *Single crochet in the next stitch, increase in the next stitch* — repeat from * to * around. (18 sts)
Round 4: *Single crochet in the next 2 stitches, increase in the next stitch* — repeat around. (24 sts)
Rounds 5-7: Single crochet in each stitch around. (24 sts) — This creates the height of the face.
Round 8: *Single crochet in the next 2 stitches, decrease (sc2tog)* — repeat around. (18 sts)
Round 9: *Single crochet in the next stitch, decrease* — repeat around. (12 sts)
Stuff the head lightly with polyester fiberfill. Do not overstuff—you want it soft and squishy, not hard.
Round 10: Decrease around. (6 sts)
Fasten off, leaving a long tail (about 12 inches). Thread the tail through a yarn needle, weave it through the front loops of the remaining 6 stitches, and pull tight to close the hole. Weave in the end securely.
Part 3: Gnome Beard (Worked in Rows)
This triangular piece creates the fluffy beard. The decreases shape it into a point at the bottom.
Row 1: With Color B (white), chain 20. Single crochet in the 2nd chain from the hook and in each chain across. (19 sc)
Row 2: Chain 1, turn. Single crochet in each stitch across. (19 sc)
Row 3: Chain 1, turn. Single crochet in the next 2 stitches, decrease (sc2tog), single crochet in the next 11 stitches, decrease, single crochet in the last 2 stitches. (17 sc)
Row 4: Chain 1, turn. Single crochet in the next 2 stitches, decrease, single crochet in the next 9 stitches, decrease, single crochet in the last 2 stitches. (15 sc)
Row 5: Chain 1, turn. Single crochet in the next 2 stitches, decrease, single crochet in the next 7 stitches, decrease, single crochet in the last 2 stitches. (13 sc)
Row 6: Chain 1, turn. Single crochet in the next 2 stitches, decrease, single crochet in the next 5 stitches, decrease, single crochet in the last 2 stitches. (11 sc)
Row 7: Chain 1, turn. Single crochet in the next 2 stitches, decrease, single crochet in the next 3 stitches, decrease, single crochet in the last 2 stitches. (9 sc)
Row 8: Chain 1, turn. Single crochet in the next 2 stitches, decrease, single crochet in the next stitch, decrease, single crochet in the last 2 stitches. (7 sc)
Fasten off, leaving a long tail (about 12 inches) for sewing. The beard will have a slightly curved, fluffy shape.
Part 4: Gnome Hat (Worked in the Round)
This creates the classic tall, pointed gnome hat. Work in a continuous spiral.
Round 1: With Color A (red), make a magic ring. Work 6 single crochet into the ring. (6 sts)
Round 2: Increase in each stitch around. (12 sts)
Round 3: *Single crochet in the next stitch, increase* — repeat around. (18 sts)
Rounds 4-6: Single crochet in each stitch around. (18 sts)
Round 7: *Single crochet in the next 4 stitches, decrease* — repeat around. (15 sts)
Rounds 8-9: Single crochet in each stitch around. (15 sts)
Round 10: *Single crochet in the next 3 stitches, decrease* — repeat around. (12 sts)
Rounds 11-12: Single crochet in each stitch around. (12 sts)
Round 13: *Single crochet in the next 2 stitches, decrease* — repeat around. (9 sts)
Rounds 14-15: Single crochet in each stitch around. (9 sts)
Round 16: *Single crochet in the next stitch, decrease* — repeat around. (6 sts)
Rounds 17-20: Single crochet in each stitch around. (6 sts) — This creates the long, tapered tip of the hat.
Fasten off, leaving a long tail (about 12 inches). Fold the hat tip to one side and secure it with a few small stitches to create the classic jaunty gnome hat shape.
Assembly Instructions
Now it's time to bring your gnome to life! Follow these steps carefully for a polished finish.
Step 1: Attach the Towel Topper Base
Fold the red rectangular base in half over the top edge of your kitchen towel, with the right side of the crochet facing out. The folded edge should sit at the top of the towel, and the two open ends should meet at the back. Using the long tail from the base, sew the two open sides together with a whip stitch or mattress stitch, securing the base firmly to the towel. Make sure the stitches are snug but not too tight, so the towel can still be removed for washing if needed.
Step 2: Attach the Gnome Head
Position the gnome head in the center of the towel topper base, just above the fold line. The head should sit slightly higher than the middle of the base. Using the tail from the head, sew it securely to the base with small, hidden stitches. Go around the perimeter of the head's bottom edge to ensure it's firmly attached.
Step 3: Attach the Beard
Place the beard just below the head, overlapping the bottom edge of the face by about half an inch. The beard should hang down over the base. Using the tail from the beard, sew it in place along the top edge only. Leave the bottom edge and sides free to create a fluffy, dimensional look. This also allows the beard to slightly cover the towel, giving a charming overhang effect.
Step 4: Attach the Hat
Place the hat on top of the head, positioning it at a jaunty angle—slightly tilted to one side. The bottom edge of the hat should sit just above the eyes (or where the eyes would be, about one-third down from the top of the head). Using the tail from the hat, sew it securely around the bottom edge of the hat. Then, fold the tip of the hat to one side and stitch it down with a few small stitches to hold the fold in place.
Step 5: Weave in All Loose Ends
Using your yarn needle, carefully weave in any remaining loose ends on the inside of the towel topper or the back of the gnome. Trim any excess yarn. Ensure all tails are securely hidden so the piece looks clean and professional.
Finishing Touches & Tips
- Optional Embellishments: For extra charm, you can embroider simple eyes and a smile on the gnome's face using black or dark brown yarn. A small French knot for the nose or a simple cross-stitch for the eyes works beautifully.
- Washing Instructions: Because this is made with cotton yarn, it's machine washable on a gentle cycle. Lay flat to dry to maintain the shape of the gnome.
- Customization: Feel free to experiment with different color combinations! A blue or green hat would work beautifully for a non-holiday version. You can also add a small loop at the top of the hat for hanging.
- Gift Giving: This gnome towel makes a wonderful housewarming gift, hostess gift, or Christmas present. Pair it with a matching set of dishcloths for a complete kitchen set.
Your Jolly Gnome Kitchen Towel is now complete! Hang it on your oven handle, a cabinet knob, or a towel rack to add a touch of handmade magic to your kitchen. This project works up quickly—perfect for last-minute gifts or holiday crafting sessions. Happy crocheting!