Harvest Moon Hedgehog Crochet Pattern – Free Pattern
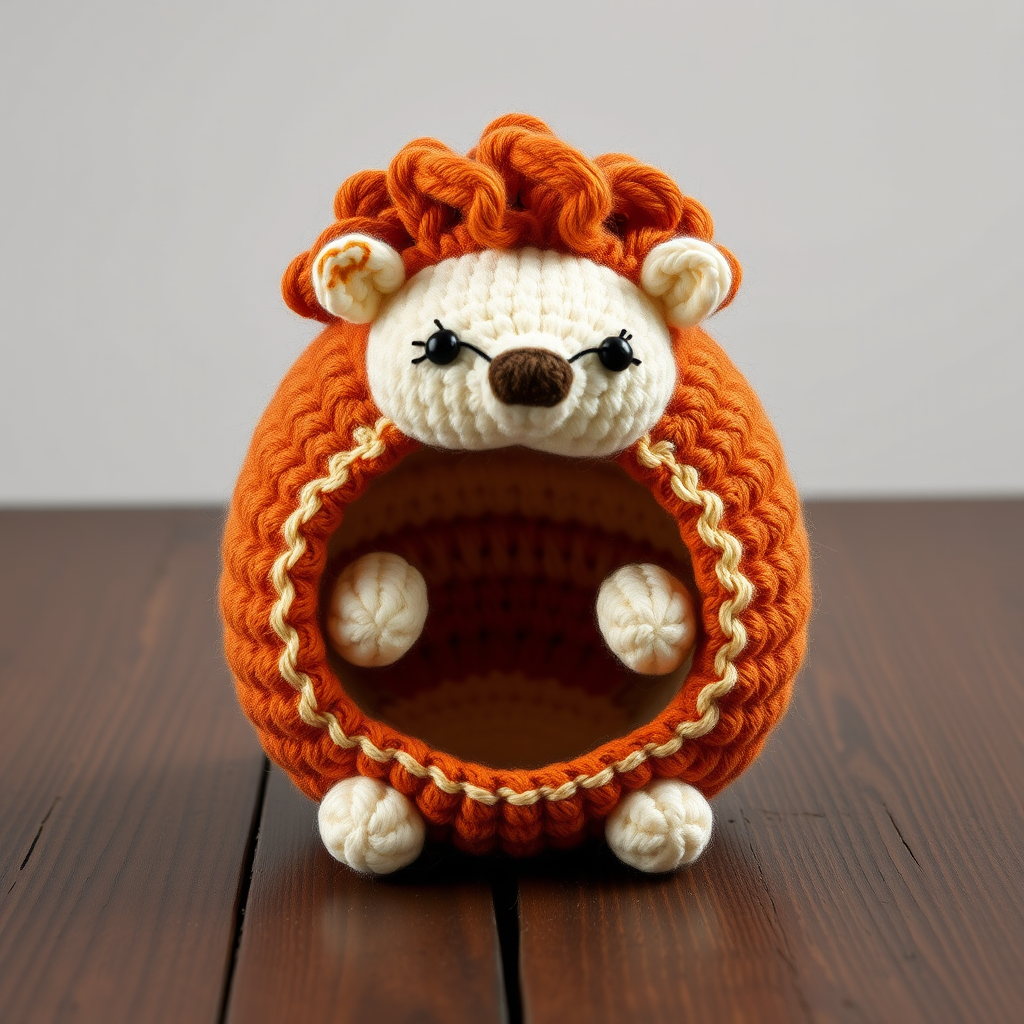
Introducing the Harvest Moon Hedgehog: A Cozy Autumn Crochet Companion
There's something undeniably heartwarming about a handmade woodland creature, especially one that captures the golden, rustic hues of autumn. Today, I am thrilled to share a free pattern for the Harvest Moon Hedgehog—a plump, textured amigurumi that is as delightful to create as it is to display. Whether you're looking for seasonal decor for your mantel, a thoughtful handmade gift, or simply a fun weekend project, this little hedgehog is the perfect companion.
This pattern is a joy for beginners and experienced crocheters alike. It relies on simple single crochet stitches worked in continuous spirals, making it a meditative project that comes together quickly. The design features a sweet cream-colored face that transitions into a warm brown body, all crowned with a textured burnt orange "quill" section. The result is a cozy, rustic friend that feels both modern and nostalgic. Let's gather our supplies and get started on bringing this Harvest Moon Hedgehog to life!
Materials Needed: Gathering Your Autumn Yarn Basket
Before we dive into the stitches, let's ensure you have everything you need. This project is wonderfully portable and requires minimal supplies. Here’s your shopping list:
- Yarn: Worsted weight (Category 4) cotton or acrylic yarn in three colors:
- Warm Brown: For the main body.
- Cream: For the face and belly area.
- Burnt Orange: For the spiky quill section on top.
- Small amount of Black: For embroidering the nose and eyes.
- Crochet Hook: 3.5 mm (E/4) crochet hook. This smaller hook size helps create the tight tension needed for amigurumi.
- Fiberfill Stuffing: For a plump, huggable finish.
- Stitch Marker: To track the beginning of your spiral rounds.
- Yarn Needle: For sewing pieces together and weaving in ends.
- Scissors: For cutting yarn.
Note on Gauge: Gauge is not critical for this pattern, but it is essential to maintain a tight tension throughout. Your stitches should be close together so the fiberfill stuffing doesn't peek through. As a general guide, you should aim for approximately 4 single crochets per inch.
Step-by-Step Instructions: Crafting Your Hedgehog
This pattern is worked in continuous spiral rounds unless otherwise stated. This means you will not join at the end of each round; instead, you'll work continuously in a spiral. It is crucial to use a stitch marker to track the beginning of each round to keep your stitch counts accurate.
Part 1: The Body (Worked from the Nose End)
We'll start with the cream-colored face and work our way back to the brown body.
- Round 1: With cream yarn, make a magic ring. Work 6 single crochet (sc) into the ring. (6 stitches)
- Round 2: Work 2 sc in each stitch around. (12 stitches)
- Round 3: *Sc in the next stitch, 2 sc in the next stitch*; repeat from * to * around. (18 stitches)
- Round 4: *Sc in the next 2 stitches, 2 sc in the next stitch*; repeat from * to * around. (24 stitches)
- Round 5: *Sc in the next 3 stitches, 2 sc in the next stitch*; repeat from * to * around. (30 stitches)
- Rounds 6-8: Sc in each stitch around. (30 stitches)
- Round 9: Switch to the warm brown yarn. Sc in each stitch around. (30 stitches)
- Round 10: *Sc in the next 4 stitches, 2 sc in the next stitch*; repeat from * to * around. (36 stitches)
- Rounds 11-14: Sc in each stitch around. (36 stitches)
- Round 15 (Decrease): *Sc in the next 4 stitches, single crochet 2 together (sc2tog)*; repeat from * to * around. (30 stitches)
- Round 16 (Decrease): *Sc in the next 3 stitches, sc2tog*; repeat from * to * around. (24 stitches)
- Round 17 (Decrease): *Sc in the next 2 stitches, sc2tog*; repeat from * to * around. (18 stitches)
Stuff the body firmly with fiberfill. Make sure to shape it nicely, pushing stuffing into the nose area to give it a rounded, plump look.
- Round 18 (Decrease): *Sc in the next stitch, sc2tog*; repeat from * to * around. (12 stitches)
- Round 19 (Decrease): Sc2tog around. (6 stitches)
Fasten off, leaving a long tail for closing. Thread the tail through a yarn needle and weave it through the front loops of the remaining 6 stitches. Pull tight to close the hole, and secure the yarn with a knot. Weave in the end or leave it for now to hide under the quill section.
Part 2: The Spike/Quill Section
Now we'll create the textured burnt orange top that gives the hedgehog its signature look. This piece is worked separately and then attached.
- Round 1: With burnt orange yarn, make a magic ring. Work 6 sc into the ring. (6 stitches)
- Round 2: 2 sc in each stitch around. (12 stitches)
- Round 3: *Sc in the next stitch, 2 sc in the next stitch*; repeat from * to * around. (18 stitches)
- Round 4: *Sc in the next 2 stitches, 2 sc in the next stitch*; repeat from * to * around. (24 stitches)
- Round 5: *Sc in the next 3 stitches, 2 sc in the next stitch*; repeat from * to * around. (30 stitches)
- Rounds 6-8: Sc in each stitch around. (30 stitches)
- Round 9 (Decrease): *Sc in the next 3 stitches, sc2tog*; repeat from * to * around. (24 stitches)
- Round 10: Sc in each stitch around. (24 stitches)
Fasten off, leaving a long tail for sewing. Stuff this piece lightly—you want it to have a bit of shape but remain soft and flexible to sit nicely on the body.
Part 3: Face Details
This is where your hedgehog's personality comes to life! Using the black yarn and your yarn needle, we will embroider the facial features.
- The Nose: Embroider a small nose at the very tip of the cream section. Make it about 2-3 stitches wide, using a satin stitch or a few tight straight stitches to form a small triangle or oval.
- The Eyes: Position two small eyes just above the nose, approximately 4 stitches apart. Use a French knot or a few small straight stitches to create tiny, cute eyes.
- The Whiskers: With the warm brown yarn, create small straight stitches on each side of the nose to suggest whiskers. Keep them subtle and delicate.
Part 4: Assembly
Now, let's put our hedgehog together!
- Position the burnt orange spike section on top of the brown body. Angle it slightly toward the back so the cream nose and face are clearly visible at the front. The spike section should sit like a little cap on the hedgehog's back.
- Using the long tail from the spike section, sew it securely to the body. Use a whip stitch or invisible seam stitch, making sure to catch the yarn from both pieces. Hide the seam under the edge of the spikes as you go.
- Once securely attached, weave in the yarn tail.
Part 5: Finishing Touches
- Weave in all ends carefully to ensure a clean, professional finish.
- Shape your hedgehog: Gently massage and push the stuffing into the desired form. Make sure the body is plump and the face is nicely rounded.
- Optional Charm: For an extra touch of autumn magic, you can crochet a tiny leaf or acorn motif and sew it to the back of the hedgehog.
Your Harvest Moon Hedgehog is now complete! Standing about 3.5 inches tall and 4 inches long, it's the perfect size for a desk companion, a shelf accent, or a heartfelt gift. The combination of the warm cream, rich brown, and burnt orange creates a beautiful autumnal aesthetic that will bring a smile to anyone's face. Happy crocheting, and enjoy your new woodland friend!


