Harvest Blessing Cornucopia Free Pattern – Textured Crochet Centerpiece
Harvest Blessing Cornucopia Free Pattern – Textured Crochet Centerpiece
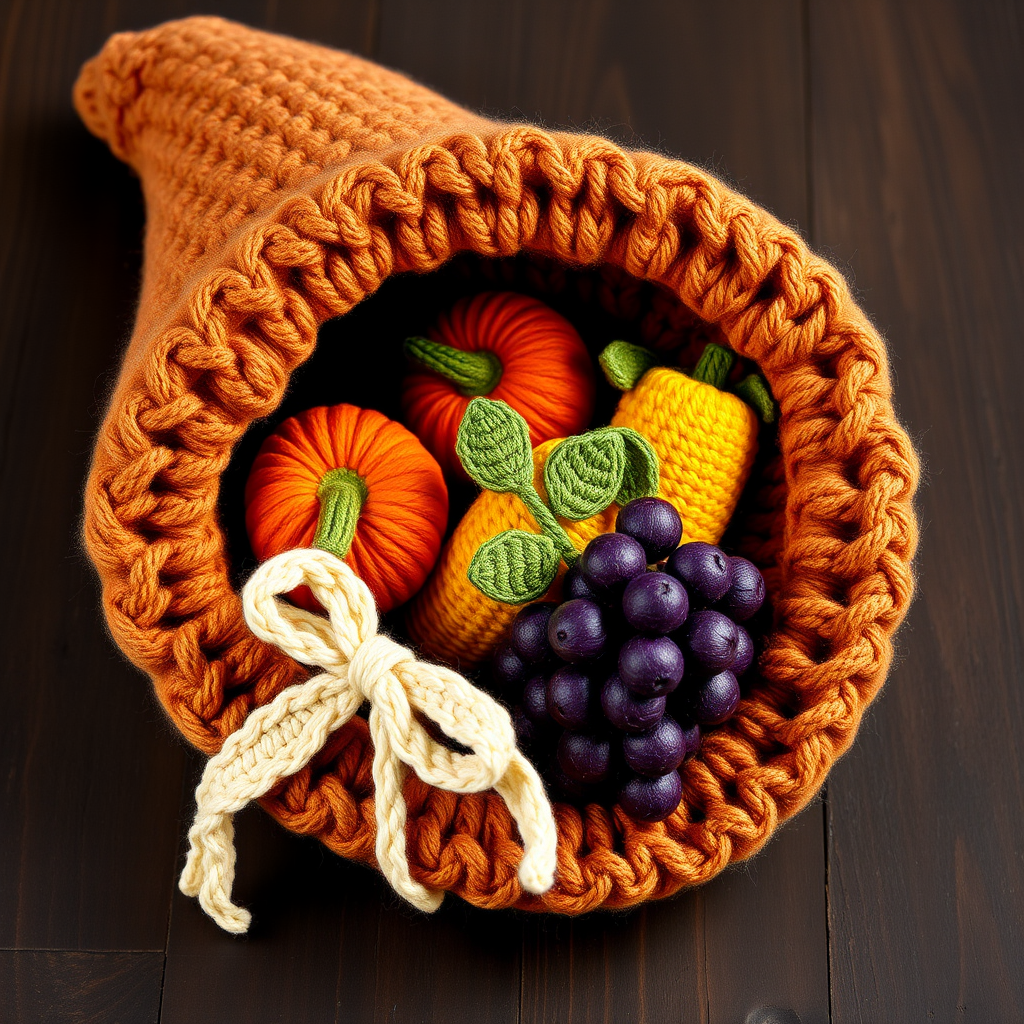
Bring the bounty of autumn to your table with this whimsical, textured crochet cornucopia that stands proudly on its own. Crafted in warm harvest hues, it's a cozy, handmade centerpiece that celebrates the season's abundance. This free pattern is perfect for intermediate beginners who want to create a stunning fall decoration that will impress guests and add rustic charm to any room.
This project features a beautifully curved horn-shaped basket filled with adorable crocheted pumpkins, apples, corn, and grapes. The dense single crochet texture gives it a sturdy, professional finish, while the vibrant autumn colors bring warmth to your Thanksgiving or harvest-themed decor. Best of all, this pattern uses simple stitches and techniques, making it accessible even if you're relatively new to amigurumi-style crochet.
Materials Needed
Before you begin, gather the following supplies to ensure a smooth crafting experience:
Yarn Requirements
- Worsted weight cotton or acrylic yarn in warm autumn colors:
- Burnt orange (for pumpkins)
- Golden yellow (for corn cob)
- Deep red (for apples and grapes)
- Forest green (for stems, leaves, and husks)
- Cream (for decorative ribbon bow)
- Brown (for the cornucopia horn and apple stems)
Tools & Notions
- 5.0 mm crochet hook (US H-8)
- Stitch markers (to track rounds)
- Yarn needle for weaving in ends and assembly
- Polyester fiberfill or stuffing of your choice
- Scissors
Gauge
4 sc x 4 rows = 1 inch (2.5 cm) in single crochet. Gauge is important for achieving the correct size, but since this is a decorative piece, slight variations are acceptable.
Step-by-Step Instructions
This pattern is worked in continuous spirals unless otherwise noted. Use a stitch marker to track your rounds—this is essential for maintaining accurate stitch counts throughout the project.
Part 1: Cornucopia Horn (Make 1)
The horn is the main body of your centerpiece. It's worked from the wide opening down to the pointed tip, creating a natural cone shape.
Starting with brown yarn:
- Magic Ring: Make a magic ring, ch 1, work 6 sc into ring. Pull tight to close. (6 sts)
- Round 2: 2 sc in each st around. (12 sts)
- Round 3: (sc in next st, 2 sc in next st) around. (18 sts)
- Round 4: (sc in next 2 sts, 2 sc in next st) around. (24 sts)
- Round 5: (sc in next 3 sts, 2 sc in next st) around. (30 sts)
- Round 6: (sc in next 4 sts, 2 sc in next st) around. (36 sts)
- Round 7: (sc in next 5 sts, 2 sc in next st) around. (42 sts)
- Round 8: (sc in next 6 sts, 2 sc in next st) around. (48 sts)
- Rounds 9-14: sc in each st around. (48 sts) — This creates the straight sides of the horn opening.
Now we begin decreasing to shape the curved tip:
- Round 15: (sc in next 6 sts, sc2tog) around. (42 sts)
- Round 16: (sc in next 5 sts, sc2tog) around. (36 sts)
- Round 17: (sc in next 4 sts, sc2tog) around. (30 sts)
- Round 18: (sc in next 3 sts, sc2tog) around. (24 sts)
- Round 19: (sc in next 2 sts, sc2tog) around. (18 sts)
- Round 20: (sc in next st, sc2tog) around. (12 sts)
- Round 21: sc2tog around. (6 sts)
Finishing the horn: Fasten off, leaving a long tail (about 12 inches). Thread the tail through a yarn needle and weave it through the front loops of the remaining 6 stitches. Pull tight to close the tip completely. Weave in the end securely.
💡 Pro Tip: To give your horn a gentle curve, gently bend it while the yarn is still slightly loose. You can also stuff the horn lightly with fiberfill to help it hold its shape, but this is optional—the dense sc fabric is quite sturdy on its own.
Part 2: Fruit & Vegetables (Make as Many as Desired)
Now for the fun part—creating the colorful harvest bounty! You can make as many pieces as you like, but the pattern includes instructions for a beautiful, balanced arrangement.
Pumpkin (Make 2)
- With burnt orange yarn, make a magic ring, ch 1, work 6 sc into ring. (6 sts)
- Round 2: 2 sc in each st around. (12 sts)
- Round 3: (sc in next st, 2 sc in next st) around. (18 sts)
- Round 4: (sc in next 2 sts, 2 sc in next st) around. (24 sts)
- Rounds 5-7: sc in each st around. (24 sts)
- Round 8: (sc in next 2 sts, sc2tog) around. (18 sts)
- Round 9: (sc in next st, sc2tog) around. (12 sts)
- Stuff firmly with fiberfill.
- Round 10: sc2tog around. (6 sts)
- Fasten off, weave tail through front loops of remaining sts, pull tight to close.
Pumpkin Stem: With green yarn, ch 4, sc in 2nd ch from hook and in next 2 ch. Fasten off, leaving a tail. Sew the stem to the top center of the pumpkin.
Apple (Make 2)
- With deep red yarn, make a magic ring, ch 1, work 6 sc into ring. (6 sts)
- Round 2: 2 sc in each st around. (12 sts)
- Round 3: (sc in next st, 2 sc in next st) around. (18 sts)
- Rounds 4-5: sc in each st around. (18 sts)
- Round 6: (sc in next st, sc2tog) around. (12 sts)
- Stuff firmly with fiberfill.
- Round 7: sc2tog around. (6 sts)
- Fasten off, weave tail through front loops, pull tight to close.
Apple Stem: With brown yarn, ch 4, sc in 2nd ch from hook and in next 2 ch. Fasten off, leaving a tail. Sew to the top of the apple.
Corn Cob (Make 1)
- With golden yellow yarn, ch 6, sc in 2nd ch from hook and across. (5 sts)
- Row 2: ch 1, turn, sc in each st across. (5 sts)
- Repeat Row 2 until piece measures 3 inches long.
- Fasten off, leaving a long tail. Fold the rectangle in half lengthwise and sew the sides together to form a tube. Stuff lightly with fiberfill.
Corn Husks: With green yarn, make 3 leaves: ch 8, sc in 2nd ch from hook and across. Fasten off, leaving tails. Sew the leaves to the base of the corn cob, fanning them out slightly.
Grapes (Make 1 Cluster)
For the grape cluster, you'll make 8 small individual grapes and sew them together:
- Each grape: With purple or deep red yarn, make a magic ring, work 6 sc into ring. (6 sts)
- Round 2: 2 sc in each st around. (12 sts)
- Round 3: sc in each st around. (12 sts)
- Round 4: sc2tog around. (6 sts)
- Fasten off, stuff lightly, and close the opening by weaving the tail through front loops and pulling tight.
Assembly: Sew all 8 grapes together in a tight cluster, arranging them in a pyramid-like shape. Add a small green leaf: ch 5, sc in 2nd ch from hook and across. Fasten off and sew to the top of the cluster.
Part 3: Assembly
Now it's time to bring your cornucopia to life!
- Position the cornucopia horn on a flat surface with the opening facing up.
- Arrange your fruits and vegetables around the rim and inside the opening. Play with the placement until you're happy with the composition—cluster some pieces together, let others peek out individually.
- Sew each piece securely to the horn using a yarn needle and matching thread. Make sure to stitch through both the fruit and the horn fabric for a strong hold.
Decorative Ribbon Bow:
- With cream yarn, ch 30, sc in 2nd ch from hook and across. (29 sts)
- Fasten off, leaving a tail.
- Tie the strip into a bow shape and sew it to the front of the horn, just below the rim.
Part 4: Finishing Touches
- Weave in all ends carefully using your yarn needle. Make sure no loose threads are visible.
- Block if desired: Lightly mist the horn with water and shape it with your hands. Allow it to dry completely. This helps the horn maintain its curved shape.
- Display: Place your Harvest Blessing Cornucopia as a stunning centerpiece on your dining table, mantel, or sideboard. It's sure to be a conversation starter at any autumn gathering!
🎃 Customization Ideas: Feel free to add more fruits or vegetables—try making a pear, a small squash, or even some acorns! You can also experiment with different color combinations to match your home decor. For a more rustic look, use natural cotton yarn in earthy tones.
Pattern Notes & Tips for Success
- Stitch markers are essential—since this pattern is worked in continuous spirals, it's easy to lose your place without them.
- Keep your tension consistent throughout the project. The dense fabric created by tight single crochet is what gives the cornucopia its sturdy, professional appearance.
- Don't overstuff the fruits—they should be firm but not stretched, so the stitches remain neat and defined.
- Take your time with assembly—this is where the magic happens! A well-arranged cluster of fruits makes all the difference in the final look.
This Harvest Blessing Cornucopia is more than just a crochet project—it's a piece of autumn artistry that you'll be proud to display year after year. Whether you're crafting for Thanksgiving, a harvest festival, or simply to add seasonal warmth to your home, this textured centerpiece delivers charm and craftsmanship in every stitch.
Happy crocheting, and may your harvest be bountiful! 🍂🧶


