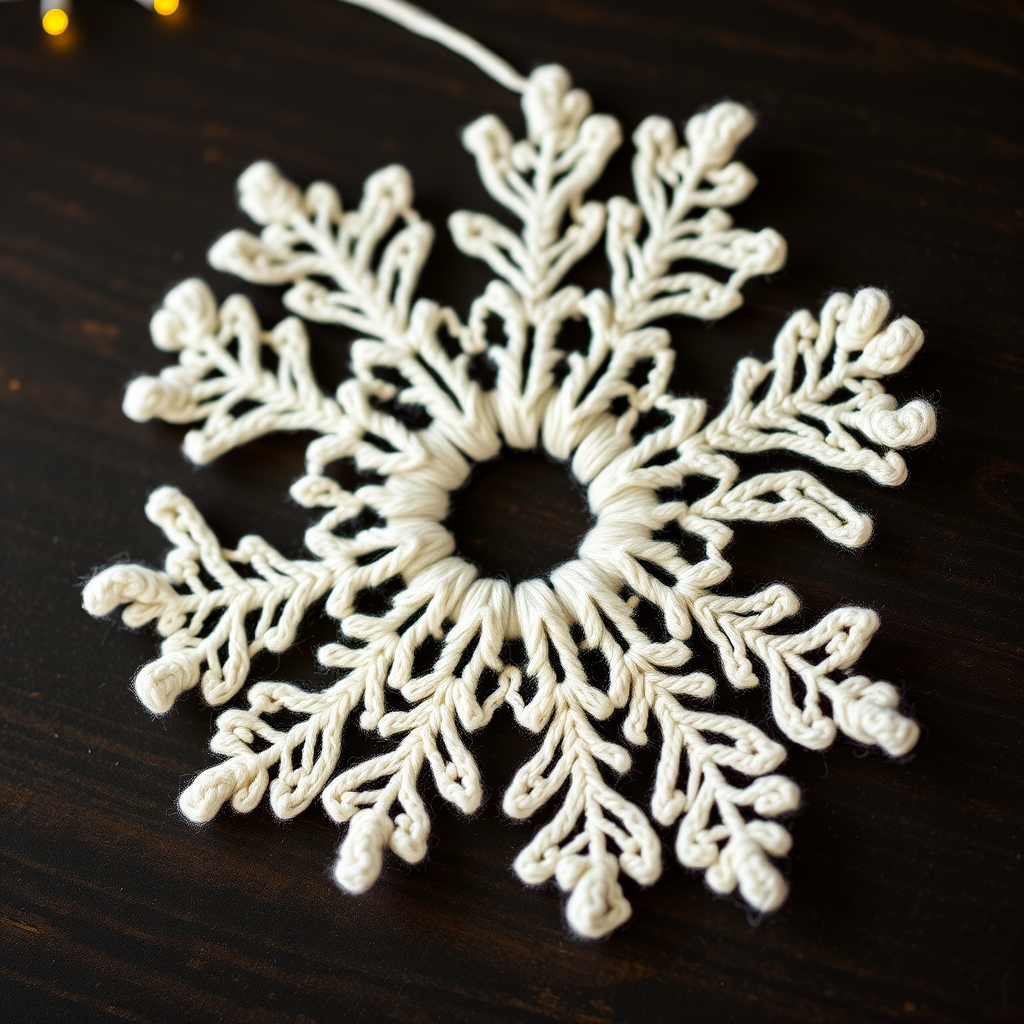
Glacier Bloom Snowflake Trio Free Crochet Pattern – Lacy Winter Ornaments

Glacier Bloom Snowflake Trio: A Free Crochet Pattern for Lacy Winter Ornaments
Elevate your winter decor with these intricate, lacy snowflakes that capture the delicate beauty of frost on a windowpane. Each unique design in this trio is quick to crochet and perfect for adding a handmade touch to gifts, garlands, or your tree. Whether you're a seasoned crocheter or just starting your journey, this pattern is designed to be beginner-friendly while still producing stunning, professional-looking results. The Glacier Bloom Snowflake Trio features three distinct designs—Crystal Star, Frosted Fern, and Silver Lace—each with its own personality, yet all sharing that crisp, openwork elegance that makes snowflakes so magical.
These ornaments make wonderful handmade gifts, thoughtful additions to gift wrapping, or charming decorations for your own holiday space. The pattern uses simple stitches and repetitive rounds, making it a relaxing and rewarding project for cozy winter evenings. Let's dive in and create some frosty magic!
Materials Needed
Before you begin, gather the following supplies. The beauty of this project is its simplicity—you only need a few basic tools and materials.
- Yarn: Worsted weight cotton yarn in three shades: Ice Blue, Silver Mist, and Pearl White (approximately 20 yards of each). Cotton is ideal because it holds its shape well when blocked and has a nice, crisp stitch definition. However, any worsted weight yarn you have on hand will work beautifully.
- Crochet Hook: US G/6 (4.0 mm) crochet hook. This size pairs perfectly with worsted weight yarn to create a fabric that's substantial enough for an ornament but still lacy and delicate.
- Gauge: Gauge is not critical for this project. Each snowflake measures approximately 4 inches across when blocked, but slight variations won't affect the overall look. Just relax and enjoy the process!
- Optional Extras: Starch or liquid fabric stiffener, foam board for blocking, rust-proof pins, and a small piece of ribbon or thread for hanging loops.
Step-by-Step Instructions
This pattern includes three distinct snowflake designs. Work each in the round, using a magic ring to start. Block finished snowflakes to open up the lace and create crisp points. The magic ring technique is essential here—it allows you to pull the center tight, leaving no hole in the middle of your snowflake.
General Notes
- Ch 3 at the beginning of rounds counts as a double crochet (dc) unless otherwise stated.
- Slip stitch (sl st) to join at the end of each round.
- For a stiffer finish, dip the finished snowflake in liquid starch or a mixture of white glue and water, then pin and dry. This will help the snowflake hold its shape beautifully.
Snowflake 1: Crystal Star
The Crystal Star is the first of our trio, featuring a classic star shape with delicate picot points. Its symmetrical design creates a stunning, crisp silhouette that catches the light beautifully.
Round 1: Magic ring, ch 3 (counts as dc), 11 dc in ring, sl st to top of ch-3. (12 dc)
Round 2: Ch 4 (counts as dc + ch 1), *dc in next dc, ch 1; repeat from * around, sl st to 3rd ch of ch-4. (12 dc, 12 ch-1 spaces)
Round 3: Sl st into first ch-1 space, ch 3 (counts as dc), 2 dc in same space, ch 3, *3 dc in next ch-1 space, ch 3; repeat from * around, sl st to top of ch-3. (12 clusters of 3 dc)
Round 4: Sl st to next dc, ch 1, sc in same dc, ch 5, sc in next dc (between clusters), ch 5, *sc in next dc, ch 5, sc in next dc, ch 5; repeat from * around, sl st to first sc. (12 ch-5 loops)
Round 5: Sl st into first ch-5 loop, ch 1, (sc, ch 3, sc) in same loop, ch 5, *(sc, ch 3, sc) in next ch-5 loop, ch 5; repeat from * around, sl st to first sc. (12 picots, 12 ch-5 loops)
Round 6: Sl st into first ch-3 picot, ch 1, sc in picot, ch 7, *sc in next picot, ch 7; repeat from * around, sl st to first sc. (12 ch-7 loops)
Round 7: Sl st into first ch-7 loop, ch 1, (sc, ch 5, sc) in same loop, ch 5, *(sc, ch 5, sc) in next ch-7 loop, ch 5; repeat from * around, sl st to first sc. Fasten off, weave in ends.
Snowflake 2: Frosted Fern
The Frosted Fern snowflake has a slightly more open, airy feel with longer chains and a delicate, fern-like quality. It's perfect for those who love a more intricate, lacy look.
Round 1: Magic ring, ch 3 (counts as dc), 11 dc in ring, sl st to top of ch-3. (12 dc)
Round 2: Ch 5 (counts as dc + ch 2), *dc in next dc, ch 2; repeat from * around, sl st to 3rd ch of ch-5. (12 dc, 12 ch-2 spaces)
Round 3: Sl st into first ch-2 space, ch 3 (counts as dc), 2 dc in same space, ch 2, *3 dc in next ch-2 space, ch 2; repeat from * around, sl st to top of ch-3. (12 clusters of 3 dc)
Round 4: Sl st to next dc, ch 1, sc in same dc, ch 4, sc in next dc (between clusters), ch 4, *sc in next dc, ch 4, sc in next dc, ch 4; repeat from * around, sl st to first sc. (12 ch-4 loops)
Round 5: Sl st into first ch-4 loop, ch 1, (sc, ch 3, sc) in same loop, ch 6, *(sc, ch 3, sc) in next ch-4 loop, ch 6; repeat from * around, sl st to first sc. (12 picots, 12 ch-6 loops)
Round 6: Sl st into first ch-3 picot, ch 1, sc in picot, ch 8, *sc in next picot, ch 8; repeat from * around, sl st to first sc. (12 ch-8 loops)
Round 7: Sl st into first ch-8 loop, ch 1, (sc, ch 6, sc) in same loop, ch 6, *(sc, ch 6, sc) in next ch-8 loop, ch 6; repeat from * around, sl st to first sc. Fasten off, weave in ends.
Snowflake 3: Silver Lace
The Silver Lace snowflake is the most open and airy of the trio, with generous chains and a truly delicate, lace-like appearance. It's a stunning showstopper that will catch everyone's eye.
Round 1: Magic ring, ch 3 (counts as dc), 11 dc in ring, sl st to top of ch-3. (12 dc)
Round 2: Ch 6 (counts as dc + ch 3), *dc in next dc, ch 3; repeat from * around, sl st to 3rd ch of ch-6. (12 dc, 12 ch-3 spaces)
Round 3: Sl st into first ch-3 space, ch 3 (counts as dc), 3 dc in same space, ch 3, *4 dc in next ch-3 space, ch 3; repeat from * around, sl st to top of ch-3. (12 clusters of 4 dc)
Round 4: Sl st to next dc, ch 1, sc in same dc, ch 5, sc in next dc (between clusters), ch 5, *sc in next dc, ch 5, sc in next dc, ch 5; repeat from * around, sl st to first sc. (12 ch-5 loops)
Round 5: Sl st into first ch-5 loop, ch 1, (sc, ch 4, sc) in same loop, ch 7, *(sc, ch 4, sc) in next ch-5 loop, ch 7; repeat from * around, sl st to first sc. (12 picots, 12 ch-7 loops)
Round 6: Sl st into first ch-4 picot, ch 1, sc in picot, ch 9, *sc in next picot, ch 9; repeat from * around, sl st to first sc. (12 ch-9 loops)
Round 7: Sl st into first ch-9 loop, ch 1, (sc, ch 7, sc) in same loop, ch 7, *(sc, ch 7, sc) in next ch-9 loop, ch 7; repeat from * around, sl st to first sc. Fasten off, weave in ends.
Finishing Touches
Once you've completed all three snowflakes, it's time to give them that professional, polished look. Proper finishing makes all the difference in how your ornaments will display.
- Weave in all ends securely. Use a tapestry needle to thread the yarn tails through the back of your work, being careful not to pull too tightly and distort the shape.
- Block each snowflake by pinning to shape on a foam board. Gently stretch each point outward to create that crisp, star-like silhouette. Spray with starch or a stiffening solution, and allow to dry completely. This step is crucial for opening up the lace pattern and achieving those beautiful, defined points.
- Attach a small hanging loop of thread or ribbon to one point if desired. A simple loop of embroidery floss or a thin satin ribbon works perfectly.
These Glacier Bloom Snowflakes are more than just ornaments—they're little works of art that capture the magic of winter. Whether you hang them on your tree, string them into a garland, or attach them to gifts, they're sure to bring a touch of handmade warmth to your holiday season. Happy crocheting, and may your winter be filled with creativity and joy!