Frosted Fern Snowflake Free Crochet Pattern – Delicate Lacy Winter Ornament
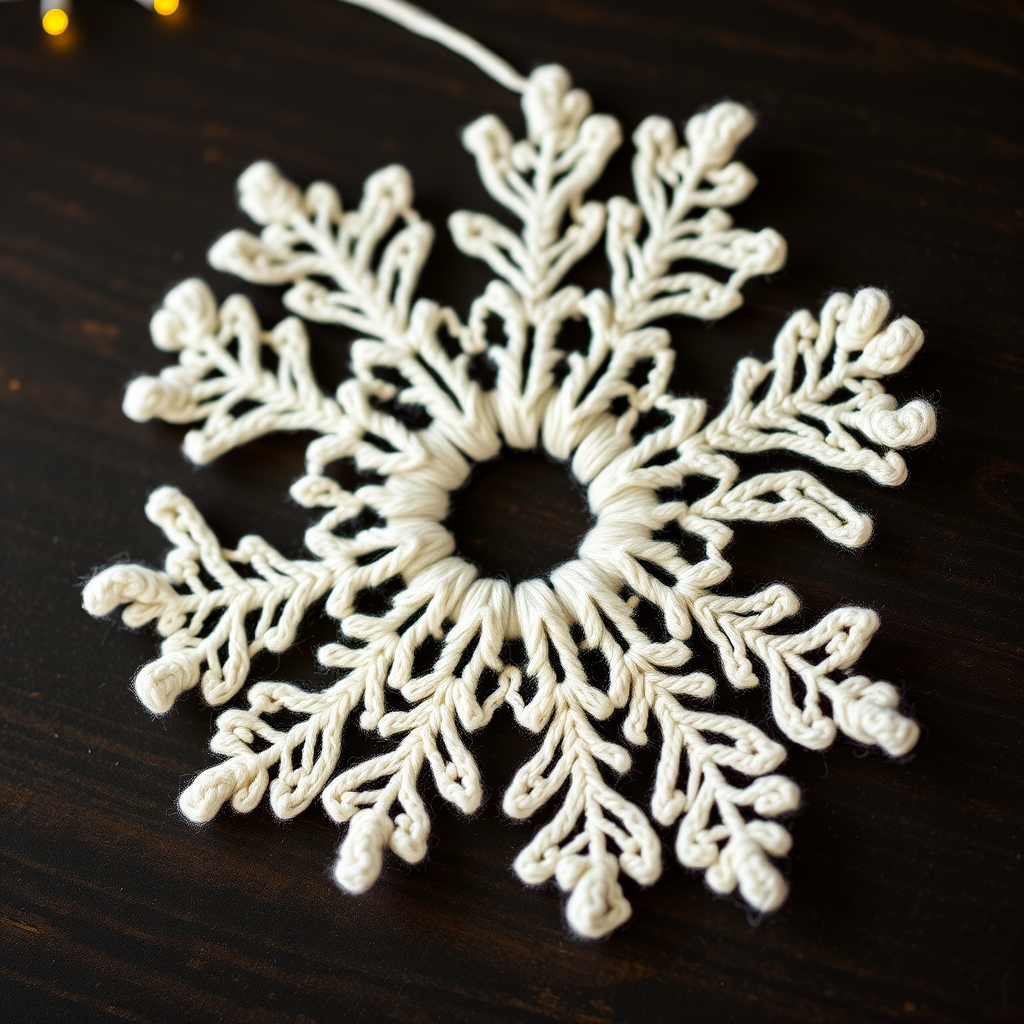
Frosted Fern Snowflake Free Crochet Pattern – Delicate Lacy Winter Ornament
There is something truly magical about the first snowfall—the way each flake falls gently, unique and intricate, capturing the quiet beauty of winter. This Frosted Fern Snowflake pattern brings that enchantment into your hands, weaving delicate fern-like fronds into a classic six-pointed star. Each flake is crocheted with fine cotton thread and stiffened to hold its shape, making it perfect for adorning your tree, windows, or gift wrapping. Whether you're a seasoned crocheter or a curious beginner, this pattern offers a rewarding project that results in a stunning, heirloom-quality ornament.
Imagine a winter forest where every branch is dusted with frost, and each snowflake that falls is a tiny work of art. That's the inspiration behind this design. The intricate lacework creates a crisp, airy texture that catches the light beautifully, and the finished snowflake lies flat, ready to be displayed on a dark wooden surface or hung among twinkling lights. This pattern is not just about creating an ornament—it's about capturing a moment of winter's fleeting beauty and making it last forever.
Materials Needed
Before you begin, gather the following materials. Each snowflake uses approximately 10 yards of thread, so you can make several from a single ball of cotton thread—perfect for creating a whole set of ornaments or gift tags.
- Yarn: Size 10 crochet cotton thread in white or silver (approx. 10 yards per snowflake)
- Hook: Steel crochet hook size 7 (1.65 mm)
- Tapestry needle for weaving in ends
- Stiffening solution: Equal parts white glue and water, or spray starch
- Pins and blocking board for shaping and drying
Note on gauge: Gauge is not critical for this project. Each snowflake measures approximately 4 inches (10 cm) across when blocked, but slight variations won't affect the beauty of the finished piece. The key is to maintain consistent tension throughout your work.
Abbreviations
Familiarize yourself with these standard crochet abbreviations before starting. If you're new to crochet, take a moment to practice each stitch—they're all basic and will become second nature quickly.
- ch = chain
- sl st = slip stitch
- sc = single crochet
- dc = double crochet
- tr = treble crochet
- picot = ch 3, sl st in 3rd ch from hook
- rnd = round
Step-by-Step Instructions
Follow these detailed instructions carefully. Each round builds upon the previous one, so take your time and count your stitches as you go. The result will be a beautifully intricate snowflake that you'll be proud to display.
Round 1: Foundation Ring
Begin by making a magic ring, or alternatively, chain 6 and join with a slip stitch to form a ring. This will be the center of your snowflake.
Chain 3 (this counts as your first double crochet). Work 11 double crochet stitches into the ring. You should now have 12 double crochet stitches total (including the initial chain 3). Join with a slip stitch to the top of the chain 3 to close the round.
Tip: If you're using a magic ring, pull the tail tightly to close the center completely. This creates a neat, small hole in the middle of your snowflake.
Round 2: Creating the First Loops
Chain 1, then single crochet in the same stitch (the one where you just joined). This counts as your first single crochet.
Now, chain 5, skip the next double crochet, and single crochet in the next double crochet. Repeat this pattern around: chain 5, skip one double crochet, single crochet in the next. You'll end with a chain 5, skip the last double crochet, and join with a slip stitch to the first single crochet.
You should now have 6 chain-5 loops radiating from the center. These loops will form the base of your snowflake's points.
Round 3: Expanding the Loops
Slip stitch into the first chain-5 loop. Chain 1, then single crochet in the same loop.
Now, chain 7, and single crochet in the next loop. Repeat this pattern around: chain 7, single crochet in the next loop. You'll end with a chain 7, then join with a slip stitch to the first single crochet.
You now have 6 chain-7 loops. These larger loops will accommodate the intricate fern-like clusters in the next round.
Round 4: Building the Fern Clusters
This is where the magic happens. Slip stitch into the first chain-7 loop.
Chain 4 (this counts as your first treble crochet). Work 5 treble crochet stitches into the same loop. Chain 5, then work 6 more treble crochet stitches into the same loop. This creates the first half of your fern cluster.
Chain 1, then skip to the next loop. In this next loop, work 6 treble crochet, chain 5, then 6 more treble crochet. Repeat this pattern around: chain 1, skip to next loop, work 6 treble crochet, chain 5, 6 treble crochet in the same loop.
At the end, chain 1 and join with a slip stitch to the top of the initial chain 4. You should now have 6 groups of 12 treble crochet stitches, each group separated by a chain-5 space in the center.
Tip: The chain-5 spaces in the middle of each group will become the tips of your snowflake points. Make sure they're clearly defined.
Round 5: Creating the Scalloped Edge
Chain 1, then single crochet in the same stitch. This is your starting point.
Now, chain 3, skip the next treble crochet, and single crochet in the next treble crochet. Repeat this pattern across the first 6 treble crochet stitches. After the 6th single crochet, chain 3, then single crochet in the chain-5 space (the center of the point). Chain 3, then single crochet in the next treble crochet.
Now, chain 3, skip the next treble crochet, and single crochet in the next treble crochet. Repeat this pattern across the next 6 treble crochet stitches. After the 6th single crochet, chain 3, single crochet in the chain-5 space, chain 3, single crochet in the next treble crochet.
Repeat this entire pattern around the snowflake. You'll create a beautiful scalloped edge that defines each point. Join with a slip stitch to the first single crochet.
Note: This round creates the delicate fern-like fronds. The chain-3 spaces form the "veins" of the fern, while the single crochets create the structure.
Round 6: Adding the Picot Tips
Chain 1, then single crochet in the same stitch. This is your starting point.
Now, chain 5, skip the next chain-3 space, and single crochet in the next single crochet. Repeat this pattern around the snowflake.
However, when you reach the center of each point (the chain-5 space from Round 4), you'll work a special picot treatment. In each chain-5 space, work: single crochet, chain 3, picot (chain 3, slip stitch in 3rd chain from hook), chain 3, single crochet. This creates the delicate tip of each fern frond.
Continue around, working chain 5, skip chain-3 space, single crochet in next single crochet, until you reach the next point. Repeat the picot treatment in each point.
Join with a slip stitch to the first single crochet. Fasten off, leaving a 6-inch tail for weaving.
Tip: The picot loops at the tips are what give this snowflake its signature "frosted fern" look. Take your time with these—they're the crowning glory of the design.
Finishing and Blocking
Now that your snowflake is complete, it's time to give it its final shape and stiffness. This step is crucial for creating a crisp, professional-looking ornament.
Weaving in Ends
Using your tapestry needle, carefully weave in all loose ends. Be sure to weave them in securely so they don't come loose during the stiffening process. Trim any excess thread.
Stiffening Solution
Mix equal parts white glue and water in a shallow dish. Alternatively, you can use spray starch for a lighter hold. Submerge your snowflake in the solution, making sure it's completely saturated. Let it soak for a few minutes to ensure the fibers are fully coated.
Gently squeeze out the excess solution. Be careful not to wring or twist the snowflake, as this can distort the shape. Instead, press it gently between your palms or against the side of the dish.
Blocking
Place your snowflake on a blocking board (a piece of foam board or a corkboard works well). Using rust-proof pins, carefully stretch the snowflake to open up the lace pattern and shape the points.
Start by pinning the center of each point, then work outward to define the scalloped edges. Make sure the snowflake lies flat and the points are evenly spaced. The chain-5 spaces at the tips should be clearly visible.
Allow the snowflake to dry completely. This typically takes overnight, but drying time may vary depending on humidity and the amount of stiffening solution used.
Final Touches
Once completely dry, remove the pins. Your snowflake should hold its shape beautifully. If you'd like to hang it, attach a small loop of thread or ribbon to one of the points. You can also add a tiny bead or crystal to the center for extra sparkle.
These snowflakes make wonderful ornaments for your tree, lovely additions to gift wrapping, or beautiful window decorations. They also make thoughtful handmade gifts for friends and family during the holiday season.
Tips for Success
- Consistent tension: Keep your tension even throughout the project. This ensures your snowflake lies flat and the stitches are uniform.
- Count your stitches: Each round builds on the previous one, so it's important to count your stitches as you go. A mistake in an early round will be magnified in later rounds.
- Blocking is essential: Don't skip the blocking step. This is what transforms your crochet piece from a floppy circle into a crisp, beautiful snowflake.
- Experiment with colors: While white and silver are classic choices, try metallic threads or even soft blue for a different look. You can also add glitter to the stiffening solution for extra sparkle.
Creating this Frosted Fern Snowflake is a delightful way to celebrate the winter season. Each one you make will be slightly unique, just like real snowflakes. Whether you're making a single ornament for your tree or a whole collection to share, this pattern is sure to bring joy and beauty to your holiday celebrations.
Happy crocheting, and may your winter be filled with delicate, handmade beauty!


