Frosted Cocoa Cup Lovey Free Crochet Pattern: A Nordic Winter Snuggle
Frosted Cocoa Cup Lovey: A Nordic Winter Snuggle (Free Beginner Crochet Pattern)
Introduction
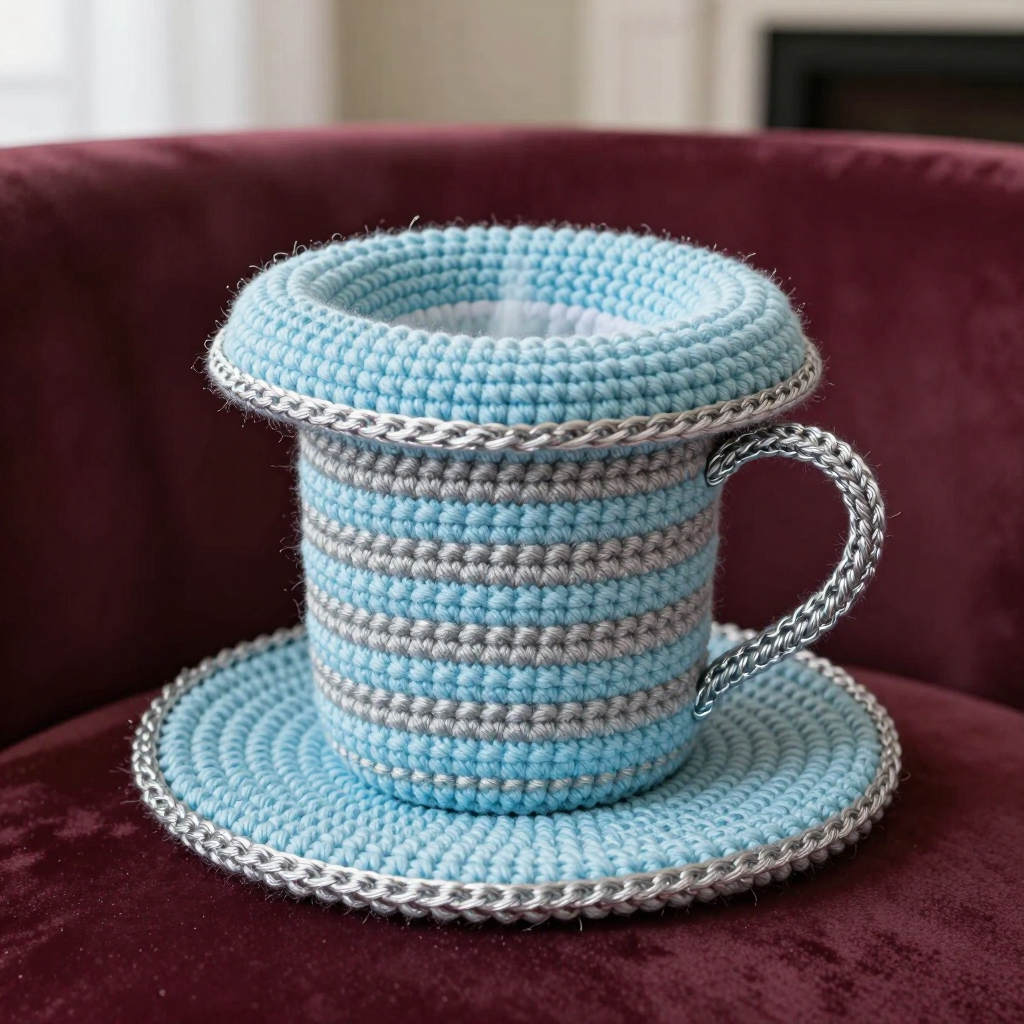
This Frosted Cocoa Cup Lovey is the perfect first amigurumi project for anyone who has never held a crochet hook before. It is a tiny, huggable mug in icy blue and silver stripes, topped with a soft, flat "steam" blanket that a little one can grip, chew, and cuddle. The finished piece is about 6.5 inches (16.5 cm) across and feels soft, squishy, and gently weighted in your hands, with a smooth matte cotton surface and a neat little loop handle on the side. Because it is worked almost entirely in simple single crochet rounds, you only need to learn one main stitch to make the whole thing. Let's make something cozy together.
Materials Needed
- Yarn: DK weight yarn (Category 3 / light worsted), cotton recommended. Total approximately 110 yd (100 m): 60 yd (55 m) ice blue and 50 yd (46 m) silver.
- Crochet hook: 3.5 mm (US E/4).
- Stitch marker (one is enough; a safety pin or scrap of contrasting yarn works too).
- Tapestry needle (a blunt, large-eyed needle for sewing yarn ends).
- Scissors.
- Small amount of polyester fiberfill (toy stuffing) for the mug body.
Finished size: Mug body about 3 in (7.5 cm) tall and 3.25 in (8.5 cm) across. Steam blanket about 6.5 in (16.5 cm) in diameter. Handle about 2.5 in (6.5 cm) long and 0.75 in (2 cm) wide.
Abbreviations and Beginner Glossary
- ch – chain. Make a loop of yarn on your hook, wrap yarn over the hook, and pull it through the loop. That is one chain.
- sc – single crochet. Insert your hook into the stitch, wrap yarn over the hook, pull up a loop (2 loops on hook), wrap yarn over again, and pull through both loops. One single crochet made.
- sl st – slip stitch. Insert hook into the stitch, wrap yarn over, and pull it straight through both the stitch and the loop on your hook. It joins without adding height.
- sc2tog – single crochet 2 together (a decrease). Insert hook into the first stitch, pull up a loop, insert hook into the next stitch, pull up a loop, then yarn over and pull through all three loops. This turns two stitches into one. (Not used in this pattern, but good to know.)
- st(s) – stitch(es). One completed loop on your work.
- BLO – back loop only. Every single crochet stitch has two top loops (a front loop near you and a back loop away from you). Working in BLO means you insert your hook only under the back loop, leaving the front loop free.
- 2 sc in next st – work two single crochet stitches into the same stitch. This is an increase and makes the circle grow.
- Magic ring – an adjustable loop you crochet into to start a circle with no hole in the middle. Wrap yarn around your fingers to make a loop, then work your first stitches into it and pull the tail tight.
- Continuous rounds – you spiral around and around without joining at the end of each round, so there is no seam.
- Fasten off – cut the yarn, pull the tail through the last loop, and tighten.
- Whipstitch – a simple sewing stitch where you pass the needle over the edge and back through, over and over, to join two edges.
Gauge
Gauge: 20 sc x 22 rounds = 4 in (10 cm) in single crochet worked in the round.
Why gauge matters: Gauge is how many stitches and rounds fit into one inch. If your stitches are looser or tighter than the pattern, your mug will come out bigger or smaller than the measurements above. How to check: Make a small flat circle of single crochet about 4 in (10 cm) wide, lay it flat, and measure 4 in (10 cm) across the middle. Count the stitches in that span. If you have more than 20, try a slightly larger hook; if fewer than 20, try a smaller hook. It is fine to be close — this is a toy, not a fitted sweater.
Beginner Tips Before You Start
- Use your stitch marker every round. Place it in the very first stitch of each round and move it up as you go. In continuous rounds it is the only way to know where a round begins and ends.
- Do not pull your yarn too tight. Tension should feel relaxed. Tight stitches make it hard to insert the hook and make the mug stiff.
- Change color on the last yarn-over of the final stitch of a round. Finish the stitch with the new color so the stripe edge looks clean.
- Carry the unused color loosely up the inside of the mug. Do not pull it tight or the mug will pucker.
- Count your stitches at the end of every increase round. The number in parentheses tells you exactly how many you should have.
- Stuff lightly. The mug should keep a flat base and gently rounded sides — overstuffing makes it bulge.
Step-by-Step Instructions
Notes: Work in continuous rounds unless told otherwise. Do not join or turn at the end of each round. Place a stitch marker in the first stitch of each round and move it up as you go.
Mug Body (make 1)
With ice blue, make a magic ring.
Round 1: 6 sc into the ring. (6 sts)
Round 2: 2 sc in each st around. (12 sts)
Round 3: [Sc in next st, 2 sc in next st] around. (18 sts)
Round 4: [Sc in next 2 sts, 2 sc in next st] around. (24 sts)
Round 5: [Sc in next 3 sts, 2 sc in next st] around. (30 sts)
Round 6: [Sc in next 4 sts, 2 sc in next st] around. (36 sts)
Round 7: [Sc in next 5 sts, 2 sc in next st] around. (42 sts)
Round 8: [Sc in next 6 sts, 2 sc in next st] around. (48 sts)
Round 9: Working in BLO, sc in each st around. (48 sts)
Rounds 10–11: Sc in each st around. (48 sts)
Change to silver.
Rounds 12–13: Sc in each st around. (48 sts)
Change to ice blue.
Rounds 14–15: Sc in each st around. (48 sts)
Change to silver.
Rounds 16–17: Sc in each st around. (48 sts)
Change to ice blue.
Rounds 18–19: Sc in each st around. (48 sts)
Change to silver.
Rounds 20–21: Sc in each st around. (48 sts)
Change to ice blue.
Round 22: Sc in each st around. (48 sts)
Sl st in next st. Fasten off, leaving a 12 in (30 cm) tail. Lightly stuff the mug with fiberfill, keeping the base flat and the sides gently rounded. Do not overstuff.
Mug Rim
Join silver with a sl st to any unworked front loop of Round 9.
Round 1: Ch 1, sc in each front loop around. (48 sts)
Sl st in next st. Fasten off and weave in ends.
Handle (make 1)
With silver, leave a 6 in (15 cm) starting tail. Ch 14.
Row 1: Sc in 2nd ch from hook and in each ch across. (13 sts)
Row 2: Ch 1, turn, sc in each st across. (13 sts)
Fasten off, leaving a 6 in (15 cm) tail. The handle should measure about 2.5 in (6.5 cm) long and 0.75 in (2 cm) wide. Fold the strip in half lengthwise with right sides facing out and whipstitch the long edges together to form a narrow loop. Use the tails to sew the handle to the side of the mug, positioning it between Rounds 12 and 20. Sew through both layers of the handle and into the mug body securely.
Steam Blanket (make 1)
With ice blue, make a magic ring.
Round 1: 6 sc into the ring. (6 sts)
Round 2: 2 sc in each st around. (12 sts)
Round 3: [Sc in next st, 2 sc in next st] around. (18 sts)
Round 4: [Sc in next 2 sts, 2 sc in next st] around. (24 sts)
Round 5: [Sc in next 3 sts, 2 sc in next st] around. (30 sts)
Round 6: [Sc in next 4 sts, 2 sc in next st] around. (36 sts)
Round 7: [Sc in next 5 sts, 2 sc in next st] around. (42 sts)
Round 8: [Sc in next 6 sts, 2 sc in next st] around. (48 sts)
Round 9: [Sc in next 7 sts, 2 sc in next st] around. (54 sts)
Round 10: [Sc in next 8 sts, 2 sc in next st] around. (60 sts)
Round 11: [Sc in next 9 sts, 2 sc in next st] around. (66 sts)
Round 12: [Sc in next 10 sts, 2 sc in next st] around. (72 sts)
Round 13: [Sc in next 11 sts, 2 sc in next st] around. (78 sts)
Round 14: [Sc in next 12 sts, 2 sc in next st] around. (84 sts)
Round 15: [Sc in next 13 sts, 2 sc in next st] around. (90 sts)
Change to silver.
Round 16: Sc in each st around. (90 sts)
Round 17: [Sc in next 14 sts, 2 sc in next st] around. (96 sts)
Round 18: Sc in each st around. (96 sts)
Sl st in next st. Fasten off and weave in ends. Gently block the blanket flat if needed.
Assembly and Finishing
- Position the blanket: Center the steam blanket over the mug opening. It should rest flat on the rim with a slight overhang all the way around.
- Sew it down: Thread a length of silver yarn on the tapestry needle. Sew the blanket to the mug through the last round of the mug and the edge of the blanket, working small, even stitches around the circumference. Leave a 1 in (2.5 cm) opening.
- Shape and close: Add a tiny amount of fiberfill to the mug if needed for shape, then sew the opening closed with the same small stitches.
- Weave in ends: Thread each yarn tail onto the tapestry needle and pass it back and forth through the inside of the work for about 1 in (2.5 cm), then trim close to the surface. This hides the tail so it cannot work loose.
- Block and shape: Lightly steam the steam blanket edge to help it lie flat. Do not press the mug body flat. Shape the mug base and handle gently with your fingers. Trim any loose yarn ends.
Pro Tips and Variations
- Change the palette: Swap ice blue and silver for any two DK cotton colors — try mint and cream for spring, or cocoa brown and gold for a classic hot-chocolate look. Keep the same stripe rhythm (two rounds of each color).
- Make it bigger or smaller: To enlarge the mug, add one more increase round (Round 23: [Sc in next 7 sts, 2 sc in next st] around = 54 sts) and work your stripe rounds to 54 sts. To shrink it, stop the base after Round 7 (42 sts). Adjust the blanket by adding or removing increase rounds the same way.
- Substitute yarn: Any DK (Category 3) cotton or cotton-blend works. Avoid fuzzy or slippery yarns for a first project — smooth cotton shows your stitches clearly and holds shape well.
- Add texture: Work the silver rounds in the back loop only for a subtle ridged stripe, or add a small embroidered snowflake to the center of the steam blanket with a few straight stitches.