Free Pattern: Low Tide Knit Monkey Phone Sock in Ocean-Blue Velvet
Free Pattern: Low Tide Knit Monkey Phone Sock in Ocean-Blue Velvet
Introduction
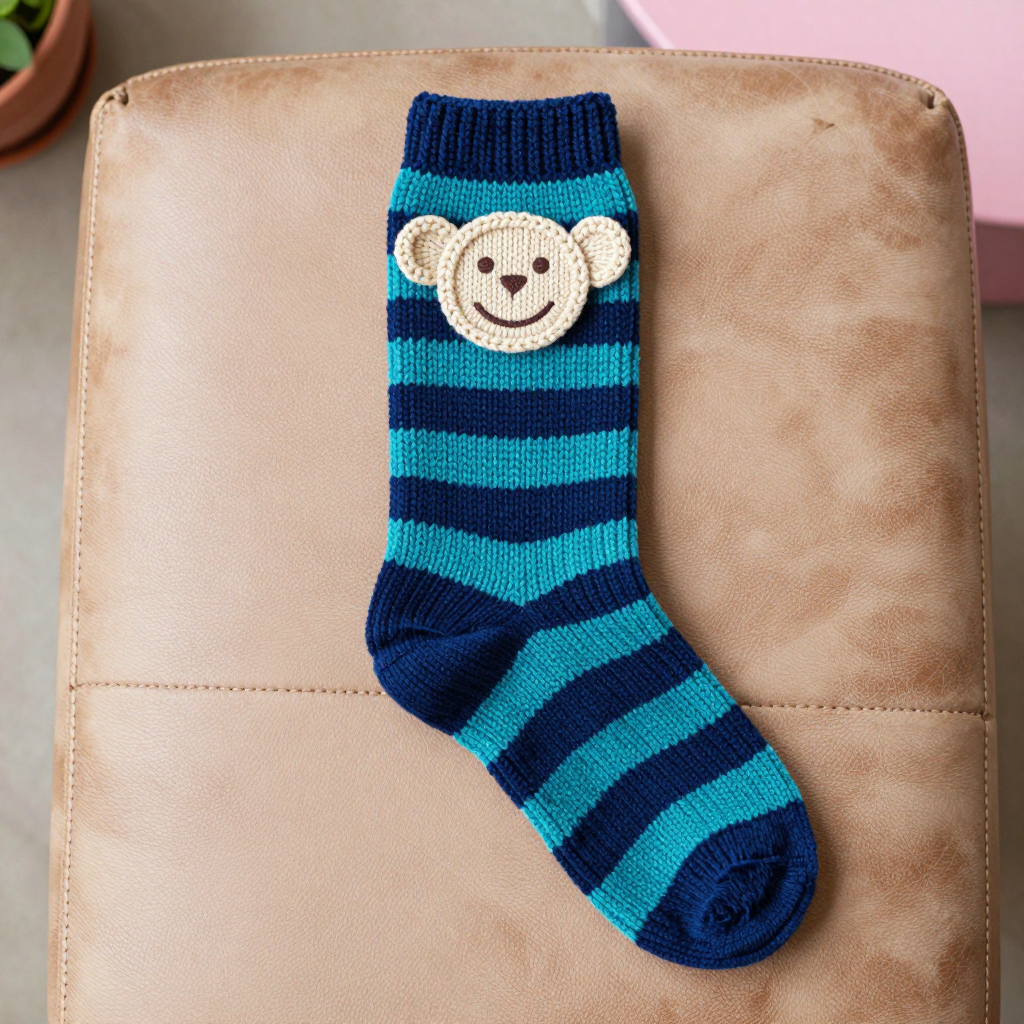
If you have ever wanted to knit something soft, useful, and genuinely adorable in a single weekend, the Low Tide Knit Monkey Phone Sock is the project for you. It is a simple rectangular sleeve worked in garter stitch (which just means you knit every single row), so there is no shaping, no complicated counting, and no chance of losing your place. The plush worsted-weight velvet yarn makes the finished sock feel like a tiny pillow for your phone, with a soft, slightly fuzzy pile and gentle horizontal stripes in deep sea blue and tidepool teal. Topped with a small cream knitted monkey face and two little ears, it has a charming desert-boho personality that makes it a lovely gift or a treat for yourself. This is the perfect first "real" project for a brand-new knitter who has learned cast on, knit, and bind off, and it is a wonderful stash-buster for anyone who already loves yarn.
Materials Needed
- Yarn: Worsted-weight velvet yarn (approximately 150 yds / 137 m per 100 g skein). You will need 1 skein each of Deep Sea Blue (A), Tidepool Teal (B), and Sandstone Cream (C). You will also need a small amount of Driftwood Brown (D) for the monkey's face details. The body uses roughly half of each of A and B, so one skein of each is plenty.
- Main needles: US 7 (4.5 mm) straight knitting needles.
- Small needles: US 6 (4.0 mm) double-pointed needles (DPNs) for the monkey face and ears.
- Stitch holder or waste yarn: To hold the live stitches while you seam the body.
- Stitch markers: Helpful for tracking your stripe changes and rounds.
- Tapestry needle: A blunt, large-eye needle for seaming and weaving in ends.
- Scissors: For cutting yarn.
- Small amount of polyester fiberfill or scrap yarn: To stuff the monkey face lightly.
- Optional: A steamer or steam iron for light blocking (never press directly on velvet).
Finished size: Width 3 in / 7.5 cm (flat, unstretched); Height 6 in / 15 cm. It fits most standard smartphones up to 3 in wide and 5.75 in tall.
Abbreviations and Beginner Glossary
- st / sts – stitch / stitches. One "stitch" is one loop on your needle.
- K – knit. Insert the right needle into the front of the stitch on the left needle, wrap the yarn around, and pull it through to make a new stitch.
- Garter stitch – knitting every row. It creates a soft, ridged, stretchy fabric that lies flat and never curls.
- Cast on – the way you create your first row of loops on the needle. (Use any cast-on you know, such as the long-tail cast-on.)
- Bind off – the way you finish an edge so the stitches do not unravel. Knit two stitches, then lift the first stitch over the second and off the needle; repeat across.
- Kfb – knit into the front and back of the same stitch. You knit the stitch normally, then knit into the back of the same stitch before slipping it off. This makes 1 extra stitch (an increase).
- K2tog – knit 2 stitches together as if they were one. This turns 2 stitches into 1 (a decrease).
- M1L – make 1 left-leaning increase. Lift the horizontal bar between two stitches with your left needle and knit it through the back loop. (Listed for reference; not used in this pattern.)
- Round – one complete circle of knitting when working in the round on DPNs, as opposed to a "row" worked flat back and forth.
- DPN – double-pointed needle. A short needle with points at both ends, used to knit small tubes in the round.
- Right sides together – placing the two "good" (public) faces of the fabric against each other so the seam hides inside.
- Whipstitch – a simple seaming stitch: bring the needle through both edges from front to back, over and over, like a spiral.
- Mattress stitch – an invisible vertical seam that joins two edges neatly.
- Weave in ends – threading yarn tails onto a tapestry needle and hiding them inside the fabric.
- Blocking – lightly steaming or dampening the finished piece so it settles into its final shape.
Gauge
18 sts and 36 rows = 4 in / 10 cm in garter stitch with US 7 needles and velvet yarn, slightly stretched.
Why gauge matters: Gauge is how many stitches and rows fit into a set measurement. If your stitches are bigger than the pattern's, your phone sock will come out too wide or too short; if they are smaller, it may be too tight. Gauge is not critical for fit here (a phone sock is forgiving), but it does affect the finished size.
How to make a gauge swatch: Cast on 24 stitches with US 7 needles and yarn A. Knit every row for about 4 inches. Bind off. Lay the swatch flat, place a ruler across the middle, and count how many stitches fit in 4 inches. If you have more than 18, your knitting is tight — try a larger needle. If you have fewer than 18, your knitting is loose — try a smaller needle. Always check gauge before you begin.
Beginner Tips Before You Start
- Use stitch markers to track your stripes. Place a marker every 12 rows, or simply count your ridges (each garter ridge = 2 rows) so you always know when to change color.
- Do not pull your yarn too tight. Velvet yarn is slippery and has little stretch. Keep your tension relaxed so the fabric stays soft and the stitches stay even.
- Change colors at the beginning of a row. Simply drop the old color, pick up the new one, and knit the first stitch — no special technique needed. Leave a 6-inch tail to weave in later.
- Count your stitches after every increase round. The monkey face grows quickly; check the stitch count in parentheses so you never lose your place.
- Keep the velvet pile facing the same way. When you join a new skein, make sure the fuzzy direction matches so the stripes look uniform.
- Work in good light. Velvet yarn hides stitch definition, so bright light makes it much easier to see your loops.
Step-by-Step Instructions
Body (worked flat as one rectangle, then seamed)
With US 7 needles and yarn A (Deep Sea Blue), cast on 28 sts.
Rows 1–12: Knit (garter stitch). Break A. (28 sts)
Rows 13–24: With yarn B (Tidepool Teal), knit. Break B. (28 sts)
Rows 25–36: With yarn A, knit. Break A. (28 sts)
Rows 37–48: With yarn B, knit. Break B. (28 sts)
Rows 49–60: With yarn A, knit. Break A. (28 sts)
Rows 61–72: With yarn B, knit. Break B. (28 sts)
Rows 73–84: With yarn A, knit. Break A. (28 sts)
Rows 85–96: With yarn B, knit. Break B. (28 sts)
Rows 97–108: With yarn A, knit. Do not break yarn. Leave all 28 sts on a stitch holder or waste yarn. (28 sts)
Note: The rectangle measures approximately 6 in / 15 cm wide by 12 in / 30 cm long before seaming. When folded in half and seamed, it forms a 3 in x 6 in sleeve.
Seaming the Body
Fold the rectangle in half with right sides together so the cast-on edge meets the live stitches on the holder. Using a tapestry needle and yarn A, whipstitch or mattress-stitch the two side edges together, leaving the top edge open. Turn right side out. The bottom edge is already closed by the fold. Weave in all ends.
Monkey Face Appliqué (worked in the round with US 6 DPNs and yarn C)
With yarn C (Sandstone Cream), cast on 6 sts onto one DPN. Distribute sts across 3 DPNs (2 sts per needle). Join to work in the round, being careful not to twist.
Round 1: Kfb in each st around. (12 sts)
Round 2: [K1, kfb] around. (18 sts)
Round 3: Knit. (18 sts)
Round 4: [K2, kfb] around. (24 sts)
Rounds 5–8: Knit. (24 sts)
Round 9: [K2, k2tog] around. (18 sts)
Round 10: [K1, k2tog] around. (12 sts)
Stuff lightly with a small amount of yarn A or polyester fiberfill.
Round 11: [K2tog] around. (6 sts)
Break yarn, leaving a 6 in tail. Thread tail through remaining 6 sts and pull tight to close. Weave in end.
Monkey Ears (make 2, with yarn C and US 6 DPNs)
Cast on 4 sts. Work in garter stitch for 4 rows. Bind off. Weave in ends.
Monkey Face Details (with yarn D and tapestry needle)
Using yarn D (Driftwood Brown), embroider two small French knots or straight stitches for eyes, positioned about 0.5 in apart in the center of the face. Embroider a small curved smile below the eyes using a single straight stitch or a short chain stitch. Embroider a small oval nose between the eyes and mouth using satin stitch (short straight stitches worked side by side to fill the shape).
Assembly and Finishing
1. Position the face. Pin the monkey face appliqué to the front of the phone sock, centered about 0.75 in below the top edge.
2. Sew on the face. Using a tapestry needle and yarn C, whipstitch the face to the sock, catching only the surface of the sock and the edge of the face. Keep your stitches small and even so they disappear into the velvet pile.
3. Attach the ears. Attach one ear to each side of the face using a few small stitches with yarn C.
4. Weave in all remaining ends. Thread each tail onto the tapestry needle and run it through the inside of the fabric for about 1 inch, then trim close to the surface.
5. Block. Lightly steam-block the phone sock, holding the steamer a few inches away and avoiding pressing the velvet pile. Do not iron directly. Allow to dry completely before use.
Optional Hanging Loop
With US 7 needles and yarn A, pick up 6 sts along the top edge at one side. Knit 4 rows. Bind off. Seam the short ends together to form a small loop. Weave in ends.
Pro Tips and Variations
- Change the colors: Swap the ocean blues for sunset oranges and dusty pinks, or use a single solid color and let the monkey face be the star. Any worsted velvet yarn will work beautifully.
- Adjust the size: For a larger phone, cast on 32 sts and work 120 rows instead of 108. For a smaller phone, cast on 24 sts and work 96 rows. Keep the stripe bands at 12 rows each so the look stays consistent.
- Substitute yarn: If velvet is hard to find, a soft worsted-weight chenille or a smooth worsted acrylic will work — just check your gauge again, since different fibers knit up at different sizes.
- Make it a keychain charm: Work a shorter version (cast on 16 sts, work 48 rows) and add the hanging loop to create a tiny matching pouch for earbuds or keys.