Free Pattern: Cozy Cloud Sloth Amigurumi
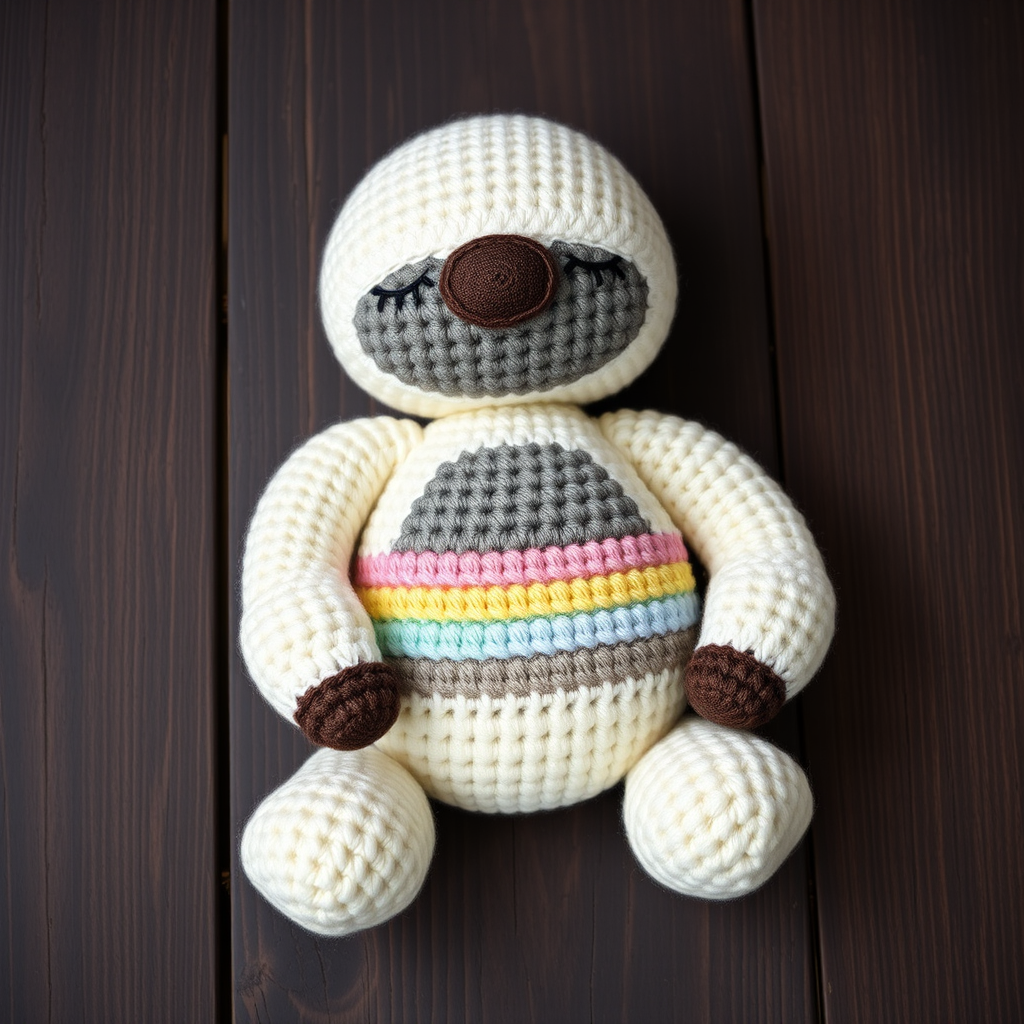
Free Pattern: Cozy Cloud Sloth Amigurumi
Are you ready to create the most huggable, dreamy companion you've ever crocheted? Meet the Cozy Cloud Sloth—a soft, pastel-colored amigurumi with a sleepy expression and a rainbow belly that's guaranteed to melt hearts. This free pattern is perfect for beginners and experienced crocheters alike, using simple single crochet stitches worked in continuous spirals. Whether you're crafting a nursery decoration, a thoughtful handmade gift, or just treating yourself to some cozy crochet time, this sloth is the perfect project. Let's dive in and bring this adorable creature to life!
Materials Needed
Before you begin, gather the following supplies to ensure a smooth and enjoyable crochet session:
- Yarn: Worsted weight (4) cotton or acrylic yarn in the following colors:
- Cream (main body and head)
- Light gray (face patch)
- Dusty pink (belly stripe and ears)
- Soft lavender (belly stripe)
- Mint green (belly stripe)
- Butter yellow (belly stripe)
- Dark brown (small amount for face details and claws)
- Crochet Hook: 3.5 mm (E) hook
- Stitch Marker: To keep track of your rounds
- Yarn Needle: For sewing parts together and weaving in ends
- Stuffing: Polyester fiberfill or your preferred stuffing material
- Scissors
Note on gauge: 4 sc x 4 rows = 1 inch. Gauge is not critical for this project, but maintaining consistent tension throughout will ensure your sloth comes out evenly shaped and proportionate.
Step-by-Step Instructions
This pattern is worked in continuous spiral rounds unless otherwise noted. Always use a stitch marker to keep track of where each round begins. Let's start with the head!
Head
R1: Magic ring, 6 sc in ring. (6)
R2: Inc in each st around. (12)
R3: (Sc in next st, inc) around. (18)
R4: (Sc in next 2 sts, inc) around. (24)
R5: (Sc in next 3 sts, inc) around. (30)
R6: (Sc in next 4 sts, inc) around. (36)
R7-12: Sc in each st around. (36)
R13: (Sc in next 4 sts, dec) around. (30)
R14: (Sc in next 3 sts, dec) around. (24)
R15: (Sc in next 2 sts, dec) around. (18)
Stuff the head firmly with fiberfill, shaping it as you go to ensure it's round and plump.
R16: (Sc in next st, dec) around. (12)
R17: Dec around. (6)
Fasten off, leaving a long tail for sewing. Weave the end through the remaining stitches and pull tight to close the hole. Set the head aside.
Face Patch (in Cream)
R1: Magic ring, 6 sc in ring. (6)
R2: Inc in each st around. (12)
R3: (Sc in next st, inc) around. (18)
R4: (Sc in next 2 sts, inc) around. (24)
Fasten off, leaving a long tail for sewing. Position the face patch on the head, slightly lower than center, and sew it in place using a whip stitch. Using the dark brown yarn, embroider a small oval nose in the center of the patch. For the sleepy eyes, embroider two curved lines (like half-closed eyes) on either side of the nose, angling downward for that drowsy, adorable expression.
Body
R1: Magic ring, 6 sc in ring. (6)
R2: Inc in each st around. (12)
R3: (Sc in next st, inc) around. (18)
R4: (Sc in next 2 sts, inc) around. (24)
R5: (Sc in next 3 sts, inc) around. (30)
R6: (Sc in next 4 sts, inc) around. (36)
R7-12: Sc in each st around. (36)
R13: (Sc in next 4 sts, dec) around. (30)
R14: (Sc in next 3 sts, dec) around. (24)
R15: (Sc in next 2 sts, dec) around. (18)
Stuff the body firmly, making sure it's well-filled but still soft to the touch.
R16: (Sc in next st, dec) around. (12)
R17: Dec around. (6)
Fasten off, leaving a long tail. Sew the head to the body, positioning it so the face patch faces forward. Use the tail to securely stitch the head onto the top of the body, weaving back and forth for a strong hold.
Belly Patch (Rainbow Stripes)
This patch is worked in rows, not rounds. Each row is a different color, creating a beautiful pastel rainbow effect.
Row 1 (pink): Ch 6, sc in 2nd ch from hook and across. (5) Ch 1, turn.
Row 2 (lavender): Sc in each st across. (5) Ch 1, turn.
Row 3 (mint): Sc in each st across. (5) Ch 1, turn.
Row 4 (yellow): Sc in each st across. (5) Ch 1, turn.
Row 5 (pink): Sc in each st across. (5)
Fasten off, leaving a long tail. Position the belly patch on the front of the body, centered horizontally and slightly below the neck seam. Sew it in place using a whip stitch, making sure the edges lie flat.
Arms (Make 2)
R1: Magic ring, 6 sc in ring. (6)
R2: Inc in each st around. (12)
R3-8: Sc in each st around. (12)
R9: (Sc in next st, dec) around. (8)
Stuff the arm lightly—just enough to give it shape without making it stiff.
R10: Sc in each st around. (8)
Fasten off, leaving a long tail. Sew the arms to the sides of the body, positioning them about halfway down the torso. Using dark brown yarn, embroider three small lines at the end of each arm to create the claws.
Legs (Make 2)
R1: Magic ring, 6 sc in ring. (6)
R2: Inc in each st around. (12)
R3-6: Sc in each st around. (12)
R7: (Sc in next st, dec) around. (8)
Stuff the leg lightly.
R8: Sc in each st around. (8)
Fasten off, leaving a long tail. Sew the legs to the bottom front of the body, slightly apart so the sloth can sit upright. Add dark brown embroidered claws to the feet as well.
Ears (Make 2)
R1: Magic ring, 6 sc in ring. (6)
R2: Inc in each st around. (12)
R3: Sc in each st around. (12)
Fasten off, leaving a long tail. Fold each ear flat (so it forms a semi-circle) and sew to the top sides of the head, just above the face patch. Position them symmetrically for a balanced look.
Assembly and Finishing Touches
Now that all your pieces are complete, it's time to bring your sloth together:
- Sew the head to the body if you haven't already, ensuring the seam is hidden at the back.
- Attach the arms to the sides of the body, angling them slightly downward so they hang naturally.
- Attach the legs to the bottom front, making sure the sloth sits flat and stable.
- Weave in all ends using your yarn needle, trimming any excess yarn.
- Optional blush: Using a small piece of pink yarn or fabric paint, add a subtle blush to the cheeks for extra cuteness. Simply stitch a few small lines or dots on each cheek.
Give your sloth a final once-over, adjusting the stuffing or positioning as needed. And there you have it—your very own Cozy Cloud Sloth, ready to bring warmth and smiles to anyone who sees it!
This pattern is perfect for using up scrap yarn in pastel shades, and the result is a one-of-a-kind keepsake. Whether you're making it for a baby shower, a child's birthday, or just because, this sloth is sure to become a treasured friend. Happy crocheting!


