Free Pattern: Copper Canyon Fox Amigurumi Crochet
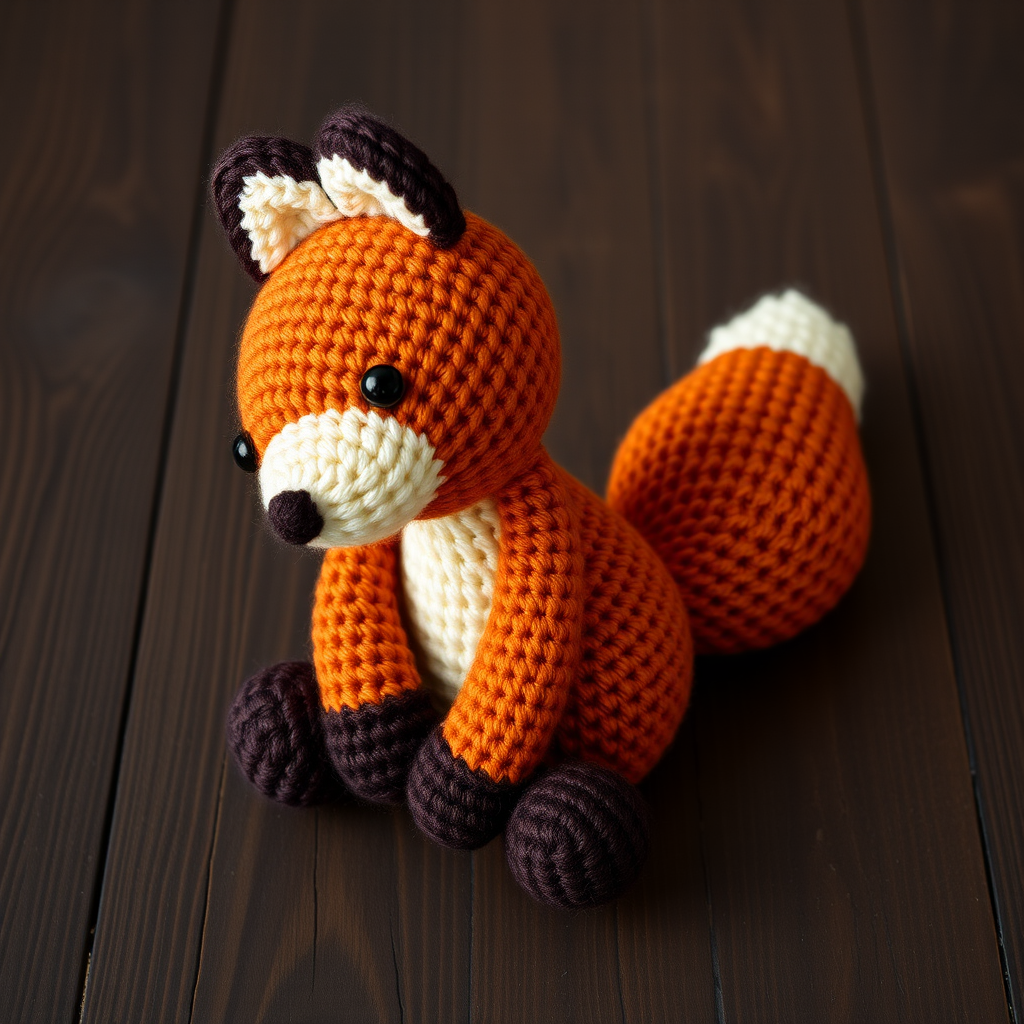
Free Crochet Pattern: Copper Canyon Fox Amigurumi
Bring a touch of woodland charm into your home with this adorable Copper Canyon Fox amigurumi! With its rich copper-and-cream palette, textured tail, and plump, huggable body, this modern fox is the perfect handmade companion for cozy nights in or a thoughtful gift for a nature lover. This intermediate-level pattern uses simple shaping and continuous spirals to create a polished, professional-looking finished piece. Whether you're a seasoned crocheter or a confident beginner looking for a fun challenge, this pattern will guide you through every step to craft your very own cuddly fox.
Materials Needed
Before you begin, gather the following supplies to ensure a smooth and enjoyable crocheting experience:
- Yarn: Worsted weight (#4) cotton or acrylic yarn in the following colors:
- Copper (main body color)
- Cream (muzzle, chest patch, and tail tip)
- Dark brown (ear tips and paws)
- Small amount of black (for embroidering the nose)
- Crochet Hook: 3.5 mm (E) crochet hook
- Stitch Marker: To track your rounds (essential for spiral crochet)
- Yarn Needle: For sewing pieces together and weaving in ends
- Stuffing: Polyester fiberfill or your preferred stuffing material
- Safety Eyes (optional): 6mm dark eyes, or dark brown yarn for embroidered eyes
- Soft Brush (optional): For brushing the tail to create a fluffy texture
Gauge: Not critical for amigurumi, but aim for a tight fabric with no stuffing showing. Approximately 5 sc and 6 rows = 1 inch. If your stitches are too loose, try a smaller hook.
Step-by-Step Instructions
Important Notes: Work in continuous spirals unless stated otherwise. Do not join rounds with a slip stitch. Use a stitch marker to track the beginning of each round. "Inc" means to work 2 single crochet stitches into the same stitch. "Dec" means to work a single crochet decrease (invisible decrease recommended).
Head
Start with your copper yarn.
- R1: Magic ring, 6 sc in ring. (6)
- R2: Inc in each st around. (12)
- R3: (Sc in next st, inc) around. (18)
- R4: (Sc in next 2 sts, inc) around. (24)
- R5: (Sc in next 3 sts, inc) around. (30)
- R6-10: Sc in each st around. (30) — This creates the height of the head.
- R11: (Sc in next 3 sts, dec) around. (24)
- R12: (Sc in next 2 sts, dec) around. (18)
- R13: (Sc in next st, dec) around. (12)
Stuff the head firmly with fiberfill, shaping it as you go to ensure it's rounded and smooth. Fasten off, leaving a long tail (at least 12 inches) for sewing to the body.
Ears (Make 2)
Using copper yarn for the base, then switching to dark brown for the tips.
- R1: Magic ring, 4 sc in ring. (4)
- R2: (Sc in next st, inc) around. (6)
- R3: (Sc in next 2 sts, inc) around. (8)
- R4-5: Sc in each st around. (8) — Switch to dark brown yarn at the beginning of R5 to create the ear tip.
Fasten off, leaving a long tail for sewing. Do not stuff the ears. Flatten each ear and sew them to the top of the head at R4-5, positioning them symmetrically on either side of the head's center.
Body
Using copper yarn.
- R1: Magic ring, 6 sc in ring. (6)
- R2: Inc in each st around. (12)
- R3: (Sc in next st, inc) around. (18)
- R4: (Sc in next 2 sts, inc) around. (24)
- R5-8: Sc in each st around. (24) — This creates the main body height.
- R9: (Sc in next 2 sts, dec) around. (18)
- R10: Sc in each st around. (18)
Stuff the body firmly, ensuring it's plump and rounded. Fasten off, leaving a long tail for sewing to the head.
Legs (Make 4)
Using copper yarn for the top portion and dark brown for the paws.
- R1: Magic ring, 6 sc in ring. (6)
- R2: (Sc in next st, inc) around. (9) — Switch to dark brown yarn for the last stitch of this round to create the paw color.
- R3-5: Sc in each st around. (9) — Continue with dark brown for R3, then switch back to copper for R4-5.
Stuff each leg lightly. Fasten off, leaving a long tail for sewing. Sew the legs to the bottom of the body, positioning the front legs slightly forward so the fox can sit upright.
Tail
Using copper yarn, then switching to cream for the tip.
- R1: Magic ring, 6 sc in ring. (6)
- R2: Inc in each st around. (12)
- R3: (Sc in next st, inc) around. (18)
- R4-6: Sc in each st around. (18)
- R7: (Sc in next st, dec) around. (12)
- R8-10: Sc in each st around. (12)
- R11: (Sc in next 2 sts, dec) around. (9) — Switch to cream yarn at the beginning of this round.
- R12-14: Sc in each st around. (9)
Stuff the tail lightly, leaving the last 2 rounds (the cream tip) unstuffed for a flatter, more natural look. Fasten off, leaving a long tail. Sew the tail securely to the back of the body, positioning it so it curves naturally upward.
Muzzle (In Cream)
- R1: Magic ring, 6 sc in ring. (6)
- R2: Inc in each st around. (12)
- R3: (Sc in next st, inc) around. (18)
Fasten off, leaving a long tail. Sew the muzzle to the front of the head, centered between the ears and positioned slightly lower on the face.
Assembly
- Sew the head to the body: Using the long tail from the head, sew it securely to the top of the body, making sure it's centered and straight.
- Attach the eyes: If using safety eyes, position them on the head above the muzzle, about 4-5 stitches apart. Insert them before sewing the head to the body for easier access. If embroidering, use dark brown yarn to create small, tight French knots or satin stitches for the eyes.
- Embroider the nose: Using the black yarn, embroider a small triangle or oval shape on the tip of the cream muzzle. Make it neat and compact.
- Add the chest patch (optional): To create the chest patch, crochet a small oval in cream: Magic ring, 6 sc, then inc in each st (12), then (sc, inc) around (18). Fasten off and sew it to the front of the body, just below the head.
- Weave in all ends: Use your yarn needle to carefully weave in any remaining loose ends inside the fox.
Finishing Touches
For a truly professional finish, use a soft brush (like a clean pet brush or a felting brush) to gently brush the cream tip of the tail. This will fluff up the yarn and create a beautiful, textured effect that mimics a real fox's bushy tail. Be gentle to avoid damaging the stitches. Your Copper Canyon Fox is now complete and ready to be loved!
Enjoy your new handmade woodland friend! This pattern is perfect for using up scrap yarn and makes a wonderful gift. Happy crocheting!


