Ember & Ash Waffle Knit Slippers Free Pattern – Cozy Textured House Shoes
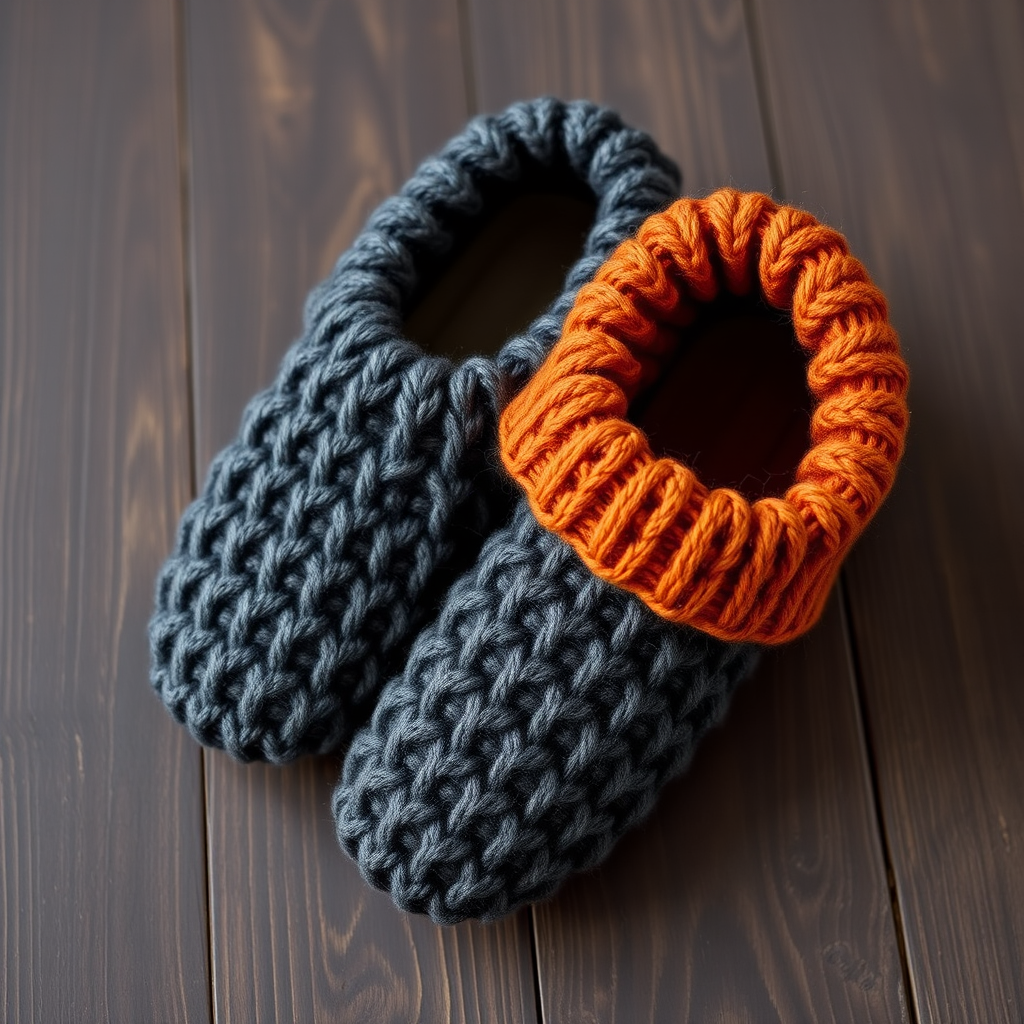
Wrap Your Feet in Warmth: Introducing the Ember & Ash Waffle Knit Slippers
There's something deeply satisfying about slipping your feet into a pair of hand-knitted slippers, especially when they feature a rich, textured pattern that feels as good as it looks. Today, I'm thrilled to share the Ember & Ash Waffle Knit Slippers—a free pattern that combines the plush, grid-like warmth of the waffle stitch with a stunning color gradient from deep charcoal to burnt ember. These aren't just house shoes; they're a cozy statement piece for your at-home relaxation.
This pattern is designed to create a sturdy, cushioned sole that feels supportive underfoot, paired with a snug, foldable cuff that adds a touch of rustic charm. Whether you're knitting a gift for a loved one or treating yourself to a new pair of DIY slippers, this project is both rewarding and practical. The textured waffle pattern is surprisingly simple to master, making it an excellent choice for knitters ready to move beyond basic scarves and into shaped garments.
Let's dive into the details and get those needles clicking. By the end of this guide, you'll have all the knowledge you need to craft a beautiful pair of textured house shoes that are as unique as they are comfortable.
Materials Needed for Your Waffle Stitch Slippers
Before we begin, let's gather our supplies. This project uses simple, readily available materials, making it a great weekend project. Here’s what you'll need:
- Yarn: Worsted weight yarn in two colors. You'll need approximately 200g total. For the authentic look, use:
- Color A (Charcoal): For the toe, foot, and heel.
- Color B (Burnt Orange/Ember): For the cuff.
- Knitting Needles: US 7 (4.5mm) knitting needles. You may need to adjust this size to achieve the correct gauge.
- Tapestry Needle: For seaming the slippers together and weaving in loose ends.
- Stitch Markers (optional): Helpful for keeping track of your rows, especially in the waffle pattern.
Understanding Your Gauge
To ensure your slippers fit perfectly, it's crucial to check your gauge. The pattern calls for 20 stitches x 28 rows = 4 inches in waffle stitch pattern. Knit a small swatch first to see if you're on track. If you have too many stitches per inch, try a larger needle. If you have too few, switch to a smaller needle. This simple step will save you from ending up with slippers that are too big or too small.
Step-by-Step Instructions for Knitting Your Slippers
This pattern is worked flat from the toe to the heel, then seamed up the back. It's a clever construction that creates a comfortable, foot-hugging shape. We'll go through each section in detail. The pattern includes three sizes, so be sure to follow the numbers for your desired size.
Sizes: Small (Women's 5-7), Medium (Women's 8-10 / Men's 7-9), Large (Men's 10-12).
Abbreviations You'll Need to Know
- CO: Cast on
- K: Knit
- P: Purl
- K2tog: Knit two stitches together (a right-leaning decrease)
- SSK: Slip, slip, knit (a left-leaning decrease)
- St(s): Stitch(es)
- Rep: Repeat
- M1: Make one (increase). To do this, pick up the bar between the stitch you just knit and the next stitch, and knit into the back of it.
Pattern Notes & The Waffle Stitch
The magic of these slippers comes from the waffle stitch. It's a simple 4-row repeat that creates that beautiful, squishy grid texture. Here's the breakdown:
- Row 1 (RS): K1, *P1, K1; rep from * to end.
- Row 2 (WS): Purl all sts.
- Row 3 (RS): K1, *K1, P1; rep from * to end.
- Row 4 (WS): Purl all sts.
Repeat these 4 rows for the entire foot section. The pattern is a multiple of 2 + 1 stitches.
Part 1: Knitting the Toe (Color A)
We'll start by shaping the toe with a few simple increases.
- Using Color A (Charcoal), CO 10 (12, 14) sts.
- Row 1 (RS): K1, M1, knit to the last st, M1, K1. You will now have 12 (14, 16) sts.
- Row 2 (WS): Purl all sts.
- Repeat Rows 1 and 2 until you have 20 (24, 28) sts on your needle. Be sure to end with a WS row (a purl row) after your final increase row.
Part 2: Creating the Foot (Color A)
Now that the toe is shaped, we'll work the main body of the slipper in the waffle stitch.
- Begin the waffle stitch pattern (Rows 1-4 as described above).
- Work even in the pattern until the piece measures 6 (7, 8) inches from the cast-on edge (the very tip of the toe).
- Make sure you end on a WS row (Row 2 or 4 of the pattern) to be ready to start the heel shaping on a RS row.
Part 3: Shaping the Heel (Color A)
Time to shape the back of the slipper with decreases. This creates a snug fit around your heel.
- Row 1 (RS): K1, SSK, knit to the last 3 sts, K2tog, K1. You will now have 18 (22, 26) sts.
- Row 2 (WS): Purl all sts.
- Repeat Rows 1 and 2 until you have 10 (12, 14) sts remaining on your needle.
- End with a WS row (a purl row).
Part 4: Adding the Foldable Cuff (Color B)
Now for the cozy, contrasting cuff. This is where we switch to our ember color.
- Cut Color A, leaving a tail for weaving in later. Switch to Color B (Burnt Orange/Ember).
- Work in K1, P1 ribbing for 2 (2.5, 3) inches. This ribbing will be stretchy and form the cuff of the slipper.
- Bind off loosely in pattern (knit the knits and purl the purls as you bind off). A loose bind-off is essential so you can easily slip your foot in and out.
Part 5: Finishing Touches & Seaming
You're almost there! The final steps are all about assembly and making your slipper look polished.
- Fold the cuff down (optional, but recommended for the classic look).
- Seam the back of the heel: Using your tapestry needle and the tail from Color A, use the mattress stitch or whip stitch to sew the heel seam together. Match up the decreases for a neat finish.
- Seam the top of the toe: Using the tail from the cast-on edge, sew the toe seam closed.
- Weave in all ends securely with your tapestry needle to ensure your slippers are durable.
- Repeat the entire process for the second slipper. Important: When you knit the second slipper, make sure to mirror the shaping. This means the toe increases and heel decreases should be symmetrical so you have a left and a right slipper.
And there you have it—a beautiful, handcrafted pair of Ember & Ash Waffle Knit Slippers! The combination of the textured waffle stitch and the warm, autumnal color palette makes these a joy to wear and a pleasure to gift. They're sturdy, cushioned, and undeniably cozy. Happy knitting!


