Desert Bloom Mosaic Throw Free Pattern
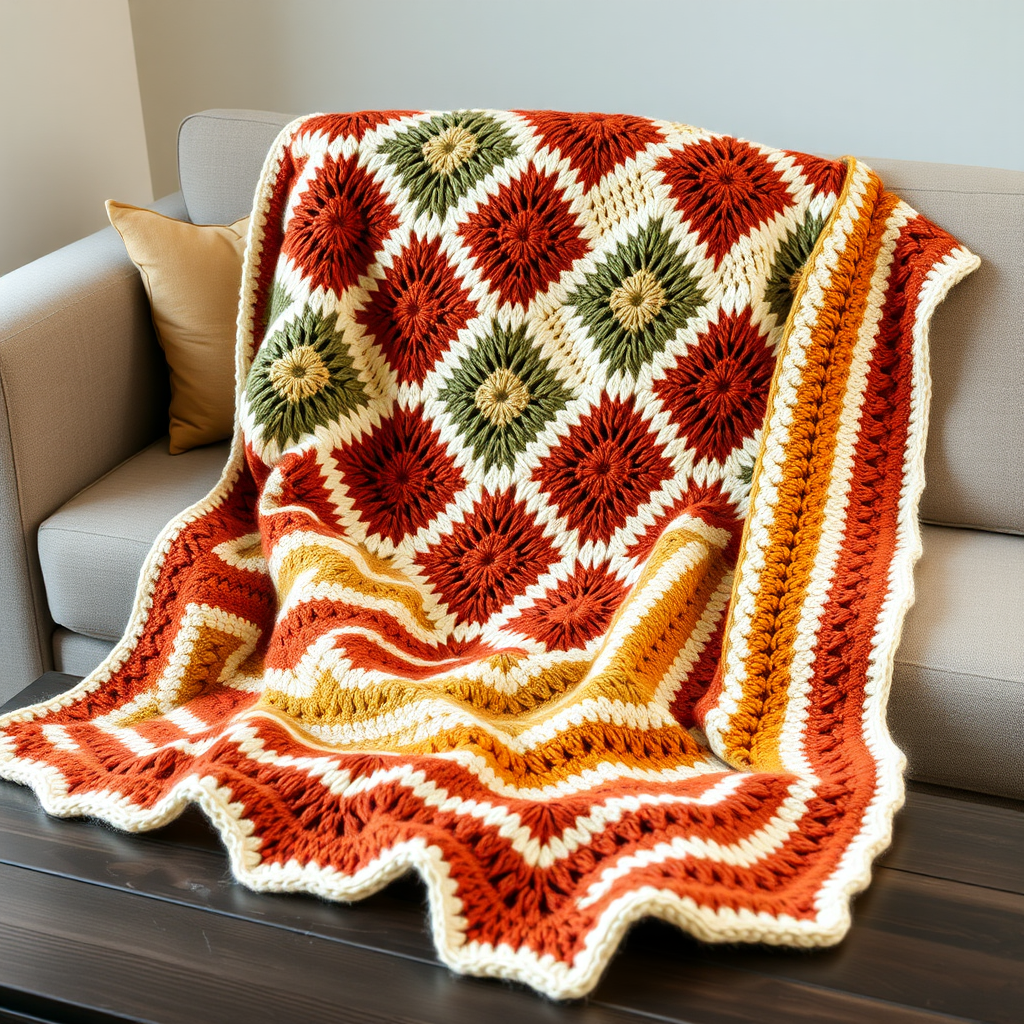
Desert Bloom Mosaic Throw: A Free Crochet Pattern for a Boho Masterpiece
Wrap yourself in the warm, earthy tones of the Desert Bloom Mosaic Throw, a stunning crochet blanket that blends geometric precision with soft, bohemian charm. This intermediate-level pattern uses mosaic crochet techniques to create a mesmerizing diamond and zigzag motif that feels both modern and timeless. Whether you're an experienced crocheter looking for a new challenge or a confident beginner ready to level up, this throw will become a cherished heirloom piece in your home.
Inspired by Southwestern textiles and desert landscapes, this blanket features a rich palette of cream, terracotta, sage green, and mustard yellow. The dense, woven-like texture created by front and back loop stitches gives the finished piece a luxurious, handcrafted feel. Drape it over a sofa, fold it at the foot of your bed, or gift it to someone special—this throw is as versatile as it is beautiful.
Materials Needed
Before you begin, gather the following supplies. Having everything ready will make your crochet session smooth and enjoyable.
Yarn
- Worsted weight yarn in 4 colors (approx. 1800 yds total):
- Color A (Cream): 700 yds
- Color B (Terracotta): 400 yds
- Color C (Sage): 400 yds
- Color D (Mustard): 300 yds
Tip: Choose a soft, durable yarn like a cotton-acrylic blend for the perfect balance of drape and stitch definition.
Hook and Notions
- US Size G/6 (4.0 mm) crochet hook
- Yarn needle for weaving in ends
- Scissors
- Stitch markers (optional, but helpful for keeping track of pattern repeats)
- Blocking mats and pins (for finishing)
Gauge
16 dc x 8 rows = 4 inches in mosaic pattern (after blocking). Be sure to check your gauge before starting to ensure your finished blanket matches the intended dimensions.
Step-by-Step Instructions
This pattern is worked flat in rows. Mosaic crochet is worked with two colors per row: a background color (Color A) and a pattern color (B, C, or D). You will carry the unused color along the side, cutting and rejoining as needed. Always work into the back loop only (BLO) for the background stitches and the front loop only (FLO) for the pattern stitches, unless otherwise noted. This technique creates the signature raised, woven effect of mosaic crochet.
Foundation and Setup
- Foundation Chain: With Color A, chain 121 loosely. This loose foundation is crucial for maintaining the width of your blanket.
- Row 1 (Right Side): Work 1 dc in the 4th ch from hook (the skipped chains count as your first dc) and in each ch across. Turn. You should have 118 dc total.
- Row 2 (Wrong Side): Ch 2 (counts as hdc), hdc in each dc across. Turn. You should have 118 hdc.
The Mosaic Pattern
Now you'll begin the mosaic pattern. Repeat the 12-row pattern below until the piece measures 60 inches from the foundation, always ending with Row 12. Each row uses Color A plus one pattern color. When switching colors, simply drop the unused color and pick up the new one, carrying the yarn along the side edge.
Row 3 (RS, Colors A & B)
- Ch 2 (counts as hdc), hdc in next st.
- *With B, dc in next st (working in FLO), with A, dc in next 3 sts (working in BLO). Repeat from * across to the last 2 sts.
- With B, dc in next st (FLO), with A, hdc in last st. Turn.
Row 4 (WS, Colors A & B)
- Ch 2, hdc in next st.
- *With B, dc in next st (FLO), with A, dc in next 3 sts (BLO). Repeat from * across to the last 2 sts.
- With B, dc in next st (FLO), with A, hdc in last st. Turn.
Note: Rows 3 and 4 create the first terracotta stripe. The wrong side rows mirror the right side rows exactly in mosaic crochet.
Row 5 (RS, Colors A & C)
- Ch 2, hdc in next st.
- *With C, dc in next st (FLO), with A, dc in next st (BLO), with C, dc in next st (FLO), with A, dc in next st (BLO). Repeat from * across to the last 2 sts.
- With C, dc in next st (FLO), with A, hdc in last st. Turn.
Row 6 (WS, Colors A & C)
- Ch 2, hdc in next st.
- *With C, dc in next st (FLO), with A, dc in next st (BLO), with C, dc in next st (FLO), with A, dc in next st (BLO). Repeat from * across to the last 2 sts.
- With C, dc in next st (FLO), with A, hdc in last st. Turn.
Note: Rows 5 and 6 introduce the sage green, creating a more intricate zigzag pattern.
Row 7 (RS, Colors A & D)
- Ch 2, hdc in next st.
- *With D, dc in next st (FLO), with A, dc in next 3 sts (BLO). Repeat from * across to the last 2 sts.
- With D, dc in next st (FLO), with A, hdc in last st. Turn.
Row 8 (WS, Colors A & D)
- Ch 2, hdc in next st.
- *With D, dc in next st (FLO), with A, dc in next 3 sts (BLO). Repeat from * across to the last 2 sts.
- With D, dc in next st (FLO), with A, hdc in last st. Turn.
Note: The mustard yellow stripe (Rows 7-8) mirrors the terracotta stripe, creating symmetry in the design.
Row 9 (RS, Colors A & B)
- Ch 2, hdc in next st.
- *With B, dc in next st (FLO), with A, dc in next st (BLO), with B, dc in next st (FLO), with A, dc in next st (BLO). Repeat from * across to the last 2 sts.
- With B, dc in next st (FLO), with A, hdc in last st. Turn.
Row 10 (WS, Colors A & B)
- Ch 2, hdc in next st.
- *With B, dc in next st (FLO), with A, dc in next st (BLO), with B, dc in next st (FLO), with A, dc in next st (BLO). Repeat from * across to the last 2 sts.
- With B, dc in next st (FLO), with A, hdc in last st. Turn.
Row 11 (RS, Colors A & C)
- Ch 2, hdc in next st.
- *With C, dc in next st (FLO), with A, dc in next 3 sts (BLO). Repeat from * across to the last 2 sts.
- With C, dc in next st (FLO), with A, hdc in last st. Turn.
Row 12 (WS, Colors A & C)
- Ch 2, hdc in next st.
- *With C, dc in next st (FLO), with A, dc in next 3 sts (BLO). Repeat from * across to the last 2 sts.
- With C, dc in next st (FLO), with A, hdc in last st. Turn.
Note: This completes one full 12-row pattern repeat. Continue repeating Rows 3-12 until your blanket measures 60 inches from the foundation chain.
Finishing and Border
After completing the final pattern row, do not fasten off. You'll work the border directly onto the blanket.
- Round 1: Ch 1, sc evenly around all edges of the blanket, working 3 sc in each corner. Join with a sl st to the first sc.
- Round 2: Ch 1, sc in each sc around, working 3 sc in each corner sc. Join with a sl st to the first sc.
- Round 3: Ch 1, work reverse sc (crab stitch) in each sc around. Join, fasten off.
The crab stitch border gives a beautiful, finished edge that complements the geometric pattern perfectly.
Weaving and Blocking
- Weave in all ends using your yarn needle. Take your time here—secure ends will ensure your blanket lasts for years.
- Block your blanket to the finished dimensions of 48" x 60". Use blocking mats and pins to gently stretch the blanket into shape, paying special attention to the edges. Allow it to dry completely before removing the pins.
Blocking is essential for mosaic crochet—it opens up the stitches, evens out tension, and makes the geometric pattern truly shine.
Tips for Success
- Keep your tension consistent. Mosaic crochet relies on even tension to create crisp, clean lines.
- Use stitch markers at the beginning of each pattern repeat to help you keep your place.
- Don't pull the carried yarn too tightly along the edges, or your blanket will pucker.
- Count your stitches at the end of each row to catch mistakes early.
With patience and attention to detail, you'll create a stunning Desert Bloom Mosaic Throw that captures the warmth and beauty of the desert landscape. Happy crocheting!



