Cream Waffle Pocket Front Tote Free Crochet Pattern
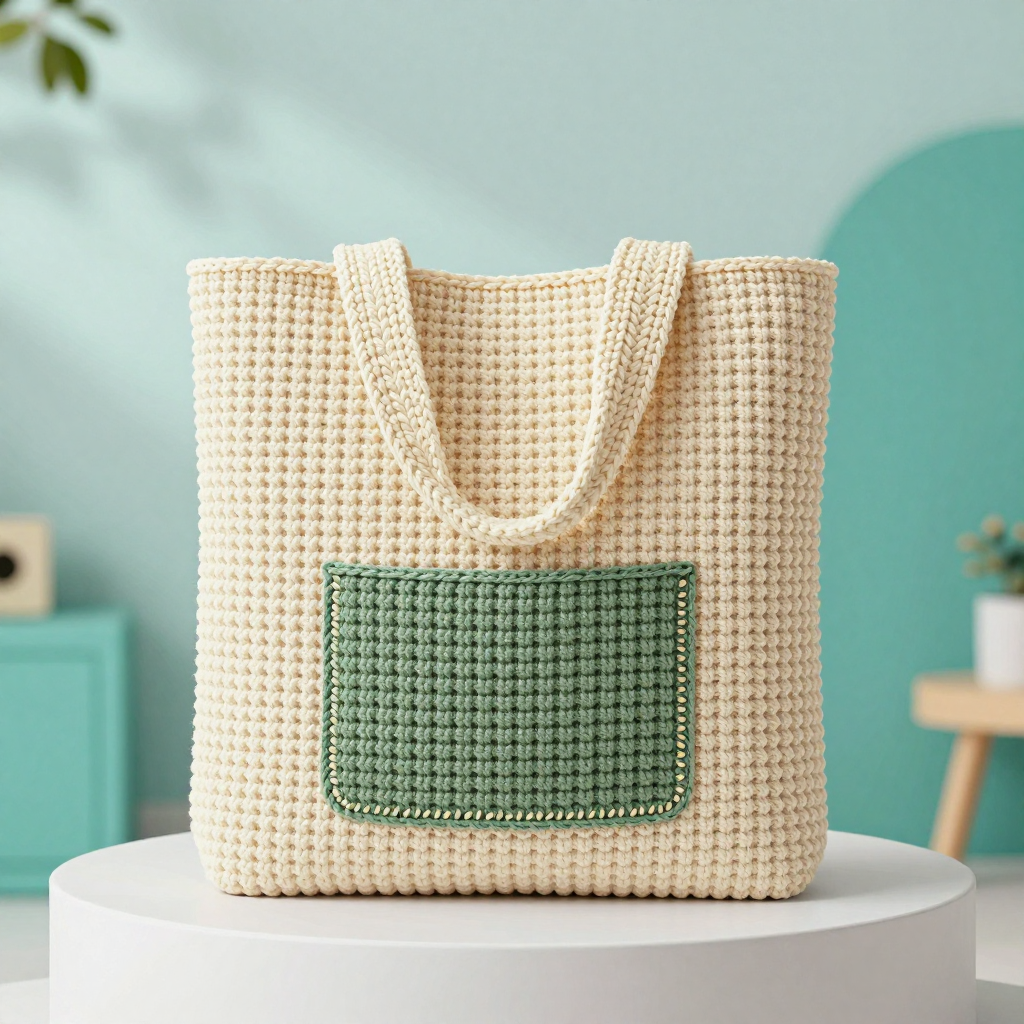
A Cozy, Structured Tote You Can Actually Make
This cream waffle-stitch tote is the perfect first "real" project for a brand-new crocheter who has already learned a chain and a double crochet. It is worked flat as two simple rectangles, seamed together, and finished with a sage green patch pocket and two sturdy strap loops — no shaping, no complicated counting, and no scary techniques. The finished bag is 13 inches wide and 14 inches tall, with a squishy raised waffle grid that looks impressive but is made from just two stitches repeated over and over. It feels matte, structured, and sturdy in worsted cotton, and the little sage pocket adds a calm Scandinavian pop of color. If you can make a rectangle, you can make this bag.
Materials Needed
- Yarn: Worsted weight (Category 4) cotton yarn — approximately 380 yds (350 m) cream and 120 yds (110 m) sage green. Cotton gives the bag its structure; avoid soft acrylic if you want it to hold its shape.
- Hook: 5.0 mm (US H-8) crochet hook.
- Stitch markers (at least 4) — small clips or safety pins work too.
- Tapestry needle (also called a yarn needle) — a large, blunt needle with an eye big enough for yarn, used for seaming and weaving in ends.
- Scissors for cutting yarn.
- Measuring tape and a couple of rust-proof pins for blocking.
Finished size: Width 13 in (33 cm) × Height 14 in (35.5 cm); strap drop 10 in (25 cm); pocket 8 in wide × 6 in tall (20 × 15 cm).
Abbreviations and Beginner Glossary
- ch – chain: yarn over the hook, pull the loop through the loop on your hook. This makes the foundation "rope" you build on.
- sc – single crochet: insert hook into stitch, yarn over, pull up a loop (2 loops on hook), yarn over, pull through both loops. One loop remains.
- dc – double crochet: yarn over, insert hook into stitch, yarn over, pull up a loop (3 loops on hook), yarn over, pull through 2 loops, yarn over, pull through last 2 loops.
- fpdc – front post double crochet: work a double crochet around the vertical post of the stitch below instead of into the top of it. Yarn over, insert hook from front to back around the post of the stitch, yarn over, pull up a loop, then finish like a normal dc. This is what creates the raised waffle line.
- sl st – slip stitch: insert hook into stitch, yarn over, pull the loop straight through both the stitch and the loop on your hook. Used for joining and seaming.
- st(s) – stitch(es).
- sk – skip: move past a stitch without working into it.
- RS – right side: the "public" side of the fabric that faces out.
- Turn – flip your work over so you can crochet back the other way.
- Fasten off – cut the yarn a few inches from the work, pull the tail all the way through the last loop, and tug gently to lock it.
- Whipstitch – a simple seaming stitch: pass the needle through both layers and back around, over and over, like a spiral of small slanted stitches.
Gauge
16 sts × 9 rows = 4 in (10 cm) in the waffle stitch pattern (dc, fpdc, dc groups).
Why gauge matters: Gauge is how many stitches and rows fit into 4 inches. If your stitches are bigger than the pattern's, your bag will come out wider and floppier than planned; if smaller, it will be stiff and too small. How to check: chain 26, work Rows 1–2 of the Waffle Stitch Pattern below, then repeat Row 3 until your swatch is about 5 inches tall. Lay it flat, place a ruler across the middle, and count how many stitches fit in 4 inches. If you have more than 16, try a larger hook; if fewer than 16, try a smaller hook. Wash and dry your swatch the way you plan to wash the bag, because cotton can shrink or relax.
Beginner Tips Before You Start
- Count every row. The waffle pattern is only two rows, but it is easy to lose your place. Write the row numbers on a scrap of paper and tick them off as you go.
- Use stitch markers. Place one in the first stitch of each row and one in the last stitch — those edge stitches are the easiest to accidentally skip, and skipping them makes your rectangle narrow and lopsided.
- Don't pull the yarn tight. Keep your tension relaxed and even. Tight crochet makes a stiff, small bag and makes the fpdc posts hard to get your hook around.
- Watch the fpdc placement. Each fpdc is worked around the post of the dc directly below the fpdc of the previous row. If your raised lines start to wander sideways, you've worked around the wrong post.
- Make both panels the same size. Lay panel one on the table and measure it before starting panel two, so you can match the height exactly.
- Keep your tails long. Leave the 24-inch seaming tail on each panel — you will use it to sew the bag together, and short tails make seaming miserable.
Step-by-Step Instructions
Waffle Stitch Pattern (multiple of 3 sts + 2)
Row 1 (RS): Ch 2 (counts as first dc), dc in each st across. Turn.
Row 2: Ch 2, dc in next st, *fpdc around next st, dc in each of next 2 sts; rep from * to last st, dc in last st. Turn.
Row 3: Ch 2, dc in next st, *dc in next st, fpdc around next st, dc in next st; rep from * to last st, dc in last st. Turn.
Repeat Rows 2–3 for the pattern. Note: every fpdc is worked around the post of the dc directly below the fpdc of the previous row, which creates the raised waffle grid.
Bag Body (make 2 panels)
With cream, ch 56.
Row 1 (RS): Dc in 3rd ch from hook and in each ch across. (54 sts)
Rows 2–32: Work in Waffle Stitch Pattern, beginning with Row 2 of the pattern and maintaining 54 sts. (54 sts; approx. 14 in / 35.5 cm tall)
Fasten off, leaving a 24 in (60 cm) tail for seaming. Make a second panel exactly the same.
Pocket (make 1)
With sage green, ch 32.
Row 1 (RS): Dc in 3rd ch from hook and in each ch across. (30 sts)
Rows 2–14: Work in Waffle Stitch Pattern, beginning with Row 2 of the pattern and maintaining 30 sts. (30 sts; approx. 6 in / 15 cm tall)
Fasten off, leaving a long tail for appliqué.
Strap Loops (make 2)
With cream, ch 20.
Row 1: Sc in 2nd ch from hook and in each ch across. (19 sts)
Rows 2–3: Ch 1, sc in each st across. Turn. (19 sts)
Fasten off, leaving a tail.
Assembly and Finishing
1. Seam the bag. Place the two bag panels right sides together (the waffle texture facing inward, so the smooth backs face you). Thread the 24-inch cream tail onto your tapestry needle. Starting at a bottom corner, whipstitch along the bottom edge and up one side edge, then knot and fasten off. Re-thread and seam the second side edge the same way. Leave the top edge completely open. Keep your stitches small and even so the seam lies flat.
2. Turn and block. Turn the bag right side out through the open top. Gently push out the corners with your finger. Pin the bag to the finished measurements (13 in wide × 14 in tall) on a towel, mist it lightly with water, and let it dry completely. This sets the cotton and evens out your stitches.
3. Attach the pocket. Center the sage pocket on the front panel, about 2 in (5 cm) from the bottom edge. Pin it in place. Using the sage tail and your tapestry needle, whipstitch around the two sides and the bottom edge only. Leave the top edge open so it works as a real pocket. Fasten off inside the bag.
4. Add the strap loops. Fold each strap loop in half so the short ends meet. Position one loop on the front top edge, 3 in (7.5 cm) from each side seam, and the second loop on the back top edge in the same positions. Sew each loop securely through all layers with cream yarn, going over the ends several times so it can hold weight.
5. Weave in all ends. Thread each tail onto the tapestry needle and run it back and forth through the inside of the fabric for about 2 inches, then trim close to the work. Never knot a tail and cut it short — it will work loose.
Optional edging: With cream, join yarn at one top corner and work 1 round of sc evenly around the entire top opening (about 1 sc in each stitch along the edges and 1 sc per row along the sides). Join with a sl st to the first sc and fasten off. This reinforces the top edge and gives it a tidy finish.
Pro Tips and Variations
- Change the colors: Swap the sage pocket for mustard, dusty rose, or navy for a completely different mood, or make the whole bag in one color and use a contrasting yarn just for the pocket.
- Adjust the size: The waffle pattern needs a multiple of 3 sts + 2. For a wider bag, add 3 chains at a time to the starting chain (for example, ch 62 for a slightly roomier tote) and add rows to keep the height in proportion.
- Substitute the yarn: Cotton or a cotton-blend worsted works best because it holds structure. If you use acrylic, make a gauge swatch first and expect a softer, slouchier bag.
- Make real straps: For a shoulder bag, replace the short loops with two long sc strips (about 40 in / 100 cm each) and sew the ends inside the top edge, 3 in from each side seam, for a comfortable over-the-shoulder carry.


