Coastal Weave Stitch Crochet Mug Cozy Free Pattern
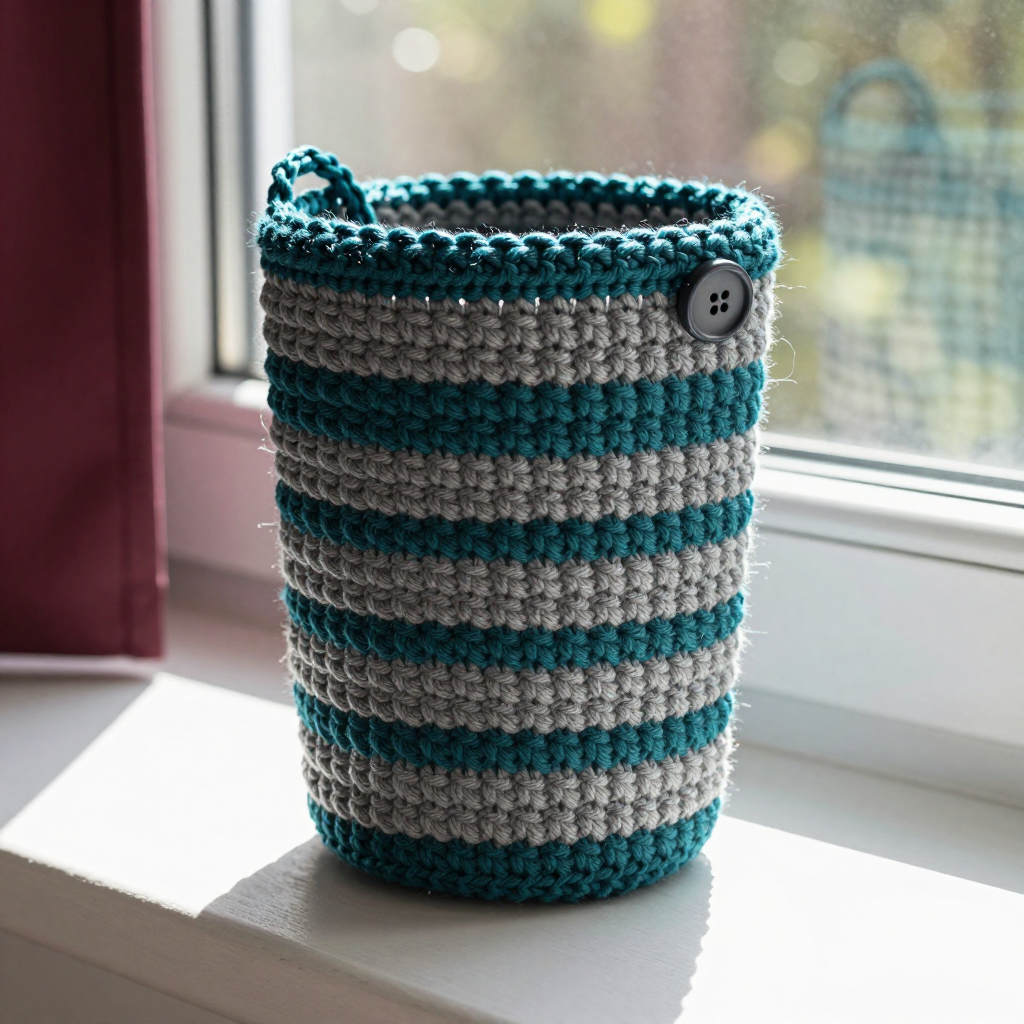
Coastal Weave Stitch Crochet Mug Cozy: A Beginner's First Project
If you have never held a crochet hook before, this is the perfect place to start. The Coastal Weave Stitch Mug Cozy is a small, flat rectangle that you simply stitch into a tube, so you never have to worry about shaping, counting in circles, or working in the round. It is worked in two calm ocean colors, deep teal and muted slate gray, in four-row stripes that keep the project interesting without ever getting complicated. The finished cozy looks like a little basket-weave cuff hugging your mug, with a dense, nubby texture that feels soft and matte in your hand and keeps your coffee warm a few minutes longer. Best of all, it takes only an evening or two, uses about 65 yards of yarn, and makes a gift that people actually use.
Materials Needed
- Yarn: Worsted weight (category 4) acrylic or cotton yarn, approximately 60–70 yards total: about 35 yards teal and 30 yards slate gray. One standard skein of each color is far more than you need.
- Crochet hook: Size H/8 (5.0 mm).
- Stitch markers: 2 or 3 (helpful for marking your first stitch and your color changes).
- Tapestry needle: A blunt-tipped yarn needle for seaming and weaving in ends.
- Scissors: Any small sharp pair.
- One button: About 0.75 inch (2 cm) across, any style you like.
- Measuring tape (for checking your gauge and finished size).
- Finished size: Approximately 3.5 inches tall x 10.5 inches long when flat, seaming into a tube about 3.25 inches in diameter to fit a standard 3 to 3.5 inch diameter mug.
Abbreviations and Beginner Glossary
Every term below is used in this pattern. Read through once before you begin — nothing here requires prior knowledge.
- ch – chain. Make a loop with the yarn, then pull a new loop through it with your hook. Each loop you pull through counts as one chain. Chains form your foundation.
- sc – single crochet. Insert your hook into the stitch, wrap the yarn over the hook, pull up a loop (2 loops on hook), yarn over again, and pull through both loops. One loop remains. This is the shortest, tightest basic stitch.
- dc – double crochet. Yarn over the hook first, insert hook into the stitch, yarn over and pull up a loop (3 loops on hook), yarn over and pull through 2 loops (2 loops remain), yarn over and pull through the last 2 loops. This stitch is taller than sc, which is what creates the woven texture.
- st / sts – stitch / stitches. One completed stitch, or several.
- sk – skip. Miss the next stitch entirely and work into the one after it. (Not used in this pattern, but listed so you recognize it in future patterns.)
- sp – space. The gap between stitches. (Also not used here, but common in crochet.)
- RS – right side. The "public" side of your work that will face outward on the finished cozy.
- turn – flip your work over so you can crochet back across the row you just finished.
- fasten off – cut the yarn a few inches from your work, then pull the tail all the way through the last loop to lock it.
- slip stitch – insert hook into the stitch, yarn over, and pull the loop straight through both the stitch and the loop on your hook in one motion. Used here only to close the button loop.
- whipstitch – a simple seaming stitch: pass the needle over both edges and back through, over and over, like lacing.
Gauge
14 stitches x 14 rows = 4 inches in woven crochet stitch.
Gauge means how many stitches and rows fit into a 4-inch square. It matters because it controls the finished size: if your stitches are much bigger than this, your cozy will be baggy on the mug; if much smaller, it will be too tight to slip on. To check, chain 21 and work 14 rows in the woven stitch (Row 1: sc across; then alternate Rows 2 and 3). Lay the swatch flat and measure a 4-inch section in the middle. If you have more than 14 stitches in 4 inches, go up one hook size; if fewer, go down one. Good news: this pattern is forgiving — gauge is not crucial. The real test is wrapping the flat piece around your own mug before you seam it.
Beginner Tips Before You Start
- Count every row. The woven stitch looks similar row to row, so place a stitch marker in the first stitch of each row to keep your place.
- Do not pull the yarn too tight. Tension is the number one beginner struggle. Keep your loops relaxed so the hook slides easily; tight stitches make a stiff, small cozy.
- Carry the unused color loosely up the side edge. When you change colors, do not cut the yarn. Leave the waiting color hanging along the edge, loose enough to lie flat. You will hide these strands inside the seam later.
- Always chain 1 at the start of a row. This little chain gives your row height. It does not count as a stitch.
- Check the fit before seaming. Wrap the flat rectangle around your mug and overlap the ends. If it overlaps by about an inch, it is perfect.
- Work your first row into the back bump of the chain if you can — it makes a neater bottom edge. If that feels confusing, just work into the top loop; it will still look lovely.
Step-by-Step Instructions
The Woven Stitch (read this first)
The woven stitch is worked flat over a multiple of 2 + 1 stitches. It alternates single crochet and double crochet, and each row shifts the pattern by one stitch, which creates the raised basket-weave look.
- Row 1 (RS): Sc in 2nd ch from hook, sc in each ch across.
- Row 2: Ch 1, turn. Sc in first sc. *Dc in next sc, sc in next sc; repeat from * across.
- Row 3: Ch 1, turn. Sc in first sc. *Sc in next dc, dc in next sc; repeat from * across, ending with sc in last sc.
Repeat Rows 2–3 for the woven texture. Note: carry the unused color loosely up the side edge; do not cut after each stripe.
Body
Striping sequence: 4 rows teal, 4 rows slate, 4 rows teal, 4 rows slate, 4 rows teal, 4 rows slate, 4 rows teal (28 rows total).
With teal, ch 37.
- Row 1 (teal): Sc in 2nd ch from hook and in each ch across. (36 sc)
- Row 2 (teal): Ch 1, turn. Sc in first sc. *Dc in next sc, sc in next sc; repeat from * across. (36 sts)
- Row 3 (teal): Ch 1, turn. Sc in first sc. *Sc in next dc, dc in next sc; repeat from * across, ending with sc in last sc. (36 sts)
- Row 4 (teal): Repeat Row 2. (36 sts)
Change to slate.
- Rows 5–8 (slate): Repeat Rows 2–3 twice more. (36 sts)
Change to teal.
- Rows 9–12 (teal): Repeat Rows 2–3 twice more. (36 sts)
Change to slate.
- Rows 13–16 (slate): Repeat Rows 2–3 twice more. (36 sts)
Change to teal.
- Rows 17–20 (teal): Repeat Rows 2–3 twice more. (36 sts)
Change to slate.
- Rows 21–24 (slate): Repeat Rows 2–3 twice more. (36 sts)
Change to teal.
- Rows 25–28 (teal): Repeat Rows 2–3 twice more. (36 sts)
Do not fasten off. Your piece should now measure about 3.5 inches tall and 10.5 inches long. Work the buttonhole loop along the right side edge.
Buttonhole Loop
- Loop: With teal, ch 8, then slip stitch back into the same edge stitch to form a loop. Fasten off and weave in ends.
Assembly and Finishing
- Block lightly. Spritz the flat piece with water and pat it to 3.5 inches tall x 10.5 inches long. Let it dry completely. This relaxes the stitches and evens out the stripes.
- Seam the short ends. Fold the piece so the right sides face each other and the two short ends meet, forming a tube. Thread your tapestry needle and whipstitch the short ends together: bring the needle through both edges from front to back, then over and through again, working all the way up the seam. Keep the stitches small and even. Leave the buttonhole loop free at the top edge. If you prefer, you can single crochet the seam instead: work sc through both edges at once from bottom to top.
- Attach the button. Turn the tube right side out. Wrap the cozy around your mug and bring the loop across to the opposite short end. Mark that spot with a pin, then sew the 0.75 inch button there with a few passes of yarn through the buttonholes.
- Weave in all remaining ends. Thread each tail onto the tapestry needle and run it back and forth through the inside of the fabric for about an inch, then trim close. Never knot your ends — weaving hides them securely and keeps the surface smooth.
- Final check. Slip the loop over the button, adjust for a snug fit, and enjoy your cozy.
Pro Tips and Variations
- Change the colors. Swap teal and slate for any two shades you love — mustard and cream, blush and charcoal, or a single solid color for a minimalist look. Keep the 4-row stripe rhythm or try 2-row stripes for a finer band.
- Adjust the size. For a wider mug, add 2 chains to your starting chain (each 2 chains adds roughly a quarter inch of width) and add 2 rows to keep the proportions balanced. For a taller cozy, add one more 4-row stripe.
- Substitute yarn. Cotton gives a crisp, washable finish; acrylic is softer and slightly stretchier. Any worsted weight (category 4) works — just check your fit around the mug before seaming.
- Make it a set. This cozy uses so little yarn that you can work three or four in an evening. Try reversing the stripe order (slate first, teal last) so each mug in the set is a little different.


