Coastal Drift Crochet Summer Top Free Pattern
Coastal Drift Crochet Summer Top – Free Beginner Pattern
Introduction
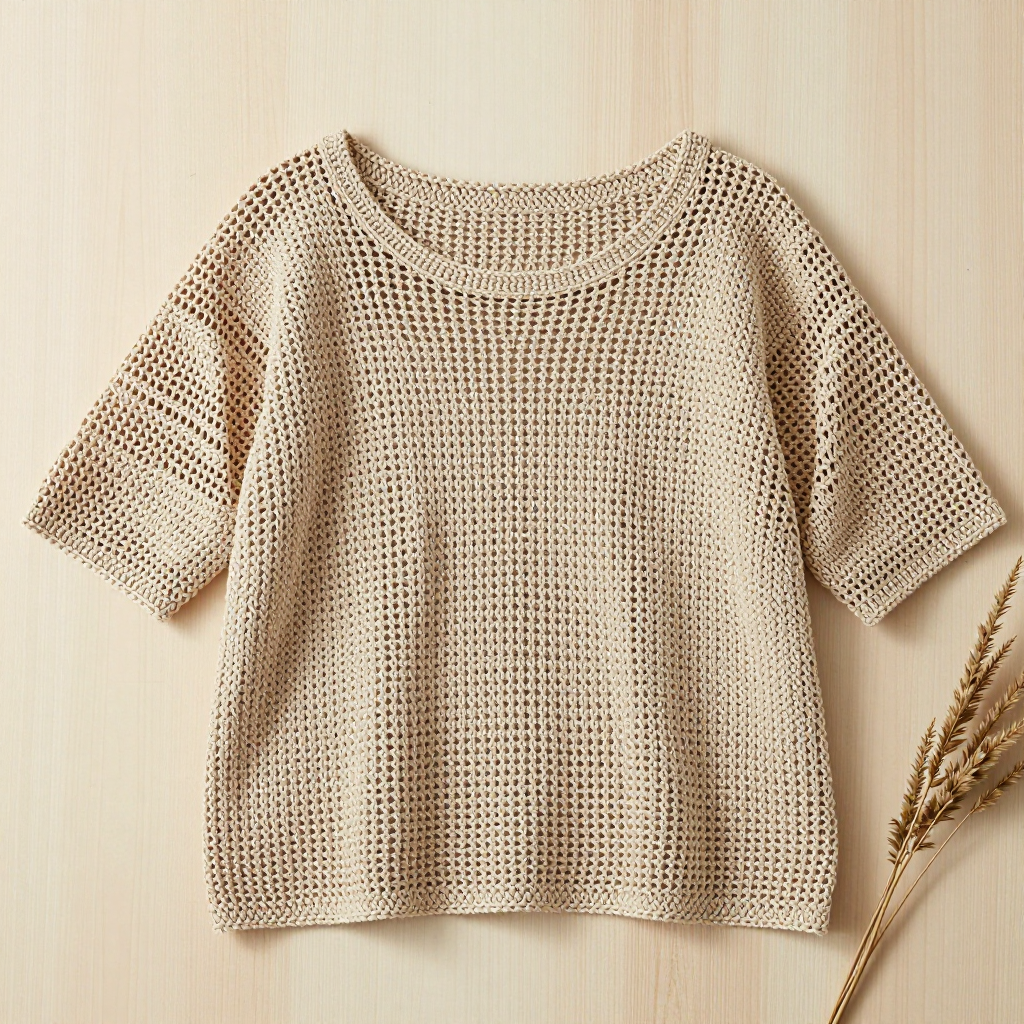
Welcome to the Coastal Drift Crochet Summer Top — a breezy, lightweight garment that is genuinely perfect for anyone who has just learned the basic crochet stitches and wants to make their very first wearable. This top is special because it uses only the simplest stitches (chain, double crochet, and single crochet) worked in a repeating mesh pattern, so you never have to memorize anything complicated. The finished piece has a relaxed, boxy silhouette with a wide neckline, short straight sleeves formed by open armholes, and a delicate openwork texture that lets the summer air right through. It looks like something you would buy at a boutique, feels soft and airy against the skin, and drapes beautifully in a fine cotton yarn. If you can make a double crochet, you can absolutely make this top — and you will be so proud to wear it.
Materials Needed
- Yarn: Fine (weight category 1, super fine) yarn — approximately 400–500 yards for sizes S–M. Cotton or a cotton-blend is strongly recommended for breathability and a natural matte look. The sample uses a soft sand-beige fine cotton.
- Crochet hook: Size G/6 (4.0 mm). (Always check your gauge — you may need to go up or down a hook size.)
- Stitch markers: At least 4 (to mark the neckline edges, underarms, and shoulder points).
- Tapestry needle: A blunt-tipped yarn needle for seaming and weaving in ends.
- Scissors: Sharp craft scissors for cutting yarn.
- Measuring tape: For checking gauge and measuring the armhole opening.
- Finished size / dimensions: Sizes S (M, L). The back panel is approximately 13.5 (14.5, 16) inches wide and 17 inches long before seaming, giving a relaxed, boxy fit. Armhole openings are approximately 7 inches deep.
Abbreviations and Beginner Glossary
Every abbreviation used in this pattern is listed below with a plain-English explanation. If you have never crocheted before, read this section twice before you begin.
- ch – chain. Make a loop with the yarn on your hook, then wrap the yarn over the hook and pull it through the loop. That is one chain. Chains form the foundation of your work.
- dc – double crochet. Yarn over (wrap yarn around hook), insert hook into the stitch, yarn over, pull up a loop (3 loops on hook), yarn over, pull through 2 loops (2 loops remain), yarn over, pull through the last 2 loops. One double crochet made.
- sc – single crochet. Insert hook into stitch, yarn over, pull up a loop (2 loops on hook), yarn over, pull through both loops. One single crochet made.
- sl st – slip stitch. Insert hook into stitch, yarn over, pull the yarn through both the stitch and the loop on your hook in one motion. Used to join rounds and to seam.
- dc2tog – double crochet two stitches together (a decrease). Yarn over, insert hook into first stitch, yarn over, pull up a loop, yarn over, pull through 2 loops (2 loops remain). Yarn over, insert hook into next stitch, yarn over, pull up a loop, yarn over, pull through 2 loops, yarn over, pull through all 3 remaining loops. Two stitches become one.
- sp – space. The little gap created by a chain (for example, a "ch-1 sp" is the hole under a single chain).
- sts – stitches.
- tog – together (as in dc2tog).
- turn – flip your work over so you can work back across the row you just made.
- fasten off – cut the yarn leaving a 6-inch tail, then pull the tail through the last loop on your hook and tighten to secure.
- join with sl st – connect the last stitch of a round to the first stitch with a slip stitch so the round closes into a circle.
- right sides together – place the two panels so the "pretty" front faces of the fabric are touching each other, with the backs facing out.
- whip stitch – a simple seaming stitch: bring the needle through both layers from front to back, then back to front, over and over, like tiny loops along the edge.
- block – gently wet or steam the finished piece and pin it to the correct measurements so it dries into a neat, even shape.
Gauge
Gauge: 24 stitches and 12 rows = 4 inches (10 cm) in the double crochet mesh pattern.
Why gauge matters: Gauge is how many stitches and rows fit into a 4-inch square of your fabric. If your stitches are bigger than the pattern's, your top will come out too large; if they are smaller, it will come out too small. Checking gauge is the single best way to make sure your finished top fits the way it should.
How to make a gauge swatch: With your G/6 (4.0 mm) hook and your chosen yarn, chain 30. Work Row 1 as double crochet across, then work Rows 2–3 of the mesh pattern (below) a few times until your swatch is at least 4 inches tall. Lay it flat, place a ruler across the middle, and count how many stitches fit in 4 inches and how many rows fit in 4 inches. If you have more stitches than 24, your stitches are too tight — try a larger hook. If you have fewer than 24, your stitches are too loose — try a smaller hook. Do not skip this step!
Beginner Tips Before You Start
- Count your stitches at the end of every row. The stitch count in parentheses at the end of each row is your safety net. If the number is wrong, fix it before moving on — it is much easier to fix one row now than to rip out five rows later.
- Use stitch markers. Place a marker in the first and last stitch of each row, and at the neckline edges when you reach the shaping rows. This stops you from accidentally losing or adding stitches at the edges.
- Do not pull your yarn too tight. Tension is everything in a mesh pattern. Keep your loops relaxed and even so the ch-1 spaces stay open and airy — that is what makes this top breathable.
- Remember that the ch 3 at the start of a row counts as your first double crochet. So when a row says "dc in next dc," you are working into the stitch after that starting chain.
- Work the two front shoulders as mirror images. After you finish the first shoulder, fasten off, then rejoin the yarn at the opposite neck edge and work the same shaping so the two sides match.
- Keep your work flat and untwisted. Because this top is made of two flat panels that are sewn together, lay each panel flat as you go and smooth it out so the mesh stays even.
Step-by-Step Instructions
Sizes: S (M, L). Instructions are written for size S first, with M and L in parentheses. Where only one number is given, it applies to all sizes.
Back Panel
Row 1: Ch 82 (90, 98). Dc in the 4th ch from hook and in each ch across. Turn. (80, 88, 96 dc)
Row 2: Ch 3 (counts as first dc), dc in next dc, *ch 1, skip next dc, dc in next dc; repeat from * across, ending with dc in last 2 dc. Turn. (80, 88, 96 sts — the dc stitches plus the ch-1 spaces)
Row 3: Ch 3, dc in each dc and in each ch-1 sp across. Turn. (80, 88, 96 dc)
Rows 4–25: Repeat Rows 2–3, alternating the mesh row (Row 2) and the solid double crochet row (Row 3) until you have completed Row 25. Fasten off at Row 25. (80, 88, 96 sts)
Front Panel
Work the Front Panel exactly the same as the Back Panel through Row 20. (80, 88, 96 sts)
Neckline Shaping (Front Panel, Rows 21–25)
Row 21: Ch 3, dc in next 28 (32, 36) sts, turn, leaving the remaining stitches unworked. (29, 33, 37 sts)
Row 22: Ch 3, dc2tog over next 2 sts, dc in each st across. Turn. (28, 32, 36 sts)
Row 23: Ch 3, dc2tog over next 2 sts, dc in each st across. Turn. (27, 31, 35 sts)
Row 24: Ch 3, dc2tog over next 2 sts, dc in each st across. Turn. (26, 30, 34 sts)
Row 25: Ch 3, dc2tog over next 2 sts, dc in each st across. Turn. (25, 29, 33 sts)
Fasten off. Rejoin the yarn at the opposite neck edge and work the mirror shaping for the second shoulder: repeat Rows 21–25 exactly as written above, working from the opposite edge so the two shoulders match. (25, 29, 33 sts on the second shoulder)
Shoulder Seams
With right sides together, sew the shoulder seams using whip stitch or slip stitch, matching the front and back panels stitch for stitch along each shoulder edge. Sew both shoulders.
Side Seams
Sew the side seams from the bottom edge up to the underarm, leaving the armholes open (approximately 7 inches from the top). Sew both sides.
Neckline and Armhole Edging
Round 1: Join the yarn at the shoulder seam. Sc evenly around the neckline. Join with sl st. (work one sc in each stitch or space around the entire opening)
Round 2: Ch 1, sc in each sc around. Join with sl st and fasten off.
Repeat the edging (Rounds 1–2) around each armhole.
Assembly and Finishing
Seaming: Thread your tapestry needle with a length of yarn about three times the length of the seam you are sewing. Hold the two panels with right sides together. Bring the needle through both layers from front to back, then back to front, making small, even whip stitches about 1/4 inch apart along the edge. Pull gently but firmly so the seam lies flat without puckering. Sew the shoulder seams first, then the side seams, leaving the top 7 inches of each side open for the armholes.
Weaving in ends: Thread each yarn tail onto the tapestry needle and weave it back and forth through the wrong side of the fabric for about 2 inches, following the line of the stitches. Then trim the tail close to the fabric. Never tie a knot — weaving in hides the end invisibly and securely.
Blocking: Lightly mist the finished top with cool water (or steam it gently with an iron held a few inches above the fabric — never press the iron directly onto the stitches). Lay it flat on a towel and pin the edges to the finished measurements: approximately 13.5 (14.5, 16) inches wide and 17 inches long. Let it dry completely. Blocking opens up the mesh, evens out the stitches, and gives the top its beautiful drape.
Optional: Add a single crochet border at the bottom hem for a clean finish — work one round of sc evenly around the bottom edge, join with sl st, and fasten off.
Pro Tips and Variations
- Change colors for a striped look: Work a few rows in one color, then switch to a second color for a beachy striped effect. Simply fasten off the first color and join the new color at the start of the next row — the mesh pattern hides the color change beautifully.
- Adjust the length: To make the top longer or shorter, add or remove rows in multiples of 2 (so you always complete a full mesh row plus a solid row) before you reach the neckline shaping. This keeps the pattern consistent.
- Substitute yarn: Any fine (weight 1) cotton or cotton-blend yarn will work. Avoid fuzzy or slippery yarns, which make the mesh harder to see. Always crochet a new gauge swatch if you change yarn, and adjust your hook size to match the gauge.
- Make it sleeveless: For a tank-style top, simply leave the armholes a little deeper (about 8 inches) and work the armhole edging as written — the openwork mesh makes a lovely sleeveless summer piece.