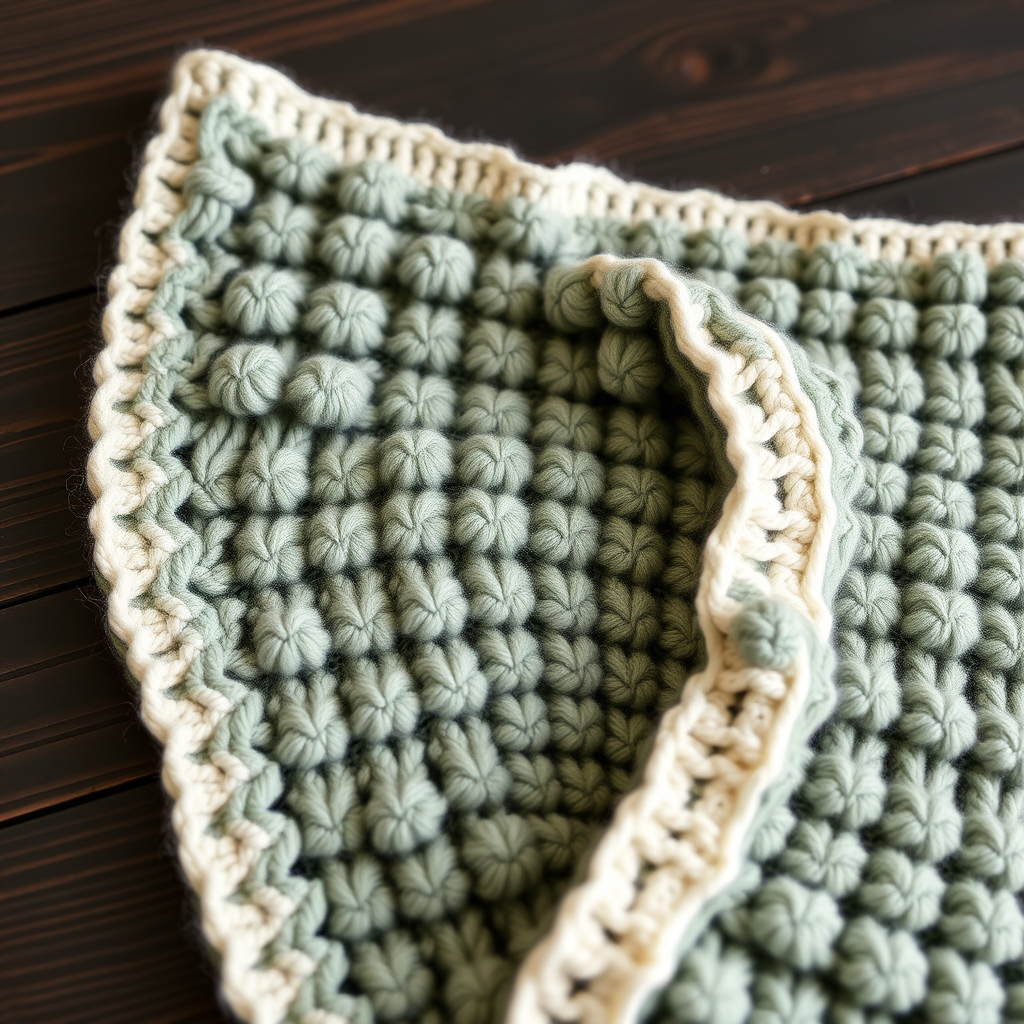
Cloudberry Bobble Carrier Cocoon Free Knitting Pattern – Cozy Infant Nest

Cloudberry Bobble Carrier Cocoon: A Cozy Knitted Nest for Your Little One
There is something truly magical about wrapping a newborn in a handcrafted piece made with love. The Cloudberry Bobble Carrier Cocoon is more than just a baby blanket—it's a modern heirloom designed to fit snugly inside an infant carrier, providing warmth, comfort, and that unmistakable handmade touch. Featuring a lush bobble lattice pattern and a gentle hood, this cocoon is as beautiful as it is functional. Whether you're a seasoned knitter or a confident beginner ready for a rewarding challenge, this free pattern will guide you through creating a plush, textured nest your baby will adore.
The design is worked flat from the bottom up, then the hood is picked up and knit in the round—a technique that creates a seamless, professional finish. The bobble lattice pattern adds a dimensional, cloud-like texture that's soft against delicate skin, while the garter stitch border keeps edges neat and tidy. Let's dive into this delightful project!
Materials Needed
Before you begin, gather the following materials to ensure a smooth knitting experience:
- Yarn: Worsted weight (Category 4) superwash merino or soft acrylic blend. You'll need approximately 450 yards (411 meters) in your main color (MC) and 100 yards (91 meters) in a contrast color (CC) for optional decorative ties.
- Needles: US 7 (4.5 mm) circular needles with a 24-inch (60 cm) cable, plus US 7 double-pointed needles for hood shaping.
- Notions: Stitch markers, tapestry needle for weaving in ends, and scissors.
- Gauge: 20 stitches and 28 rows = 4 inches (10 cm) in stockinette stitch, after blocking. Always knit a gauge swatch to ensure your finished cocoon matches the intended size.
Step-by-Step Instructions
This pattern is worked flat from the bottom up, then the hood is picked up and knit in the round. Follow along carefully, and you'll have a beautiful cocoon in no time.
Abbreviations
- k = knit
- p = purl
- k2tog = knit two together (decrease)
- yo = yarn over (increase)
- MB = make bobble: (k1, p1, k1, p1, k1) all into the same stitch, then pass the 4th, 3rd, 2nd, and 1st stitches over the 5th stitch one at a time (creates a 5-stitch bobble)
- sl = slip stitch purlwise
- pm = place marker
- rnd = round
Bottom Edge
Cast on 72 stitches with your main color (MC) using the long-tail cast-on method.
Rows 1–6: Knit all stitches. This creates a neat garter stitch border that will form the bottom edge of the cocoon.
Bobble Lattice Pattern
Now you'll begin the beautiful textured pattern. Worked over 72 stitches, this lattice combines bobbles and delicate eyelets for a plush, dimensional effect.
Row 7 (RS): K4 (garter edge), *p2, k2, MB, k2, p2, k4*; repeat from * to * across, ending with k4 (garter edge).
Row 8 (WS): K4, *k2, p2, k5, p2, k2, k4*; repeat from * to * across, ending with k4.
Row 9: K4, *p2, k2, k2tog, yo, k1, yo, k2tog, k2, p2, k4*; repeat from * to * across, ending with k4.
Row 10: K4, *k2, p2, k7, p2, k2, k4*; repeat from * to * across, ending with k4.
Row 11: K4, *p2, k2, k1, yo, k2tog, k1, k2tog, yo, k1, k2, p2, k4*; repeat from * to * across, ending with k4.
Row 12: K4, *k2, p2, k7, p2, k2, k4*; repeat from * to * across, ending with k4.
Row 13: K4, *p2, k2, k2tog, yo, k1, yo, k2tog, k2, p2, k4*; repeat from * to * across, ending with k4.
Row 14: K4, *k2, p2, k7, p2, k2, k4*; repeat from * to * across, ending with k4.
Row 15: K4, *p2, k2, k1, yo, k2tog, k1, k2tog, yo, k1, k2, p2, k4*; repeat from * to * across, ending with k4.
Row 16: K4, *k2, p2, k7, p2, k2, k4*; repeat from * to * across, ending with k4.
Row 17: K4, *p2, k2, MB, k2, p2, k4*; repeat from * to * across, ending with k4.
Row 18: K4, *k2, p2, k5, p2, k2, k4*; repeat from * to * across, ending with k4.
Repeat Rows 7–18 until your piece measures 12 inches (30 cm) from the cast-on edge, ending with a wrong-side row. This will give you the perfect length for a snug carrier fit.
Top Shaping
Now you'll shape the top of the cocoon, gradually decreasing stitches to create a tapered, rounded opening.
Next Row (RS): K4, *p2, k2tog, k1, k2tog, k2, p2, k4*; repeat from * to * across, ending with k4. (You'll now have 60 stitches.)
Next Row (WS): K4, *k2, p2, k3, p2, k2, k4*; repeat from * to * across, ending with k4.
Next Row (RS): K4, *p2, k2tog, k1, k2tog, p2, k4*; repeat from * to * across, ending with k4. (You'll now have 48 stitches.)
Next Row (WS): K4, *k2, p2, k1, p2, k2, k4*; repeat from * to * across, ending with k4.
Next Row (RS): K4, *p2, k3tog, p2, k4*; repeat from * to * across, ending with k4. (You'll now have 36 stitches.)
Next Row (WS): K4, *k2, p1, k2, k4*; repeat from * to * across, ending with k4.
Next Row (RS): K4, *p1, k1, p1, k4*; repeat from * to * across, ending with k4. (You'll now have 24 stitches.)
Next Row (WS): K4, *k1, p1, k1, k4*; repeat from * to * across, ending with k4.
Bind off all stitches loosely. This creates the opening where your baby will be nestled.
Hood
The hood adds that extra touch of warmth and charm. You'll pick up stitches along the bound-off edge and knit in the round.
With the right side facing you, pick up and knit 36 stitches evenly along the bound-off edge using your main color. Place a marker and join in the round, being careful not to twist your stitches.
Rnd 1–4: Knit all stitches.
Rnd 5: *K4, MB, K4*; repeat from * to * around. (You'll create 4 bobbles.)
Rnd 6–8: Knit all stitches.
Rnd 9: *K2, MB, K2*; repeat from * to * around. (You'll create 9 bobbles.)
Rnd 10–12: Knit all stitches.
Rnd 13: *K1, MB, K1*; repeat from * to * around. (You'll create 18 bobbles.)
Rnd 14–16: Knit all stitches.
Rnd 17: *K2tog*; repeat from * to * around. (You'll now have 18 stitches.)
Rnd 18: *K2tog*; repeat from * to * around. (You'll now have 9 stitches.)
Cut your yarn, leaving a long tail. Thread the tail through the remaining 9 stitches, pull tight to close the top of the hood, and secure firmly.
Finishing Touches
Weave in all loose ends with your tapestry needle, being careful to hide them within the fabric. Block the cocoon gently to shape—this helps the bobbles relax and the fabric settle into its final form.
For an optional decorative touch, use your contrast color (CC) to create an i-cord tie at the bottom edge. This adds a charming closure and a pop of color. Simply knit a few inches of i-cord and attach it at the bottom corner, or create a drawstring effect by threading it through the garter stitch border.
Your Cozy Creation Awaits
And there you have it—a stunning, heirloom-quality Cloudberry Bobble Carrier Cocoon that's both practical and beautiful. The plush bobble lattice and gentle hood will keep your little one snug and stylish, whether you're out for a walk or just cuddling at home. This pattern is a joy to knit, and the result is a piece you'll treasure for years to come.
Happy knitting, and enjoy every stitch of this cozy project!