Celestial Guardian Angel Amigurumi Free Pattern
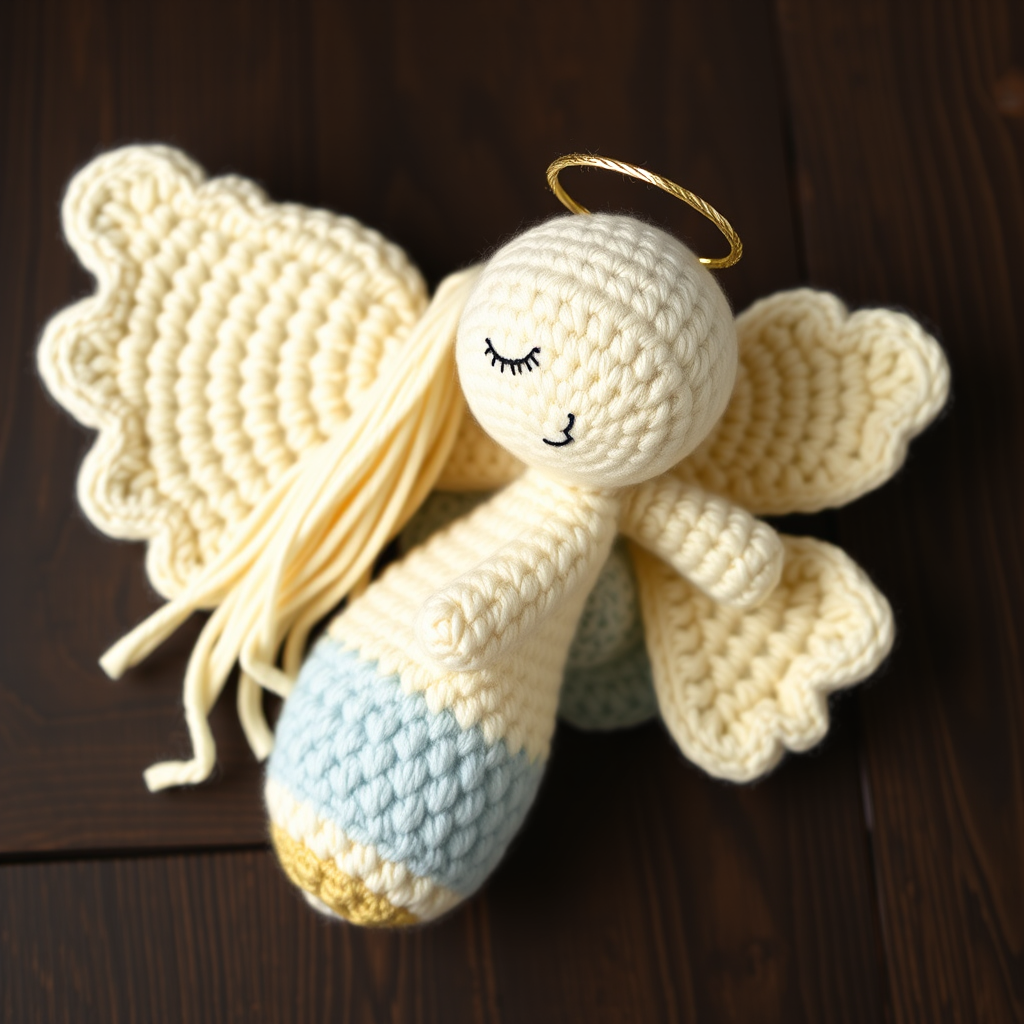
Celestial Guardian Angel Amigurumi: A Heirloom Crochet Pattern
Welcome to a world of serene crafting! Today, we're embarking on a beautiful project that will bring a touch of celestial peace into your home. This Celestial Guardian Angel Amigurumi is more than just a crochet pattern; it's an heirloom-quality soft sculpture designed to bring comfort and a sense of calm to any nursery, meditation space, or cozy corner. With its flowing yarn locks, delicate golden halo, and gentle, embroidered expression, this handmade angel is a true labor of love. Whether you're a seasoned crocheter or a confident beginner looking for a meaningful project, this pattern is designed to guide you every step of the way. Let's pick up our hooks and create a guardian of our own!
Materials Needed: Gathering Your Celestial Toolkit
Before we begin, let's ensure you have all the necessary supplies. This project uses simple, accessible materials to create a stunning result. The key is to maintain a consistent, tight tension for a polished, professional finish.
- Yarn: Worsted weight cotton or acrylic blend in three colors:
- Cream: For the head, body, and hair (approx. 100g).
- Soft Gold: For the wings (approx. 50g).
- Dusty Blue: For embroidering the closed eyes (small amount).
- Metallic Gold Thread: A small amount for creating the halo.
- Crochet Hook: 3.5mm (E) crochet hook.
- Tapestry Needle: For sewing pieces together and weaving in ends.
- Stitch Markers: To help you keep track of your rounds.
- Polyester Fiberfill: For stuffing the head and body firmly.
- Optional: A small star charm or bead to embellish the halo.
Note on Gauge: Gauge is not critical for amigurumi, but you should maintain a consistent tension to create tight stitches (approximately 4 single crochets per inch). This ensures the stuffing doesn't show through.
Step-by-Step Instructions: Crafting Your Guardian
Let's break down the pattern into manageable sections. We'll start with the head, then move to the body, wings, and finally the beautiful details that bring your angel to life. Remember to work in continuous rounds unless otherwise stated, and use your stitch marker to mark the beginning of each round.
Part 1: The Head
We'll begin with a magic ring to create a seamless, smooth start for the head.
- R1: Make a magic ring and work 6 single crochets (sc) into it. (6 stitches)
- R2: Increase (inc) in each stitch around. This means working 2 sc into each of the 6 stitches. (12 stitches)
- R3: *Sc in the next stitch, inc in the next stitch.* Repeat from * to * around. (18 stitches)
- R4: *Sc in the next 2 stitches, inc in the next stitch.* Repeat from * to * around. (24 stitches)
- R5: *Sc in the next 3 stitches, inc in the next stitch.* Repeat from * to * around. (30 stitches)
- R6-10: Sc in each stitch around for 5 rounds. (30 stitches)
- R11: *Sc in the next 3 stitches, decrease (dec) in the next stitch.* Repeat from * to * around. (24 stitches) To decrease, insert your hook into the next stitch, yarn over and pull up a loop, insert into the following stitch, yarn over and pull up a loop, yarn over and pull through all three loops on your hook.
- R12: *Sc in the next 2 stitches, dec in the next stitch.* Repeat from * to * around. (18 stitches)
- Stuff the head firmly with fiberfill, shaping it into a smooth, round ball.
- R13: *Sc in the next stitch, dec in the next stitch.* Repeat from * to * around. (12 stitches)
- R14: Dec around. (6 stitches) Fasten off, leaving a long tail. Use the tail to weave through the front loops of the remaining 6 stitches and pull tight to close the hole. Weave in the end securely.
Part 2: The Body
The body is a simple, slightly tapered cone that will form the angel's robe.
- R1: Make a magic ring and work 6 sc into it. (6 stitches)
- R2: Inc in each stitch around. (12 stitches)
- R3: *Sc in the next stitch, inc in the next stitch.* Repeat from * to * around. (18 stitches)
- R4: *Sc in the next 2 stitches, inc in the next stitch.* Repeat from * to * around. (24 stitches)
- R5-8: Sc in each stitch around for 4 rounds. (24 stitches)
- R9: *Sc in the next 2 stitches, dec in the next stitch.* Repeat from * to * around. (18 stitches)
- R10-12: Sc in each stitch around for 3 rounds. (18 stitches)
- Stuff the body firmly with fiberfill.
- Fasten off, leaving a long tail for sewing the body to the head.
Part 3: The Wings (Make 2)
These beautiful, flat wings have a delicate scalloped edge created by the decreases. Do not stuff them.
- R1: Make a magic ring and work 4 sc into it. (4 stitches)
- R2: Inc in each stitch around. (8 stitches)
- R3: *Sc in the next stitch, inc in the next stitch.* Repeat from * to * around. (12 stitches)
- R4: *Sc in the next 2 stitches, inc in the next stitch.* Repeat from * to * around. (16 stitches)
- R5: *Sc in the next 3 stitches, inc in the next stitch.* Repeat from * to * around. (20 stitches)
- R6-7: Sc in each stitch around for 2 rounds. (20 stitches)
- R8: *Sc in the next 3 stitches, dec in the next stitch.* Repeat from * to * around. (16 stitches)
- R9: *Sc in the next 2 stitches, dec in the next stitch.* Repeat from * to * around. (12 stitches)
- Fasten off, leaving a long tail for sewing. Flatten the wing and set it aside. Repeat to make the second wing.
Part 4: The Halo
This delicate halo adds a touch of magic and celestial light.
- Using the metallic gold thread and your 3.5mm hook, chain (ch) 20. Join with a slip stitch (sl st) to form a ring. Be careful not to twist the chain.
- Round 1: Ch 1 (does not count as a stitch), work 30 sc into the ring. Join with a sl st to the first sc.
- Fasten off, leaving a long tail for attaching the halo to the head. You can gently shape the halo into a perfect circle.
Part 5: The Hair
This is where your angel gets its flowing, serene locks.
- Cut multiple 12-inch strands of cream yarn. You will need about 30-40 strands, depending on how full you want the hair to be.
- Using the latch hook method (or a crochet hook), attach the strands to the top and sides of the head. To do this, fold a strand in half, insert your hook into a stitch on the head, pull the folded loop through, then pull the two loose ends through the loop and tighten.
- Cover the top of the head and work down the sides to create a natural hairline. Leave the face area clear.
- Once all strands are attached, trim them to your desired length. For a flowing effect, leave some strands longer than others, cascading down the back and shoulders.
Part 6: The Face
Give your angel a peaceful, gentle expression.
- Using the dusty blue yarn and your tapestry needle, embroider two closed, peaceful eyes. Create a small, curved line for each eye using a straight stitch or a backstitch. Position them about 6-8 stitches apart, centered on the face.
- Using a small piece of pink or cream yarn, add a tiny smile below the eyes. A simple straight stitch or a small curved line works perfectly.
Part 7: Assembly and Finishing
Now it's time to bring all the pieces together to create your guardian angel.
- Sew the Head to the Body: Using the long tail from the body, sew the head securely to the top of the body. Make sure it's centered and firmly attached.
- Attach the Wings: Using the long tails from the wings, sew them to the back of the body. Position them symmetrically, slightly angled upwards. Weave in all ends securely.
- Attach the Halo: Using the tail from the halo, sew it to the top of the head. Position it slightly tilted for a whimsical, celestial look. You can also add a small star charm or bead to the halo at this point if you wish.
- Weave in All Ends: Use your tapestry needle to carefully weave in any remaining loose yarn ends into the body of the angel.
- Finishing Touch: Gently steam block your angel to shape it perfectly. Hold a steam iron a few inches away from the surface and steam lightly, then allow it to dry completely. This will help smooth out any uneven stitches and give your angel a professional, polished look.
Congratulations! Your Celestial Guardian Angel is complete. This beautiful, handmade creation is ready to watch over its new home, bringing a sense of peace and comfort to all who see it. This pattern is perfect for gifting and makes a truly memorable, heirloom-quality piece. Happy crafting!


