Celestial Drifter Crochet Bag Pattern (Free)
Celestial Drifter Crochet Bag Pattern (Free)
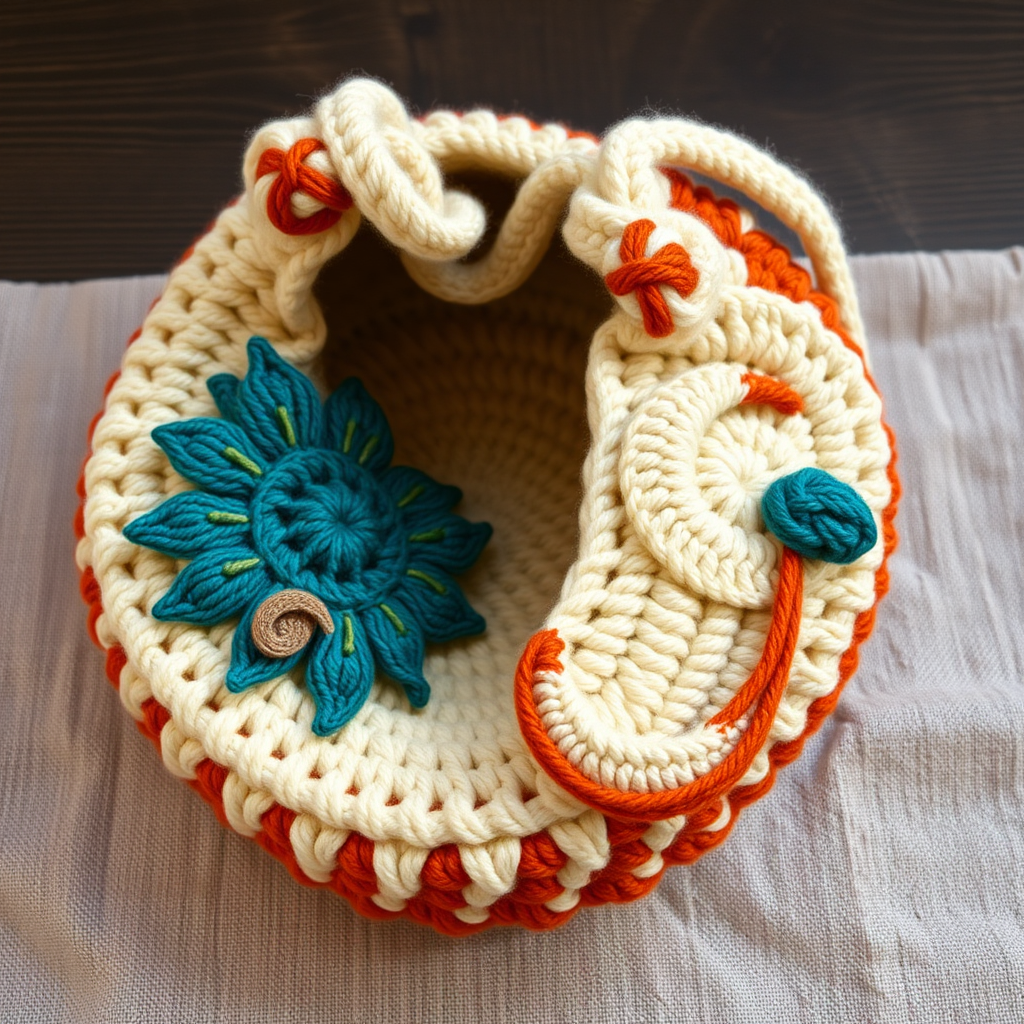
Carry a piece of the cosmos with this free-spirited, textured crochet bag that blends earthy neutrals with celestial charm. The Celestial Drifter Bag is a stunning accessory that combines a chunky, handcrafted aesthetic with practical design. Featuring a unique sunburst motif and a crescent moon applique, this bag is perfect for the boho lover in your life—or as a treat for yourself. The thick, bulky yarn works up quickly, making this an ideal weekend project for confident beginners and intermediate crocheters alike.
This pattern is completely free and designed to be worked in the round from the bottom up, creating a flat circular base that transitions into a roomy cylindrical body. The drawstring closure keeps your belongings secure while adding a rustic, artisanal touch. Let’s dive into the cosmic crafting journey!
Materials Needed
Before you begin, gather the following supplies to ensure a smooth and enjoyable crochet session:
- Yarn: Bulky weight yarn (Category 5) in three colors:
- Color A (Warm Cream): Approximately 150g for the base, sides, and drawstring.
- Color B (Terracotta): Approximately 100g for the sides and crescent moon applique.
- Color C (Deep Teal): Approximately 50g for the sunburst motif.
- Crochet Hook: 6.5 mm (K/10.5) hook. This larger hook is essential for achieving the correct gauge and the chunky, textured look.
- Yarn Needle: For weaving in ends and sewing the motifs onto the bag.
- Stitch Markers: Helpful for keeping track of rounds, especially when working in a continuous spiral.
- Scissors: For cutting yarn.
Gauge: 12 single crochet (sc) x 13 rows = 4 inches in single crochet. Always check your gauge to ensure your bag turns out the correct size. If your gauge is off, switch to a different hook size.
Step-by-Step Instructions
This pattern is worked in the round from the bottom up. We will create the base, build the sides, add the drawstring eyelets, and finish with the celestial appliques. Follow along carefully, and don't hesitate to refer back to the materials list if you need clarification on abbreviations.
Abbreviations (US Terminology)
- ch: Chain
- sc: Single Crochet
- hdc: Half Double Crochet
- dc: Double Crochet
- sl st: Slip Stitch
- st(s): Stitch(es)
- rnd: Round
- rep: Repeat
Part 1: The Base (Worked in a Continuous Spiral)
Note: Do not join rounds with a slip stitch unless specified. Use a stitch marker to mark the beginning of each round.
- Round 1: With Color A, make a magic ring. Work 6 sc into the ring. Pull the tail to close the ring tightly. (6 sts)
- Round 2: Work 2 sc in each stitch around. (12 sts)
- Round 3: *Sc in the next st, 2 sc in the next st*; repeat from * to * around. (18 sts)
- Round 4: *Sc in the next 2 sts, 2 sc in the next st*; repeat from * to * around. (24 sts)
- Round 5: *Sc in the next 3 sts, 2 sc in the next st*; repeat from * to * around. (30 sts)
- Round 6: *Sc in the next 4 sts, 2 sc in the next st*; repeat from * to * around. (36 sts)
- Round 7: *Sc in the next 5 sts, 2 sc in the next st*; repeat from * to * around. (42 sts)
- Round 8: *Sc in the next 6 sts, 2 sc in the next st*; repeat from * to * around. (48 sts)
- Round 9: *Sc in the next 7 sts, 2 sc in the next st*; repeat from * to * around. (54 sts)
- Round 10: *Sc in the next 8 sts, 2 sc in the next st*; repeat from * to * around. (60 sts)
- Round 11: *Sc in the next 9 sts, 2 sc in the next st*; repeat from * to * around. (66 sts)
- Round 12: *Sc in the next 10 sts, 2 sc in the next st*; repeat from * to * around. (72 sts)
- Fasten off Color A. Your flat circular base should measure approximately 7-8 inches in diameter.
Part 2: The Sides
Now we will build the vertical walls of the bag. This creates a clean, sharp fold line between the base and the sides.
- Round 13: Join Color B with a slip stitch in any stitch of Round 12. Chain 1. Working in the back loops only (insert hook under the top loop only), sc in each stitch around. (72 sts). This creates a beautiful ridge that defines the bottom of the bag.
- Rounds 14-20: Sc in each stitch around. (72 sts). Do not fasten off. You should have a tube that is roughly 5-6 inches tall from the base ridge.
Part 3: Eyelet Round for Drawstring
This round creates the holes through which your drawstring will weave.
- Round 21: Ch 1, sc in the first st. *Ch 2, skip the next 2 sts, sc in the next st*; repeat from * to * around, ending with ch 2, skip the last 2 sts, and join with a slip stitch to the first sc. (You will have 24 ch-2 spaces/eyelets).
Part 4: Top Edging
This final round on the body of the bag stabilizes the eyelets and gives a neat, finished edge.
- Round 22: Ch 1, sc in each st and each ch-2 space around. (96 sts). Fasten off and weave in the end.
Part 5: The Sunburst Motif (Make 1)
This vibrant motif will be the centerpiece of the bag's front. We use Color C (Deep Teal) for this.
- Round 1: With Color C, make a magic ring. Ch 3 (counts as your first dc), work 11 dc into the ring. Join with a sl st to the top of the ch-3. (12 dc)
- Round 2: Ch 3 (counts as dc), dc in the same st. Work 2 dc in each st around. Join with a sl st to the top of the ch-3. (24 dc)
- Round 3: Ch 1, sc in the same st. *Ch 3, skip the next st, sc in the next st*; repeat from * to * around, ending with ch 3 and a sl st to the first sc. (12 ch-3 loops)
- Round 4: Sl st into the first ch-3 loop. Ch 1. In each ch-3 loop around, work the following sequence: (sc, hdc, 3 dc, hdc, sc). Join with a sl st to the first sc. Fasten off, leaving a long tail for sewing. (12 petals created)
Part 6: Crescent Moon Applique (Make 1)
This charming applique is worked in rows, not rounds. We use Color B (Terracotta) for this.
- Foundation: With Color B, ch 12.
- Row 1: Sc in the 2nd ch from the hook and in each ch across. (11 sc). Ch 1, turn.
- Row 2: Sc in the first st, 2 sc in the next st, sc in the next 7 sts, 2 sc in the next st, sc in the last st. (13 sc). Ch 1, turn.
- Row 3: Sc in each st across. (13 sc). Ch 1, turn.
- Row 4: Sc in the first st, 2 sc in the next st, sc in the next 9 sts, 2 sc in the next st, sc in the last st. (15 sc). Ch 1, turn.
- Row 5: Sc in each st across. (15 sc). Ch 1, turn.
- Row 6: Sc in the first st, 2 sc in the next st, sc in the next 11 sts, 2 sc in the next st, sc in the last st. (17 sc). Ch 1, turn.
- Row 7: Sc in each st across. (17 sc). Ch 1, turn.
- Row 8: Sc in the first st, 2 sc in the next st, sc in the next 13 sts, 2 sc in the next st, sc in the last st. (19 sc). Ch 1, turn.
- Row 9: Sc in each st across. (19 sc). Fasten off, leaving a long tail for sewing.
Tip: To give the moon a more curved, crescent shape, you can gently curve the rectangle while sewing it on, or you can slightly gather one edge. The increases on the ends naturally create a gentle arc.
Part 7: The Drawstring
You have two easy options for the drawstring. Choose the one you prefer.
- Option 1 (Chain): With Color A, make a loose chain approximately 60 inches long. Fasten off.
- Option 2 (Twisted Cord): Cut two strands of Color A, each about 120 inches long. Hold them together, fold in half, and tie a knot at the folded end. Attach the loose ends to a stationary object (like a doorknob) and twist the yarn tightly in one direction. Fold the twisted yarn in half, letting it twist upon itself to form a cord. Tie a knot at the end to secure.
Weave the drawstring through the eyelet holes created in Round 21, starting and ending at the front of the bag.
Part 8: Assembly and Finishing
- Position the Sunburst: Place the sunburst motif on the center front of the bag, just below the eyelet round. Use the long tail from the motif to sew it securely in place with a whip stitch or mattress stitch.
- Position the Moon: Place the crescent moon applique on the upper right of the sunburst, slightly overlapping it. Use the long tail to sew it on securely.
- Weave in Ends: Using your yarn needle, carefully weave in all remaining loose ends on the inside of the bag to keep the exterior clean and polished.
Your Celestial Drifter Crochet Bag is now complete! Fill it with your daily essentials and let your bohemian spirit shine. This bag makes a wonderful gift, and the pattern is perfect for using up leftover bulky yarns in your stash. Happy crocheting!


