Brick & Mortar Cozy Lego Block Bag Free Crochet Pattern – Chunky Textured Tote
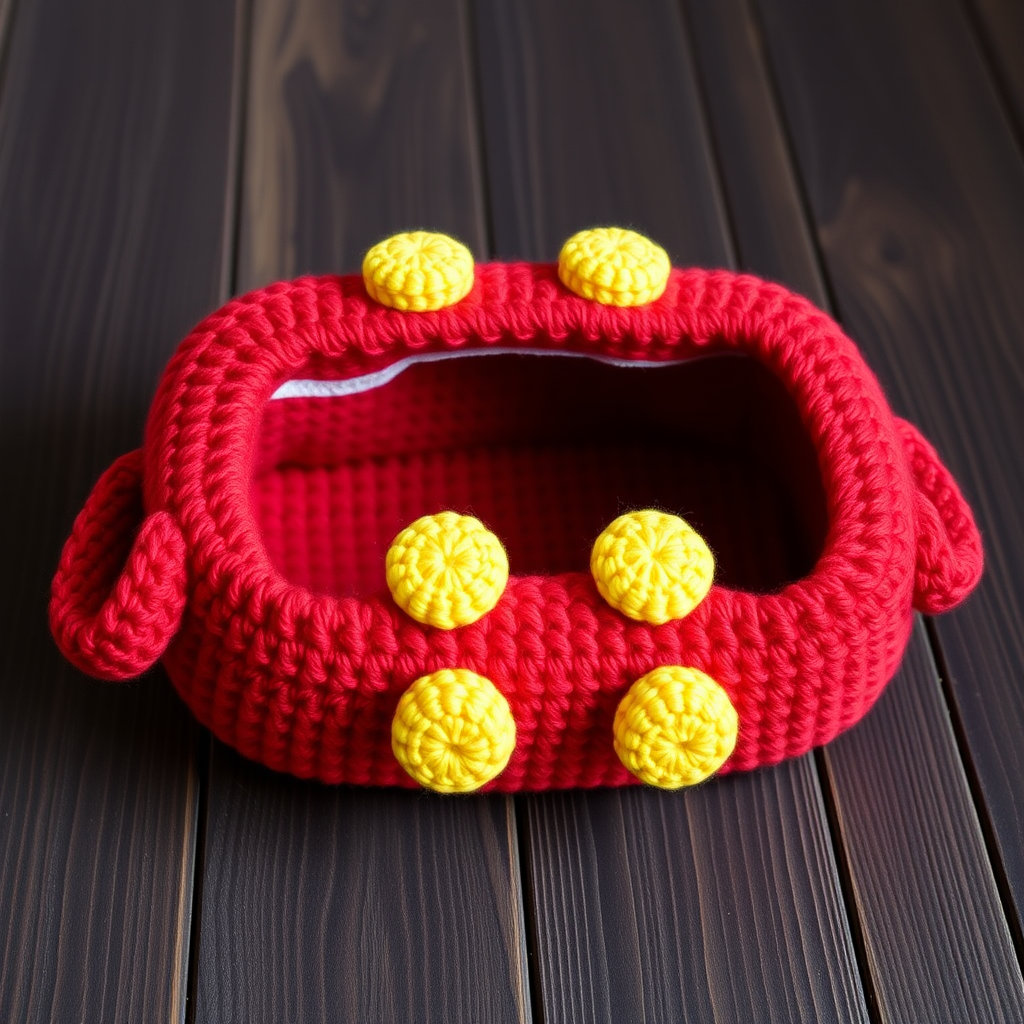
Carry Your World in a Giant Lego Brick: The Brick & Mortar Cozy Tote
Imagine a bag that’s equal parts nostalgic, playful, and incredibly practical. The Brick & Mortar Cozy Lego Block Bag is exactly that—a chunky, squishy tote crocheted to resemble a classic building block. With its bold primary colors and dense, tactile fabric, this isn't just a bag; it's a statement piece that brings a smile to everyone who sees it. Whether you're heading to the farmer's market, the library, or just want to add a pop of fun to your everyday carry, this pattern is as rewarding to make as it is to use. Let's dive into creating your own soft, giant Lego brick!
Materials Needed: Gathering Your Building Blocks
Before you start, gather your supplies. The beauty of this pattern is its simplicity—you only need a few things to get started.
- Yarn: Super bulky weight yarn (size 6). You'll need approximately 300g of your main color (we used a vibrant red) and 50g of an accent color for the studs (we used bright yellow). You'll also need a small amount of black yarn if you want to add the classic Lego "eyes" or detailing, though this is optional.
- Hook: An 8.0 mm crochet hook, or whatever size you need to achieve the correct gauge.
- Gauge: 10 single crochets (sc) x 11 rows = 4 x 4 inches. This ensures your bag is the perfect size and shape.
- Other: A yarn needle for weaving in ends and sewing the studs, and a small amount of fiberfill stuffing for the studs.
Pro-Tip: For an even sturdier bag, you can hold two strands of worsted weight yarn together instead of using one strand of super bulky. This creates a denser, more durable fabric that holds its shape beautifully.
Step-by-Step Instructions: Crocheting Your Brick
This bag is worked in continuous rounds from the bottom up, making it a fantastic project for beginners and experienced crocheters alike. We'll break it down into clear sections.
Part 1: The Base of the Brick
We'll start by creating a flat, oval base that will form the bottom of your bag.
- Start: Make a magic ring. Chain 1 (this does not count as a stitch). Work 8 single crochets (sc) into the ring. Pull the tail tight to close the ring. (8 stitches)
- Round 2: Work 2 sc into each stitch around. (16 stitches)
- Round 3: *Sc in the next stitch, 2 sc in the next stitch.* Repeat from * to * around. (24 stitches)
- Round 4: *Sc in the next 2 stitches, 2 sc in the next stitch.* Repeat around. (32 stitches)
- Round 5: *Sc in the next 3 stitches, 2 sc in the next stitch.* Repeat around. (40 stitches)
- Round 6: *Sc in the next 4 stitches, 2 sc in the next stitch.* Repeat around. (48 stitches)
- Round 7: *Sc in the next 5 stitches, 2 sc in the next stitch.* Repeat around. (56 stitches)
- Round 8: *Sc in the next 6 stitches, 2 sc in the next stitch.* Repeat around. (64 stitches)
Your base is now complete and should measure about 8 inches across.
Part 2: Building Up the Sides
Now we'll create the tall, straight walls of your tote.
- Round 9: This round creates a crisp, defined edge for the base. Working in the back loops only, sc in each stitch around. (64 stitches)
- Rounds 10-20: Sc in each stitch around for these rounds. Continue until your bag measures about 8 inches tall from the base. (64 stitches each round)
Part 3: Creating the Handle Openings
This is where we shape the openings for your handles.
- Round 21: This round creates the handle gaps. Here’s the breakdown:
- Sc in the next 14 stitches.
- Chain 20. Skip the next 20 stitches (this creates the first handle opening).
- Sc in the next 30 stitches.
- Chain 20. Skip the next 20 stitches (this creates the second handle opening).
- Sc in the next 14 stitches to complete the round. Join with a slip stitch to the first stitch of the round.
- Round 22: Sc in each stitch and each chain around. This means you'll work 64 sc (from the bag body) + 20 sc (from the first chain) + 20 sc (from the second chain) = 104 stitches total.
- Round 23: Sc in each stitch around. (104 stitches)
- Finish: Fasten off and weave in your ends securely.
Part 4: Crocheting the Handles
We'll reinforce the handle openings with sturdy, crocheted straps.
- First Handle: Attach your yarn to one side of a handle opening. Chain 1. Work 20 sc evenly along the edge of the ch-20 space.
- Continue working sc in each stitch for 5 more rows. This creates a thick, comfortable strap.
- Fasten off and weave in ends. Repeat this entire process for the second handle opening.
Part 5: Making the Lego Studs
These are the iconic, puffy bumps that make your bag a true Lego brick. You'll make 8 of these.
- Start: With your accent color, make a magic ring. Chain 1. Work 6 sc into the ring. Pull tight. (6 stitches)
- Round 2: Work 2 sc in each stitch around. (12 stitches)
- Round 3: *Sc in the next stitch, 2 sc in the next stitch.* Repeat around. (18 stitches)
- Round 4: Sc in each stitch around. (18 stitches)
- Finish: Fasten off, leaving a long tail (about 12 inches) for sewing. Gently stuff each stud with a small amount of fiberfill to make them puffy and soft.
Part 6: Assembly and Final Touches
Time to put it all together!
- Attach the Studs: Position 4 studs evenly spaced on the front of the bag, about 2 inches below the top edge. Use the long tails and your yarn needle to securely stitch them in place. Repeat this for the back of the bag.
- Weave in Ends: Weave in any remaining loose ends to give your bag a clean, professional finish.
- Optional Lining: For extra strength and to prevent small items from slipping through the stitches, you can line the bag with a piece of fabric. Simply sew a fabric rectangle to the inside of the bag.
And there you have it—your very own Brick & Mortar Cozy Lego Block Bag! This project is a wonderful way to use up chunky yarn and create a unique, functional accessory. The combination of the dense single crochet and the playful studs makes it a conversation starter wherever you go. Happy crocheting!


