Aurora Waves Throw Pillow Free Pattern
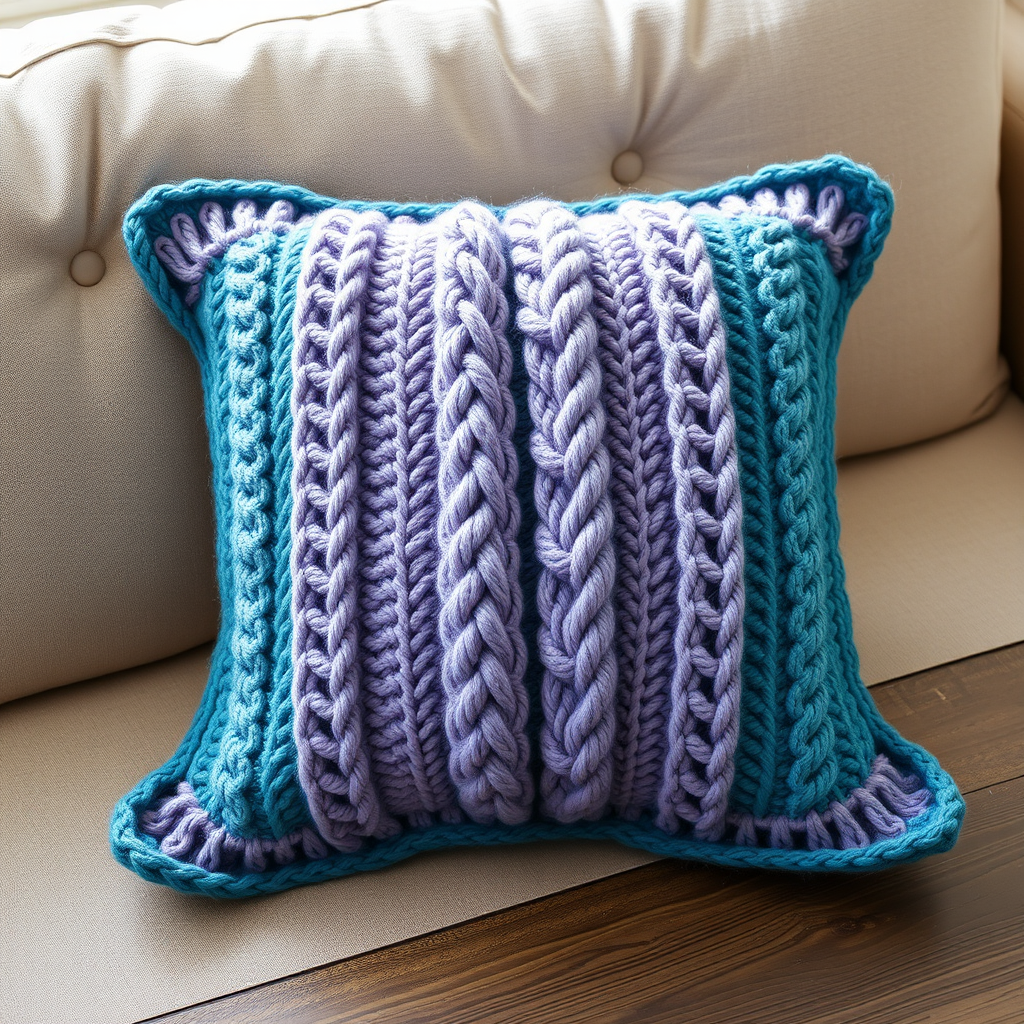
Aurora Waves Throw Pillow: A Cozy Cable Knit for Your Modern Home
Imagine the ethereal dance of the northern lights captured in a cozy, textured throw pillow. That's exactly what you'll create with this Aurora Waves Throw Pillow knitting pattern. This chunky, cable-knit pillow cover is the perfect weekend project for knitters ready to move beyond the basics. With its shifting cable panel and ribbed sections, it adds a touch of modern, handcrafted elegance to any sofa, bed, or reading nook. Best of all, it's a free pattern that uses bulky yarn, so it works up quickly and delivers a stunning, high-impact result.
This pattern is designed to be approachable for confident beginners. If you know how to knit, purl, and work a simple cable, you can create this beautiful piece. We'll guide you through every step, from casting on to the final whip stitch, ensuring your finished pillow is something you'll be proud to display.
Materials Needed
Before you begin, gather your supplies. This project is all about creating a chunky, luxurious texture, so the right materials are key.
- Yarn: Bulky weight yarn (approx. 250 yards total). You will need two colors:
- Color A (Main Color): Deep Teal (for cast-on, ribbing, and top decrease)
- Color B (Contrast Color): Soft Lavender (for the main body)
- Needles: US 10.5 (6.5 mm) circular knitting needles with a 16-inch cable. You will also need a set of double-pointed needles (DPNs) in the same size for finishing the top, or you can use the magic loop method.
- Notions: Stitch markers, a cable needle, a tapestry needle for weaving in ends, and a 16-inch pillow form.
- Gauge: 14 stitches and 20 rows = 4 inches in stockinette stitch. Always check your gauge to ensure your pillow cover fits your form perfectly.
Step-by-Step Instructions
This pillow cover is knitted in the round as a seamless tube, then closed at both ends. The pattern features a repeating "wave" motif created by a central cable panel flanked by reverse stockinette and ribbed sections. Let's get started!
Abbreviations
- CO: Cast on
- K: Knit
- P: Purl
- C4F: Cable 4 front (slip 2 stitches to cable needle, hold in front, knit next 2 stitches, then knit 2 from cable needle)
- C4B: Cable 4 back (slip 2 stitches to cable needle, hold in back, knit next 2 stitches, then knit 2 from cable needle)
- K2tog: Knit two together (decrease)
- P2tog: Purl two together (decrease)
- St(s): Stitch(es)
- Rnd: Round
Getting Started: Cast On and Ribbing
Step 1: Cast On
With Color A (deep teal), CO 80 stitches. Place a stitch marker to mark the beginning of the round and join in the round, being extremely careful not to twist your stitches.
Step 2: Ribbing
Work in K2, P2 ribbing for 2 inches (approximately 10 rounds). This creates a neat, structured edge for the bottom of your pillow cover.
The Aurora Wave Pattern: Knitting the Body
Step 3: Switch to Color B
Cut Color A, leaving a tail to weave in later. Join Color B (soft lavender) and begin the wave pattern. The pattern is a repeat of 8 rounds that creates the beautiful, flowing texture.
Step 4: Work the 8-Round Pattern
Here is the core pattern. Repeat these 8 rounds until your piece measures 16 inches from the cast-on edge, or the desired length to fit your pillow form (typically 16-18 inches).
- Rnd 1: *P4, K8, P4, K2, P2, K2, P2, K2*; repeat from * to * around (4 total repeats).
- Rnd 2: *P4, C4F, C4B, P4, K2, P2, K2, P2, K2*; repeat from * to * around.
- Rnd 3: *P4, K8, P4, K2, P2, K2, P2, K2*; repeat from * to * around.
- Rnd 4: *P4, K8, P4, K2, P2, K2, P2, K2*; repeat from * to * around.
- Rnd 5: *P4, C4B, C4F, P4, K2, P2, K2, P2, K2*; repeat from * to * around.
- Rnd 6: *P4, K8, P4, K2, P2, K2, P2, K2*; repeat from * to * around.
- Rnd 7: *P4, K8, P4, K2, P2, K2, P2, K2*; repeat from * to * around.
- Rnd 8: *P4, K8, P4, K2, P2, K2, P2, K2*; repeat from * to * around.
Pro Tip: The cables are worked on Rounds 2 and 5. On Round 2, the cable twists to the front (C4F) then to the back (C4B). On Round 5, the order is reversed (C4B then C4F). This creates the "S" curve that mimics flowing waves.
Shaping the Top: Decreases
Step 5: Switch Back to Color A
Once your tube reaches the desired length, cut Color B and join Color A. Now you will begin the decrease rounds to shape the top of the pillow. This section cinches the fabric together neatly.
Follow these decrease rounds carefully. The stitch counts are provided to help you keep track.
- Rnd 1: *P4, K2tog, K4, K2tog, P4, K2, P2, K2, P2, K2*; repeat from * to * around (72 sts).
- Rnd 2: *P4, K6, P4, K2, P2, K2, P2, K2*; repeat from * to * around.
- Rnd 3: *P4, K2tog, K2, K2tog, P4, K2, P2, K2, P2, K2*; repeat from * to * around (64 sts).
- Rnd 4: *P4, K4, P4, K2, P2, K2, P2, K2*; repeat from * to * around.
- Rnd 5: *P4, K2tog, K2tog, P4, K2, P2, K2, P2, K2*; repeat from * to * around (56 sts).
- Rnd 6: *P4, K2, P4, K2, P2, K2, P2, K2*; repeat from * to * around.
- Rnd 7: *P4, K2tog, P4, K2, P2, K2, P2, K2*; repeat from * to * around (52 sts).
- Rnd 8: *P4, K1, P4, K2, P2, K2, P2, K2*; repeat from * to * around.
- Rnd 9: *P2tog, P2, K1, P2tog, P2, K2, P2, K2, P2, K2*; repeat from * to * around (44 sts).
- Rnd 10: *P3, K1, P3, K2, P2, K2, P2, K2*; repeat from * to * around.
- Rnd 11: *P2tog, P1, K1, P2tog, P1, K2, P2, K2, P2, K2*; repeat from * to * around (36 sts).
- Rnd 12: *P2, K1, P2, K2, P2, K2, P2, K2*; repeat from * to * around.
- Rnd 13: *P2tog, K1, P2tog, K2, P2, K2, P2, K2*; repeat from * to * around (28 sts).
- Rnd 14: *P1, K1, P1, K2, P2, K2, P2, K2*; repeat from * to * around.
- Rnd 15: *P2tog, K1, P2tog, K2, P2, K2, P2, K2*; repeat from * to * around (20 sts).
Step 6: Close the Top
Cut the yarn, leaving a long tail (at least 12 inches). Thread the tail onto a tapestry needle. Slide the needle through the remaining 20 stitches, removing them from the knitting needle. Pull the yarn tight to cinch the top closed, and secure it with a few small stitches. Weave in the end securely.
Finishing Touches
Step 7: Weave in Ends
Weave in all loose ends from your color changes and cast-on edge using your tapestry needle.
Step 8: Insert Pillow Form and Close
Insert your 16-inch pillow form into the open tube. Using the long tail from the cast-on edge, sew the bottom closed with a neat whip stitch. Make sure your stitches are secure and evenly spaced.
Step 9: Blocking (Optional but Recommended)
To even out your stitches and give your pillow a professional finish, lightly block it. You can do this by gently steaming the pillow cover with a garment steamer or iron (without touching the yarn directly) or by lightly misting it with water and laying it flat to dry.
And there you have it—a stunning, handcrafted Aurora Waves Throw Pillow that brings a touch of the celestial into your home. Enjoy your new cozy, modern decor piece!


