Aurora Waves Neck Warmer Free Pattern
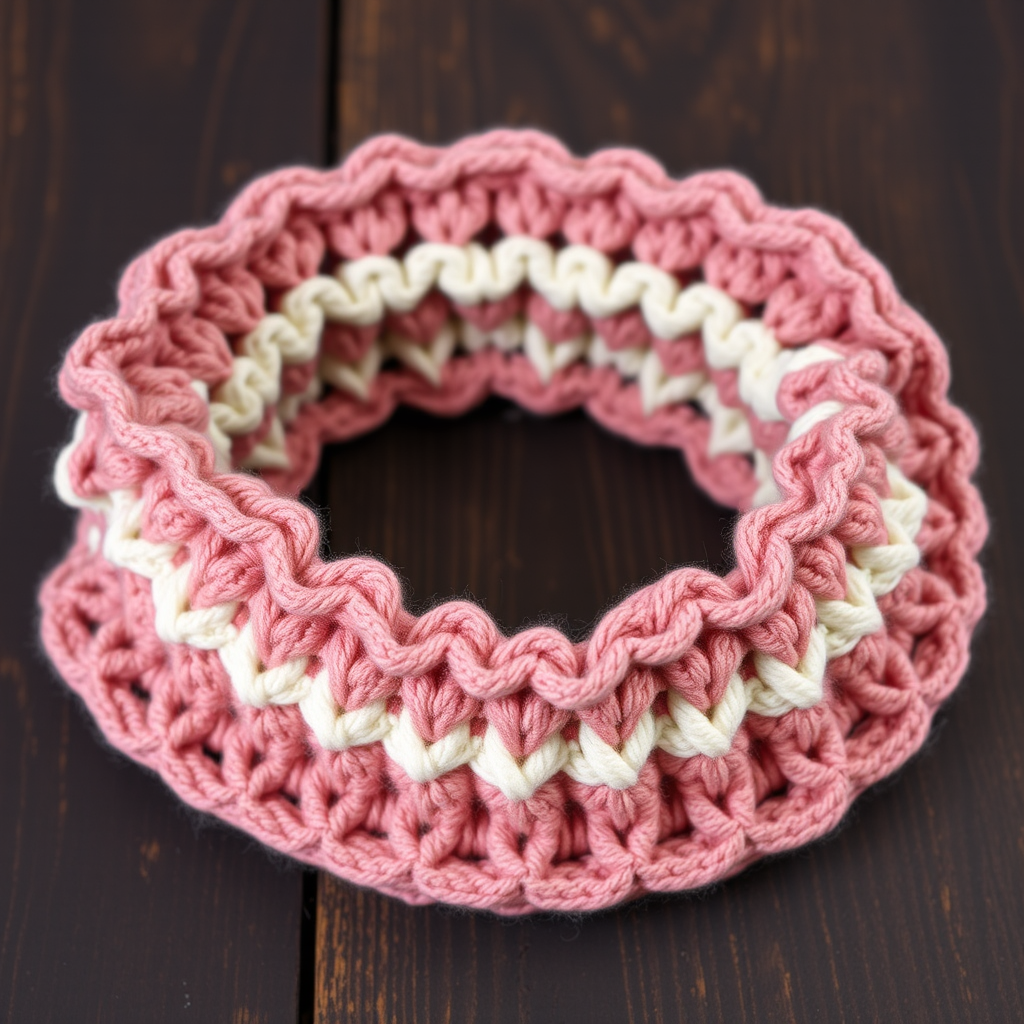
Aurora Waves Neck Warmer: A Beginner-Friendly Crochet Cowl
Wrap yourself in the cozy, undulating rhythm of the Aurora Waves Neck Warmer, a modern take on the classic ripple stitch. This quick-to-stitch cuff is the perfect layering piece for chilly days and adds a handmade touch to any outfit. With its soft, dusty rose and warm cream color palette, this crochet neck warmer is both stylish and practical—and it's an ideal project for beginners looking to master increases, decreases, and color changes.
This free crochet pattern creates a rectangular piece worked flat in rows, which you'll seam into a snug cuff. The ripple stitch pattern produces gentle peaks and valleys that drape beautifully around your neck. Best of all, the entire project uses only about 150 yards of worsted weight yarn, making it a great stash-buster or a thoughtful handmade gift.
Materials Needed
Before you begin, gather the following supplies:
- Yarn: Worsted weight yarn in two colors—Color A (main) and Color B (contrast), approximately 150 yards total. The sample uses a soft dusty rose for Color A and a warm cream for Color B.
- Crochet Hook: I/9 (5.5 mm) crochet hook
- Yarn needle for weaving in ends and seaming
- Scissors
Gauge: 14 dc x 8 rows = 4 inches in ripple pattern. Exact gauge is not critical for this project, but aim for a similar drape so the neck warmer fits comfortably.
Special Stitches
This pattern uses three basic crochet stitches. If you're new to crochet, review these before starting:
- dc (double crochet): Yarn over, insert hook into stitch, yarn over and pull through, yarn over and pull through two loops, yarn over and pull through remaining two loops.
- dc2tog (double crochet 2 together): Yarn over, insert hook into next stitch, yarn over and pull through, yarn over and pull through two loops (2 loops remain on hook). Yarn over, insert hook into next stitch, yarn over and pull through, yarn over and pull through two loops (3 loops remain on hook). Yarn over and pull through all three loops. This creates a decrease.
- ch (chain): Yarn over and pull through the loop on your hook.
Step-by-Step Instructions
This pattern is worked flat in rows, creating a ripple effect that is then seamed into a cuff. Follow these detailed instructions carefully, and you'll have a beautiful neck warmer in no time.
Foundation Row
With Color A, chain 30. This foundation chain will be the width of your neck warmer.
Row 1
Work 2 dc into the 4th ch from hook (this counts as your first dc + 1 dc increase). Then follow this sequence:
- *Dc in the next 3 ch
- Dc2tog over the next 2 ch (decrease)
- Dc in the next 3 ch
- Work 3 dc in the next ch (increase)*
Repeat from * to * across until 4 ch remain. Then dc in the next 3 ch, and work 2 dc in the last ch. Turn your work. You should have 4 ripple peaks and 3 valleys across the row.
Row 2
Ch 3 (counts as your first dc). Work 2 dc in the first dc (this creates an increase at the edge). Then follow this sequence:
- *Dc in the next 3 dc
- Dc2tog over the next 2 dc (decrease)
- Dc in the next 3 dc
- Work 3 dc in the next dc (this is the center dc of the peak)*
Repeat from * to * across, ending with 2 dc in the top of the turning chain. Turn your work.
Row 3 (Color Change)
Repeat Row 2, but change to Color B at the beginning of the row. To change colors seamlessly, work the last yarn over of the last dc of the previous row with the new color. This means when you have two loops left on your hook from the final dc of Row 2, yarn over with Color B and pull through both loops. Continue with Color B for this row.
Rows 4-5
Repeat Row 2 with Color B. You'll now have two rows of Color B completed.
Rows 6-7
Repeat Row 2 with Color A. Remember to change colors at the end of Row 5 by working the last yarn over of the final dc with Color A.
Rows 8-9
Repeat Row 2 with Color B.
Rows 10-11
Repeat Row 2 with Color A.
Rows 12-13
Repeat Row 2 with Color B.
Rows 14-15
Repeat Row 2 with Color A.
Row 16
Repeat Row 2 with Color B. This is your final row.
Finishing
Fasten off, leaving a long tail (at least 12 inches) for seaming. Fold the rectangle in half so the short ends meet, with the right sides facing each other. Using the tail and a yarn needle, whip stitch the short ends together to form a cuff. The whip stitch is simple: insert your needle through both layers from back to front, then bring it over the top and insert again, creating a spiral of stitches along the seam.
Weave in all loose ends using your yarn needle. Block gently if desired—this helps even out the stitches and gives the neck warmer a more polished look. To block, simply wet the piece, gently squeeze out excess water, and lay flat to dry, shaping it as needed.
Tips for Success
- Count your stitches at the end of each row to ensure you maintain the ripple pattern. You should have the same number of stitches in each row.
- Keep your tension consistent throughout the project. If your tension changes, the ripple effect may look uneven.
- Mark the center dc of each peak with a stitch marker if you find it helpful. This is where you'll work the 3 dc increase.
- Practice the dc2tog stitch on a scrap piece of yarn first if you're new to decreases.
Your Aurora Waves Neck Warmer is now complete! This cozy, modern accessory is perfect for fall and winter layering. The ripple stitch pattern creates a beautiful texture that looks more complex than it actually is, making this a rewarding project for beginners and experienced crocheters alike. Wear it with pride, or gift it to someone special—either way, you've created something beautiful with your own hands.


