Aurora Mist Lace Crochet Shawl Free Pattern
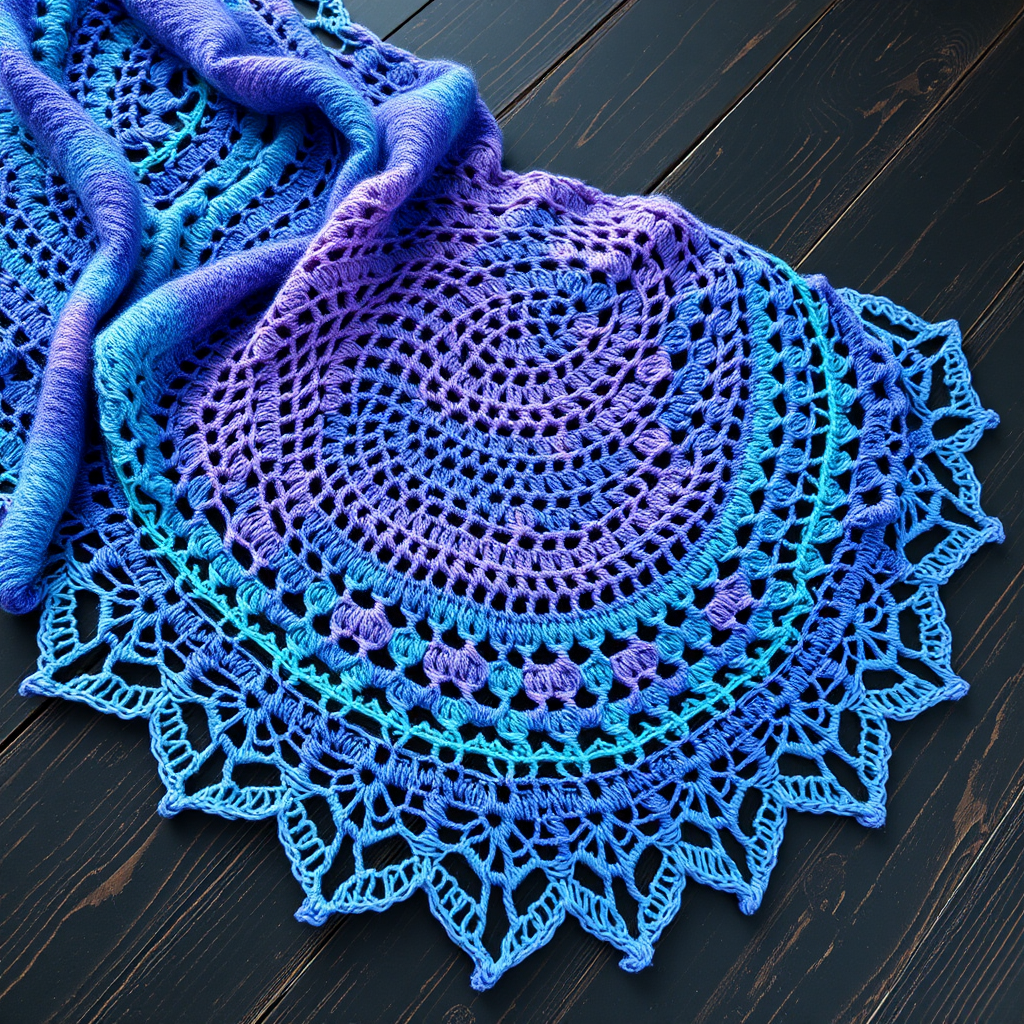
Wrap Yourself in the Northern Lights: The Aurora Mist Lace Crochet Shawl
Imagine draping the ethereal, dancing colors of the aurora borealis over your shoulders. With the Aurora Mist Lace Crochet Shawl, you can turn that dream into a wearable reality. This crescent-shaped masterpiece is a celebration of delicate lace, flowing lines, and breathtaking colorwork. Designed with the beginner in mind, this free pattern uses only basic stitches and simple repeats to create a fabric that looks far more complex than it is. The result is a lightweight, breathable shawl that adds a touch of elegance to any outfit, making it the perfect project for a cozy evening in or a thoughtful, handmade gift.
This pattern is your gateway to creating a stunning, heirloom-quality accessory. The magic lies in the gradual increase of chain spaces, which naturally forms the graceful crescent silhouette. Whether you choose a vibrant gradient yarn that mimics the night sky or a subtle solid hue, this shawl is sure to become a treasured piece in your wardrobe.
Materials Needed: Gathering Your Tools
Before you begin your crochet journey, ensure you have all the necessary supplies on hand. The beauty of this pattern is its simplicity—you need very few items to get started.
- Yarn: Fingering weight yarn (approx. 800-900 yards). A gradient or self-striping colorway in blues, purples, greens, and pinks is ideal to mimic the aurora effect, but any fingering weight yarn will work beautifully.
- Crochet Hook: 4.0 mm (G/6) crochet hook. This size is perfect for creating a drapey, open fabric with fingering weight yarn.
- Other Tools: A yarn needle for weaving in ends, and a pair of scissors. Blocking mats and pins are highly recommended for the finishing stage.
Gauge & Size
Gauge: 21 dc x 12 rows = 10 cm (4 inches) square, after blocking. While gauge is important for size, this shawl is forgiving. The blocking process will help you achieve the final dimensions.
Finished Size: Approximately 78 cm (30.5 inches) from the top edge to the bottom point, though you can easily adjust the length to your preference.
Step-by-Step Instructions: Crafting Your Masterpiece
This shawl is worked from the top center down, increasing at the edges to form its beautiful crescent shape. The pattern is built on simple repeats, making it a relaxing and meditative project. Let's break it down step by step.
Abbreviations
Familiarize yourself with these standard crochet abbreviations before you begin:
- ch: chain
- dc: double crochet
- sc: single crochet
- tr: treble crochet
- sk: skip
- st(s): stitch(es)
- sp: space
- RS: right side
- WS: wrong side
Foundation & Increase Rows (Rows 1-10)
We'll start by creating the small top edge of the shawl and then work our way down, adding stitches at each end to create the shape.
Row 1 (RS): Ch 5, dc in 5th ch from hook (this counts as a dc + ch-1 sp). Turn. (2 sts)
Row 2: Ch 4 (counts as dc + ch-1), dc in first st, ch 1, dc in last st. Turn. (4 sts)
Row 3: Ch 4, dc in first st, ch 1, dc in next st, ch 1, dc in last st. Turn. (6 sts)
Row 4: Ch 4, dc in first st, ch 1, dc in each st across to last st, ch 1, dc in last st. Turn. (8 sts)
Repeat Row 4 until you have a total of 20 dc sts (including the first and last dc). This forms the solid base of your shawl.
Lace Pattern Setup (Row 11)
Now we introduce the first chain spaces to begin the lace effect.
Row 11: Ch 4, dc in first st, *ch 2, sk 1 st, dc in next st* repeat from * to * across, ending with ch 1, dc in last st. Turn. (10 dc, 9 ch-2 sps)
Lace Pattern Rows (Rows 12-21)
This section establishes the rhythm of the lace. You'll notice the chain spaces gradually get longer, creating a beautiful, airy web.
Row 12: Ch 4, dc in first st, *ch 2, sk ch-2 sp, dc in next dc* repeat from * to * across, ending with ch 1, dc in last st. Turn. (10 dc, 9 ch-2 sps)
Row 13: Ch 4, dc in first st, *ch 3, sk ch-2 sp, dc in next dc* repeat from * to * across, ending with ch 2, dc in last st. Turn. (10 dc, 9 ch-3 sps)
Row 14: Ch 4, dc in first st, *ch 3, sk ch-3 sp, dc in next dc* repeat from * to * across, ending with ch 2, dc in last st. Turn. (10 dc, 9 ch-3 sps)
Row 15: Ch 4, dc in first st, *ch 4, sk ch-3 sp, dc in next dc* repeat from * to * across, ending with ch 3, dc in last st. Turn. (10 dc, 9 ch-4 sps)
Row 16: Ch 4, dc in first st, *ch 4, sk ch-4 sp, dc in next dc* repeat from * to * across, ending with ch 3, dc in last st. Turn. (10 dc, 9 ch-4 sps)
Row 17: Ch 4, dc in first st, *ch 5, sk ch-4 sp, dc in next dc* repeat from * to * across, ending with ch 4, dc in last st. Turn. (10 dc, 9 ch-5 sps)
Row 18: Ch 4, dc in first st, *ch 5, sk ch-5 sp, dc in next dc* repeat from * to * across, ending with ch 4, dc in last st. Turn. (10 dc, 9 ch-5 sps)
Row 19: Ch 4, dc in first st, *ch 6, sk ch-5 sp, dc in next dc* repeat from * to * across, ending with ch 5, dc in last st. Turn. (10 dc, 9 ch-6 sps)
Row 20: Ch 4, dc in first st, *ch 6, sk ch-6 sp, dc in next dc* repeat from * to * across, ending with ch 5, dc in last st. Turn. (10 dc, 9 ch-6 sps)
Row 21: Ch 4, dc in first st, *ch 7, sk ch-6 sp, dc in next dc* repeat from * to * across, ending with ch 6, dc in last st. Turn. (10 dc, 9 ch-7 sps)
Increase Lace Rows (Rows 22-30)
Now we begin to shape the crescent by adding increases at the edges. This is where the shawl starts to widen dramatically.
Row 22: Ch 4, dc in first st, *ch 7, sk ch-7 sp, dc in next dc* repeat from * to * across, but in the last ch-7 sp, work (dc, ch 3, dc) to increase, then dc in last st. Turn. (12 dc, 10 ch-7 sps)
Row 23: Ch 4, dc in first st, *ch 7, sk ch-7 sp, dc in next dc* repeat from * to * across, ending with ch 6, dc in last st. Turn. (12 dc, 10 ch-7 sps)
Row 24: Repeat Row 22, but increase in the first and last ch-7 sps. (14 dc, 11 ch-7 sps)
Row 25: Repeat Row 23. (14 dc, 11 ch-7 sps)
Row 26: Repeat Row 22, increasing in the first and last ch-7 sps. (16 dc, 12 ch-7 sps)
Row 27: Repeat Row 23. (16 dc, 12 ch-7 sps)
Row 28: Repeat Row 22, increasing in the first and last ch-7 sps. (18 dc, 13 ch-7 sps)
Row 29: Repeat Row 23. (18 dc, 13 ch-7 sps)
Row 30: Repeat Row 22, increasing in the first and last ch-7 sps. (20 dc, 14 ch-7 sps)
Continue Lace Pattern (Rows 31-40)
To grow your shawl to the desired size, you'll continue the established pattern. Repeat Rows 22-30 until you have a total of 40 dc sts (including the first and last dc). Then, work even rows (like Row 23) until the shawl measures approximately 78 cm (30.5 inches) from the top edge to the bottom point, or your desired length.
Edging: The Perfect Finish
The scalloped edging adds a romantic, airy finish to your shawl.
Row 1 (RS): Ch 1, sc in first st, *ch 3, sk 1 st, sc in next st* repeat from * to * across, ending with sc in last st. Turn.
Row 2: Ch 1, sc in first sc, *ch 5, sk ch-3 sp, sc in next sc* repeat from * to * across. Fasten off.
Finishing & Blocking
Weave in all loose ends with your yarn needle. The final, crucial step is blocking. Gently wet or steam block the shawl to open up the lace pattern, relax the yarn, and achieve the correct measurements. Pin it out to shape on blocking mats and allow it to dry completely. This step transforms your work from a crumpled fabric into the ethereal, flowing shawl you envisioned.
Congratulations! You've created your very own Aurora Mist Lace Shawl. This stunning piece is a testament to your skill and a beautiful addition to any wardrobe. Enjoy the compliments and the cozy, elegant warmth it provides.



