Aurora Borealis Driftwood Scarf Free Knitting Pattern – Iridescent Ombre Wrap
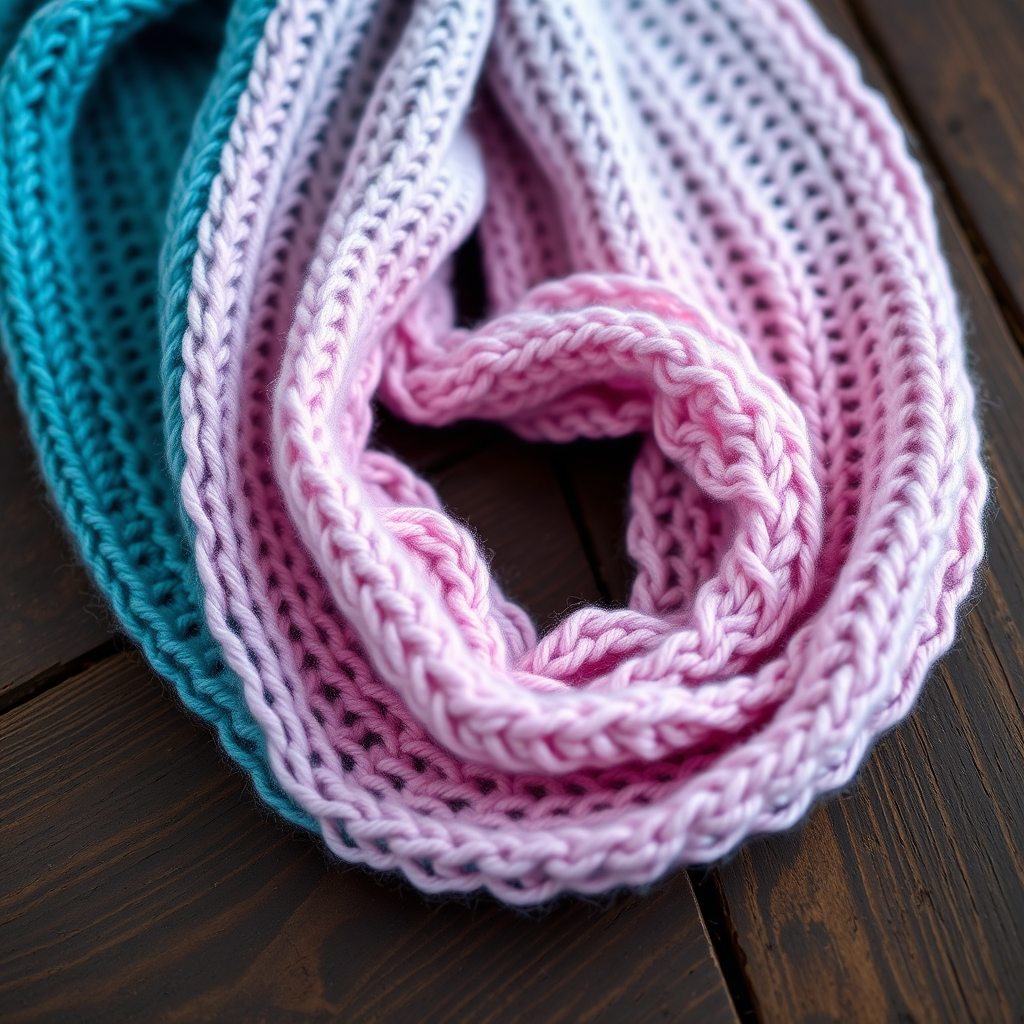
Aurora Borealis Driftwood Scarf Free Knitting Pattern – Iridescent Ombre Wrap
Wrap yourself in the shifting colors of the northern lights with this stunning ombre scarf, knitted in a soft, brushed yarn. The gentle gradient and delicate lace sections create a dreamy, ethereal accessory that feels like a cozy cloud. This beginner-friendly pattern is perfect for those looking to expand their skills while creating a truly wearable piece of art. The combination of simple stockinette and easy eyelet lace makes this project both relaxing and rewarding.
Why You'll Love This Pattern
This scarf is designed to be both beautiful and accessible. The three-color gradient mimics the breathtaking aurora borealis, transitioning from deep teal through soft lavender to pale pink. The lace eyelet rows add a touch of elegance without being complicated, making it ideal for knitters who are ready to move beyond basic scarves but aren't quite ready for complex lacework. Plus, the worsted weight yarn means it works up quickly – you'll have a stunning new accessory in no time.
Materials Needed
Before you begin, gather the following supplies:
- Yarn: Worsted weight yarn (e.g., Lion Brand Wool-Ease) in 3 colors:
- Color A: Deep Teal – approx 120g
- Color B: Soft Lavender – approx 115g
- Color C: Pale Pink – approx 115g
- Needles: US 9 (5.5mm) straight or circular needles (circular recommended for comfort with long projects)
- Tapestry needle for weaving in ends
- Scissors
Gauge
18 stitches x 24 rows = 4 inches in stockinette stitch. Always knit a gauge swatch to ensure your finished scarf matches the intended dimensions. If your gauge is off, adjust your needle size accordingly.
Abbreviations
- CO: cast on
- K: knit
- P: purl
- K2tog: knit two stitches together (decrease)
- YO: yarn over (increase, creates a hole)
- Sl: slip stitch
- RS: right side (the front of the work)
- WS: wrong side (the back of the work)
Step-by-Step Instructions
Section 1: Color A (Deep Teal)
Cast On: CO 40 stitches with Color A. Use a long-tail cast on for a neat, stretchy edge.
Garter Stitch Border:
- Rows 1-8: Knit every row. This creates a garter stitch border that will prevent curling and give your scarf a polished edge.
First Lace Eyelet Row:
- Row 9 (RS): K2, *YO, K2tog, K2; repeat from * to end of row. This creates a delicate row of eyelets. The YO adds a stitch, and the K2tog removes one, keeping your stitch count at 40.
Stockinette Body:
- Rows 10-16: Work in stockinette stitch (Knit on RS rows, Purl on WS rows).
Second Lace Eyelet Row:
- Row 17 (RS): K2, *YO, K2tog, K2; repeat from * to end of row.
Continue Stockinette:
- Rows 18-24: Work in stockinette stitch.
Repeat the Pattern: Continue alternating the lace eyelet row (Row 9 pattern) followed by 8 rows of stockinette stitch until the piece measures 12 inches from the cast-on edge, ending with a WS row. This creates a beautiful rhythm of solid fabric punctuated by airy lace bands.
Section 2: Color B (Soft Lavender)
Join New Color: Cut Color A, leaving a 6-inch tail. Join Color B at the beginning of a RS row.
Garter Stitch Border:
- Rows 1-8: Knit every row. This garter section creates a subtle visual break between the color changes.
First Lace Eyelet Row:
- Row 9 (RS): K2, *YO, K2tog, K2; repeat from * to end of row.
Stockinette Body:
- Rows 10-16: Work in stockinette stitch.
Second Lace Eyelet Row:
- Row 17 (RS): K2, *YO, K2tog, K2; repeat from * to end of row.
Continue Stockinette:
- Rows 18-24: Work in stockinette stitch.
Repeat the Pattern: Continue alternating the lace eyelet row and 8 rows of stockinette until the piece measures 12 inches from the Color B start, ending with a WS row.
Section 3: Color C (Pale Pink)
Join New Color: Cut Color B, leaving a 6-inch tail. Join Color C at the beginning of a RS row.
Garter Stitch Border:
- Rows 1-8: Knit every row.
First Lace Eyelet Row:
- Row 9 (RS): K2, *YO, K2tog, K2; repeat from * to end of row.
Stockinette Body:
- Rows 10-16: Work in stockinette stitch.
Second Lace Eyelet Row:
- Row 17 (RS): K2, *YO, K2tog, K2; repeat from * to end of row.
Continue Stockinette:
- Rows 18-24: Work in stockinette stitch.
Repeat the Pattern: Continue alternating the lace eyelet row and 8 rows of stockinette until the piece measures 12 inches from the Color C start, ending with a WS row.
Finishing Touches
Binding Off
Bind off loosely in pattern on the RS. To keep the edge stretchy, use a larger needle for binding off or use the "knit two together" bind off method. Simply knit two stitches, then pass the first stitch over the second, knit one more, pass the previous over, and continue until all stitches are bound off.
Weaving in Ends
Thread your tapestry needle with the yarn tails from your cast-on, bind-off, and color changes. Weave them carefully through the wrong side of the work, following the path of the stitches. Trim any excess yarn close to the fabric.
Blocking
Blocking is essential for this pattern to open up the lace and even out the edges. Soak the scarf in lukewarm water with a gentle wool wash for 15-20 minutes. Gently squeeze out excess water (never wring or twist). Lay the scarf flat on a clean towel, gently stretching it to its intended dimensions. Pin the edges if needed to create straight lines and open up the eyelets. Allow to dry completely before wearing.
Optional: Adding Fringe
For a playful, bohemian finish, add fringe to both ends of the scarf. Cut strands of yarn from all three colors, each about 10-12 inches long. Fold each strand in half, insert the folded end through the edge of the scarf using a crochet hook, and pull the loose ends through the loop. Tighten gently. Space the fringe evenly across both ends, using 2-3 strands per fringe for a fuller look.
Care Instructions
To keep your Aurora Borealis scarf looking its best, hand wash in cold water with a gentle detergent. Lay flat to dry away from direct sunlight. Store folded in a drawer or on a shelf – avoid hanging, as this can stretch the fabric over time.
Customization Ideas
This pattern is wonderfully versatile. Here are a few ways to make it your own:
- Change the colors: Try a sunset palette (orange to yellow to pink) or a cool ocean theme (navy to aqua to white).
- Adjust the length: Add more repeats of the lace/stockinette sections for a longer scarf, or reduce them for a shorter cowl-like wrap.
- Make it wider: Cast on more stitches in multiples of 4 (plus 2 for the edge stitches) to create a wider shawl.
- Add texture: Substitute the stockinette sections with seed stitch or ribbing for a different look and feel.
Final Thoughts
This Aurora Borealis Driftwood Scarf is more than just a knitting project – it's a wearable piece of art that captures the magic of the northern lights. The combination of simple techniques and stunning color transitions makes it a joy to knit and a treasure to wear. Whether you're making it for yourself or as a gift for someone special, this scarf is sure to become a beloved staple in any wardrobe.
Happy knitting, and may your stitches always be even and your yarn never tangle!


